Disassembly and Repair of the Apple M2452 Keyboard
Original equipment with the early CRT iMacs and other same-generation desktops, the compact, basic M2452 Apple keyboard may still be useful all these years later… if it works reliably. Sometimes that is not the case. This page is for those willing and interested to get inside and fix this keyboard.
Disassembly
…Is not fun. It is difficult to do in a non-destructive fashion, especially for the 3rd. or 4th. or more repair attempt.
Separating the Top and Bottom Case
Almost all of you will have figured out that all 4 of the black screws on the bottom/back side of the keyboard need to come out—and they do. For reassembly, it can help to know that the two larger screws with the separate washers go near the USB ports, and the smaller “shoulder” screws with the built-in washers go on the outside corners.
With the 4 screws removed, the rear (near the cable and USB ports) of the top cover will lift off… but not the front. Oh no, definitely not the front… that would be too easy. There are a series of 6 locking tabs along the front edge that hold the top and bottom of the case together. The tab protrusions on the bottom, with the angled locking face, are pretty sturdy, though for what seems like sadistic reasons, they point inward towards the keys, making it pretty well impossible to stick in any tool to push on these tabs.
The tabs, on the base (bottom), lock into thin rectangular latch pieces, on the top. These break very easily, as they consist of only a thin line of plastic. Accessibility is poor, and what accessibility exists happens from the top. So, it goes something like this:
- Remove the bottom row of keys. I recommend all of them… you’ll want the space. Yet if you’re a minimalist, at least the following: Control, Command (both), Space bar, right arrow, numeric 0, Enter.
- Use a pointy tool to very carefully pry the latch away from the tab as you gently separate the top and bottom.
- Repeat for the other tabs.
To have any hope of doing this work without breaking things, you’ll want to get a better idea than my textual words, hence the photos below. To focus attention on the latching mechanism, these pictures show the top and bottom case assembled (snapped together) with the keyboard assembly removed.
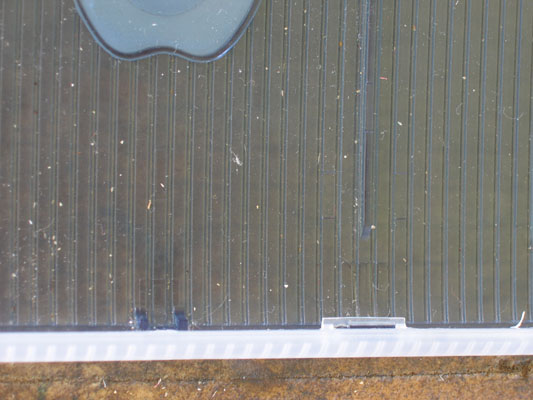
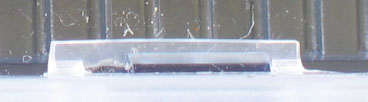
Overview and close-up of one single latch
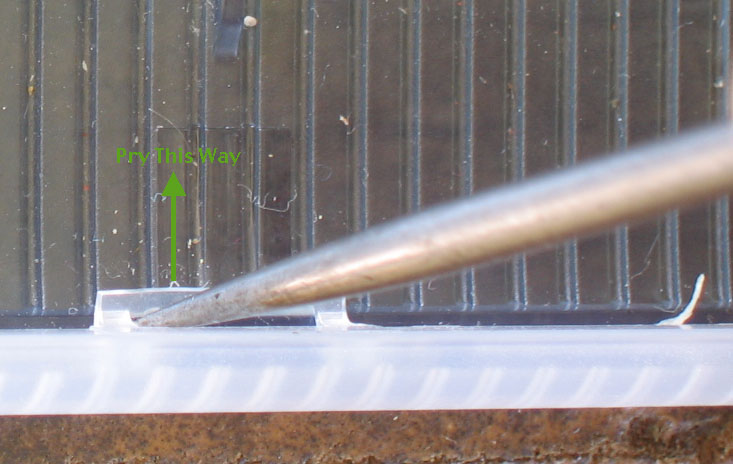
Pointy tool prying the latch (clear plastic line) away from the tab (blue-gray plastic ramp)
With care, you may be able to get these latches unlatched without breaking them. While i don’t consider myself a rough knuckle-dragging barbarian, lacking this knowledge and having needed to get into my keyboard at least 6 times over the years, all 6 of the latches on mine are broken. At one point before they all gave out, i did attempt a repair of one broken latch with a piece of wire in place of the plastic… that didn’t work particularly well. At this point, i just use my favorite clear-ish cellophane-ish tape (envision well-known name brand here) to hold the front top and bottom case pieces together. Holds well, comes off easily, and is easily renewable.
Watch out for the Power button and its long stem falling out of top case. Be sure it is in place before reassembly!
Removing the Keyboard Mechanism
Much easier: remove screws… but not all the visible ones: the 4 gold-colored screws with large, flat heads, two at each end, which hold the tilt bar stay in place.
The two gold-colored shoulder screws holding the cable clamp do need to be removed, since the cable will go with the keyboard assembly. Similarly, the screw holding the black ground wires needs to be removed. The visible gold-colored shoulder screw between the Return and numeric 4 keys which holds the keyboard assembly to the bottom case definitely has to come out. So does its invisible mate, hiding under the Caps Lock key—you’ll need to remove the Caps Lock key cap to access it.
At this point, with some gentle judicious wiggling of the USB connectors, the whole keyboard assembly, USB connectors, and cable will come out together. Done.
Repair
Electrical
The classic failure for this keyboard model seems to be one or more keys becoming electrically intermittent or dead. Unless there has been a major spill of certain liquids (esp. carbonated beverages) that has been allowed to soak in, most likely the problem will be at the interface of the flex PCB cable and the hard circuit board solder traces.
Whatever the failure, start out by documenting exactly which keys are not functioning properly, then checking the results against the two handy images below, which map each key to each matrix contact:
![[upper key matrix]](etc/M2452Upper.jpeg)
![[lower key matrix]](etc/M2452Lower.jpeg)
Most likely, whatever combination of keys is failing will correspond to one or two or possibly several contacts at the flex to solid PCB interface. It is likely that you’ll be able to temporarily restore operation, or at least change the failure, by pressing the key frame and hard PCB together while testing the funky keys. In any case, i very much recommend unscrewing the 4 Philips head screws that hold the hard PCB to the keyboard frame, cleaning the contacts, reassembling, and re-testing… unless you already know that the problem is inside (such as knowing about a liquid spill).
If you find you need to take apart the keyboard frame and get into the key matrix itself, at least you have the images above to help you with testing!
Mechanical
The key caps pull straight up and off, as with most keyboards. Use your usual care, and a key puller if you have one. I usually do OK with spoons, or sometimes one spoon and some fingers on the other side. If you have to take the sandwich apart, it may be a good idea to remove all the keys first, so there will not be pressure on the small plastic cups that are the return springs for each key. Or, you may just want to get in to do some deeper cleaning of the keyboard frame and the key caps than can be done when they’re assembled.
That’s all i have. Let me know if you have something worth adding.