
Save. Close the resource.
Introduction
TechTool Pro 1 review
TechTool Pro 2 review
TechTool Pro 3 review
Recommendations and Conclusions
As discussed in the individual reviews for TechTool Pro versions 2 and 3, Type 1 crashes when booted from the TTP CD-ROM have been very frequent, esp. on 680x0 Macs. Having become annoyed at this situation during March 2005 testing for an update to this review, i decided to take the time to look deeper into the problem.
I had long know that the problem only occurs when the computer is running from the Mac OS 7.6.1 on the CD. Running from OS 7.5.5 on the CD rarely crashed, and when it did, the crashes were usually not Type 1. It sometimes seemed difficult to do anything running under 7.6.1.
It occurred to me to try copying the OS 7.6.1 off the CD-ROM onto my IIsi’s internal hard drive (hereinafter HD), to see if the crashes would still happen. I knew that when running from the stock 7.6.1 on the HD, Type 1 crashes were extremely rare (if indeed they happened at all… i don’t remember). Sure enough, when running from the OS 7.6.1 copied from the TTP CD-ROM, Type 1 crashes happened all over the place, in the same way and under the same conditions as when booted from the CD. This established two things:
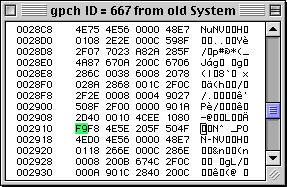
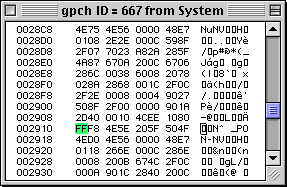
Next, i spent literally a couple of days trying experiments comparing the working and crashing copies of OS 7.6.1, and shuffling parts between them to try and narrow down the root problem. There were several false leads and dead ends. After many, many hours of thought and experimentation, i finally found the problem: a defect in the System file of OS 7.6.1 on the TechTool Pro CD-ROM. Specifically, a one-byte difference in the “gpch” resource between working and crashing versions of the file. I checked the three MicroMat-made TTP CD-ROMs i have (for TTP 2.5.4, 3.0.6, and 3.0.9): every single one had the byte F9 at offset 2910 in the gpch ID=667 resource. I checked the 5 or 6 other OS 7.6.1 System files i currently had available on various Mac HDs and on the AlSoft DiskWarrior 2.1.1 CD-ROM: all of them had the byte FF at that same position. There was 100% correspondence between the presence of F9 and Type 1 crashes, and FF and no crashes. I edited the crashing copy of 7.6.1 copied from the TTP CD-ROM so that the byte was FF: the crashes went away. I re-edited it to be F9 again: the crashes returned. I did this several times with both a CD all-Macs OS install and an OS originally installed on the IIsi HD specific to the IIsi. 100% predictable and repeatable. Finally, i made a CD-R copy of my TTP CD-ROM, identical except for the one-byte change from F9 to FF: No Crashes when running under OS 7.6.1. Case closed.
Why this didn’t occur to me to try several years ago, when MicroMat would have been able to fix it, i don’t know for sure. I am guessing that 1) I was busier then, 2) I was not getting paid to do this, as i used to be at Apple, and assumed that someone who was getting paid would do this time-consuming sleuthing. Since it appears that TechTool Pro 3 is still for sale, i am hoping that once MicroMat is aware of my new findings, they will take action to ensure that anyone wishing to run TTP on 680x0 Macs from a bootable CD will be able to do so without unnecessary Type 1 errors. If i hear anything on this topic from them, i’ll post or link to the information (as permitted) from here.
Especially interesting, and disturbing, is that TechTool Pro fails to detect problems in this clearly damaged System File. This matter is discussed in the TechTool Pro 3 review.
Users of ResEdit, Resorcerer, or other resource editing tools will probably find this faster and easier than going through the OS installation process. Users with no Mac upon which OS 7.6.1 can be directly installed will need to use this method.


Simple, right? Just copy TechTool Pro from the CD-ROM to a HD, run the updater, and follow the usual instructions for making a bootable TTP CD (next section below).
Wrong.
When i tried doing that, i was greeted with the following message from the Vise updater:

Nice… how informative! Well, a couple of choices present themselves:
The first choice is easy, and it should be obvious what needs to be done. Don’t forget that you will have to move a copy of your TechTool Pro Preferences file (with the registration information filled in) from your HD onto the image for the new CD-ROM, otherwise you will have a nifty coaster (it would be kind of you not to ask how i know this*).
The second choice is geeky and harder, so of course that’s the method i chose (eventually). Remember that updater error message about HEXA 128? Well, that’s a resource that exists in installed copies of TechTool Pro that live on HDs. CD copies of TTP have no HEXA resource at all. (This applies to TTP 2 and 3. TTP 1 shipped on floppy disks. I have never seen TTP 4, and OSeX makes things all different). OK, so we know:
Again, it probably makes sense to just put an updated copy with a HEXA resource on there and be sure to put on a preferences file where one’s registration information has been typed. Lacking sense (and curious how MicroMat made the CDs work), i used the following silly workaround:
Is there any advantage to this harder method? No. I just wanted to learn something about how these things work.
The following instructions apply to Toast Titanium 5. The details probably will vary for earlier and later versions of Toast, and you may need to experiment or consult other resources to work out any problems. If you are using a product other than Toast, i regret that you are on your own working out modifications to these instructions. My testing was only done with Toast Titanium 5.2.3, which should be a free update for all Toast Titanium 5 owners (and is recommended).
It is essential that an appropriate version of the Apple CD/DVD (or the older Apple CD) extension be installed and running in the active System folder from which the Mac is being run as the bootable CD-R is written#. This is because Toast “digs in” to that extension to extract the needed code that will make your CD-R bootable. Newer versions of the Apple CD/DVD extension, specifically 1.4.x and later, will Sad Mac at least some 680x0 Macs. You will have to decide which machines you want to boot with your CD. The newest extension version i have found that will still boot 68030 Macs like the IIsi is version 1.3.5, which was included with (i believe) Mac OS 9.0.4. If you have 9.0.4 on anything (CD or HD), you may already have this extension version. This extension is new enough that it will also boot all beige Macs, and i suspect all G3s and most G4s. (As of this revision, i do not own any G4 or G5 Macs, and cannot test on those). If you don’t need to boot 680x0 Macs yet want to boot all Macs that can boot into OS 9, you might be better off with a newer version, such as 1.4.7. Personally, i would make a CD-R or CD-RW with 1.3.5 and see if it works on the last Macs that can boot directly into OS 9. If so, you should be covered for all Macs that TTP covers.
Worst-case scenario: you may need to make more than one CD, with different versions of the extension. In that case, you might want to think about further customization that i will not cover here.
There are many basic details about CD writing basics that are not mentioned below. The author assumes prior experience making CD-Rs. Consult the excellent Toast manual for information, if needed.

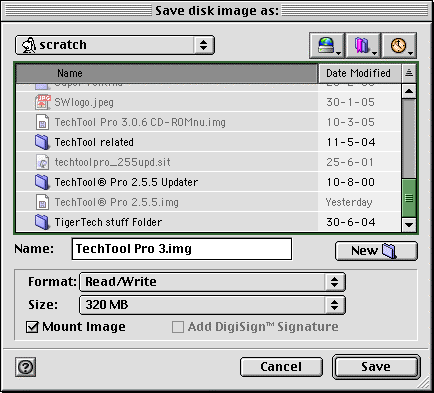
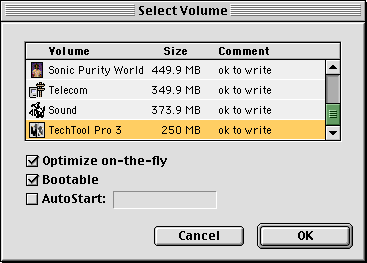
While it would seem to make sense to use Disk Image format, that format does not include the necessary CD driver information to make a bootable CD. Data format defeats the multi-OS-boot functionality of the resulting CD. Mac Volume format preserves multi-boot, window structure, and following these instructions, bootability.

The CD image used to make the new CD may be deleted or saved for future use, as you prefer.
* Actually, i used a CD-RW just in case something went wrong, which it did: “The Application ‘Unknown’ has unexpectedly quit because an error of type 28 occurred.” Type 28 is a Stack ran into Heap error. Ouch!
#This is true, yet not the whole story. What actually happens depends upon several factors, including the specific version of Toast. With my Toast 5.2.3, if there is NO CD/DVD driver active in the boot OS, AND there is an Apple CD/DVD driver in the blessed System of the image from which the CD is about to be made, Toast will happily use the driver from the image. When both exist, and the version in the boot OS is newer, Toast picks the one from the boot OS. I did not test to see whether it was preferring the newer version number or the file location. Because of these unknowns, unless you wish to take the time to experiment, i recommend having the desired driver located only in the OS to which the Mac is booted as the CD is written. This is the most reliable method in my tests.
Type 1 discussion in the TechTool Pro 2 review | Type 1 discussion in the TechTool Pro 3 review | Main article Recommendations and Conclusions