- Breville 800 Repair Home
- Normal Sequence of Operations
- Disassembly
- Electrical/Electronic Issues
- Mechanical/Water/Hydraulic Issues
- Modifications
Mechanical/Water/Hydraulic Repair Notes for the Breville 800ESXL Espresso Machine
Index
of topics covered on this pageFailures and Repairs
- Badly Leaking Water
- No Water Flow
- Very Low Water Flow
- Poor Flow from Steam Wand/General Poor Water Temperature Conditions
- Poor or No Flow from Steam Wand Even After Wand Cleaning/Decalcification
- Leaking Steam Wand
- Poor Flow from Brew Head
- Low, Surging Steam. Low Brew (Group) Head Pressure
- Repair: Replacing Thermal Block (Boiler) Assembly
Improvements and Information
Failure and Repair: Badly Leaking Water
Boiler Assembly Leaks
Kindly contributed by Erwin Niehaus, Paul, Jean-Seb, and Stéphane CLoose Screws
Erwin discovered that sometimes one or more of the corner screws holding the top casting of the boiler assembly (a.k.a. thermal block, heating unit) may have come loose. In his case, the front two (one in each front corner) were loose. Water had been leaking out of the left and right sides of the assembly until he tightened these two screws. Once tightened, the leaking stopped… Fixed! Might as well check all 4 corner screws.
Thermoblock Gaskets/Seals
General Gaskets/Seals
If loose screws are not the problem, the gaskets (seals) might be leaking. Site correspondent Paul reports that finding replacement seals is “not possible” (and from his and my correspondence, i get the sense that he made quite a solid, sustained effort in his search). It may be necessary to replace the whole thermal block (boiler) assembly… discussed on its own page.
On the contrary, by the mere act of consulting with his local bearing shop, Jean-Seb walked out with a pair of seals for around $1 each. Here’s his story:
I had very good luck finding some replacement seals for the boiler at a bearing shop. The guy at my local bearing shop helped me find the size and composition of the original viton seals and keeping in mind this need to be food grade. I only needed the two seals in the lower part of the boiler since they were the ones leaking. He had no problem finding them for me at about 1$ each. If anyone would like to deal directly with the same shop, here are the details: parts numbers are: 020 viton at 1.39$ and 010 viton at 0.50$ shop is General Bearing Service 445 boul. Maloney Est, Gatineau, Quebec J8P 6Z8 phone number (819) 643-2128.Update a day or so later:
Hi Sonic, thanks for posting the info. I’m really happy to be part of this site. In the end I had to change also the large seal for the upper boiler. The part number was: 155 Viton, 8.82$. I noticed there were a lot of imperfections in this part of the boiler. There were clear evidence of these aluminum debris had been gouging in the seal. Cleaning up and smoothing the surface could only help I guess. Have a great day!
I did a little reading and learned that Viton is a registered trademark for a brand of synthetic rubber and fluoropolymer elastomer made by DuPont Performance Elastomers L.L.C., which fall under the category of FKM (Wikipedia article) elastomers. There are some competing products under other brand names/trademarks. Seems as though as long as one can find food-grade seals (or gaskets) made of a suitable material from this materials category, one may be able to install new seals—Jean-Seb did!
Or is it Viton? Per site correspondent John M.:
The boiler seals are not Viton. They are red high temperature silicone. Viton is a fluoropolymer, and intended for volatile fuels, so it’s likely not used for food applications.
Site correspondent and coffee lover Stéphane C. found a D.I.Y. Cut Your Own silicone solution:
I cut seals in a silicone cake molder like in this photo [Link to Canadian Tire ad he sent in English | Français]. It works perfectly. Since 1 month [as of early June 2021—ed] my coffee maker is like new.In case the Canadian Tire links break, to me this looks like most of the square silicone cake pans i found in an image search at the time this information was added to this article (June 2021). This one was red, as the original seals appear to be (which may not matter).
O-Rings
Site correspondent JC has some potentially money-saving o-ring advice:
While places like ereplacementparts are great for the real proprietary parts, and while prices really aren’t terrible on the big important items, one thing that's egregiously priced are the red silicone O-rings for the hoses. At least on my BES870XL unit, it takes 10 or more of those on all the various hoses and plastic connectors.
If you find you have a single failed seal, or, you are in there replacing anything else (like the solenoid), then IMO ALL of them should be preventatively replaced if the machine is of the age that anything at all has started to fail.
The problem is those tiny O-rings are ridiculously $2 each at ereplacement, when they are generic silicone o-rings that can be sourced elsewhere easily. An ebay seller sells them at $5 each (and I suspect he’s figured out what I have but is making a business out of it…). Spending $20-50 on o-rings that I know should cost a few cents each was really unpalatable to me.
From measuring and comparing, I found the small red O-rings on the hoses to be either identical or extremely close to a AS568-007 size. It’s likely that the exact size is a metric that is very slightly different but the -007 is functionally equivalent and has been working perfectly in application for me. From that spec, it is elementary to find FDA food-grade red silicone O-rings in that size. I bought a bag of 100 for $7 including shipping (vs $2/ea. for ereplacement) from orings-online.
One could also replace with Viton (i.e. FKM) O-rings, and many DIYers like to ‘upgrade’ to Viton seals, however Viton/FKM is not as ideal for steam/hot-water use as Silicone so in this case sticking with the OE choice I think is correct.
Hope that information might be of some use to someone else struggling with the $2-5 each o-ring challenge!
(I am not a materials scientist, so i’m presenting what has been submitted to me, for your consideration and further investigation.)
An anonymous site correspondent contributes this additional o-ring information:
There is a standardized imperial o-ring sizing system, known as AS568, and that’s where the 010, 020, and 155 sizes come from.
O-Ring Size Chart at The O-Ring Store LLCThe 020 size mentioned in the article does work as a replacement for the oval gasket, but I think that 021 is actually a better fit as the 020 is a bit tight and my old seal measures very close to 021.
Finally, I also bought my gaskets from a Montreal location of General Bearing Service. The 010 Viton were about $0.75 and the 020 about $1.75. However, they indicated that in the future it would likely only be possible to buy them in multi-packs, as they are phasing out loose rings (and I suspect this is an industry-wide trend).
Here’s hoping that some suppliers will continue to offer individual o-rings!
I’m quite impressed with a quick scan of several pages on The O-Ring Store LLC website (linked above). Looks like a good source of all sorts of o-ring information, as well as a possible source for the rings themselves.
When coffee Will Not Wait, Ashton from Auckland has an idea for those pesky thermoblock o-rings that may keep you brewing awhile:
Hi—great site! I just had to tear down our 800ESR because of a biggish leak appearing to come from just above the basket handle. Water was coming from the vents in the main housing just next to the screws that hold the thermoblock.
Pulled it all apart following the instructions on the site, and then I ran it with the covers all off. Water was coming out of the ’block from behind the control valve. OK, so ’block out.
I took the bottom section off the thermoblock revealing the small round o-ring and the slightly bigger elongated o-ring. There was no way I was going to get new ones in time for tomorrow morning’s cuppajo, so I did an old engineering trick: turn them over. The top face of the ’block is flat, the bottom face is curved, so when the o-ring is turned over it reseats and spreads out.
It worked. Not sure how long for, but ok after testing.
Cheers
Ashton in Auckland, New Zealand.
Thanks to all the site correspondents above for sharing their findings! I think at this point we’ve covered the o-ring/seals issue pretty well, for the purposes of this page. If you have something pertinent you feel would benefit others related to this subject let me know and i’ll consider adding your findings to the wisdom above.
Broken Valve
Example of the failure
Upon turning the machine this morning, the pump didn’t sound as it usually does when it’s pulling water from the tank. Almost immediately, a large amount of water began dripping from the holes around the outside of the brewhead. Upon removing the back cover, it was immediately clear what the problem was: a broken water valve assembly.
I found the part on e-replacementparts.com however, to my utter disappointment, it’s now obsolete. I called Breville and the nice young man confirmed that, yes indeed, that part is obsolete (800ESXL/242). He said that they might be getting more of these parts sometime in the summer [of 2012 —Sonic]. Best I can tell from surfing round the interwebs, no one has that particular part. I now face the stark reality of either, a). purchasing a new machine, or b). using my drip machine (gack!) until some distant point in the future when/if Breville decides to get more of these valve assemblies.
Anyway, another tip for your readers should they experience this issue.
Cheers, Broken In Boise (aka, Todd H.)
Replacement
In May 2019, site correspondent Roman provided the following information:
I don’t know how relevant this is anymore, but Lavazza EP950 seems to have exactly the same yellow relief valve that is obsolete for the Breville machine.
By the way, a Delonghi EC685M valve works as well, but its shape is wrong, so in order to put it in you’d have to cut the rubber pump holder and you’d also need a longer hose from it to the heater.
As of October 2020, bruno048 of Canada reports that this part is used by many espresso machines and can readily be found on ebay.fr (note that suffix) under “ariete”. Here is one example, which i’m so sure will go dead soon that i’m just going to put the whole raw URL here and tell you right now that if you use it much after October 2020, it will likely be dead:
https://www.ebay.fr/itm/ARIETE-Valvola-Pompa-Bypass-Acqua-Macchina-Caffe-KONSUELO-RETRO-MOKA-AROMA-ROMA/152250183597?hash=item2372d16fad:g:BisAAOSw31ldijPBHere’s one i found on U.S. ebay (ebay.com), with its original SHOUTING subject line:
ARIES VALVE PUMP YELLOW RETURN WATER BYPASS RAQUEL RETRO CHARM MOCHAFar more useful than any ebay auction link may be some information from this latter’s listing:
| Brand | Mfg. Part # | UPC |
|---|---|---|
| Ariete | AT4026003600 | 8027998009688 |
Note that bruno048 instead went with a Saeco 229452100, moving 2 hoses. Here’s a pic of the installation in his machine:
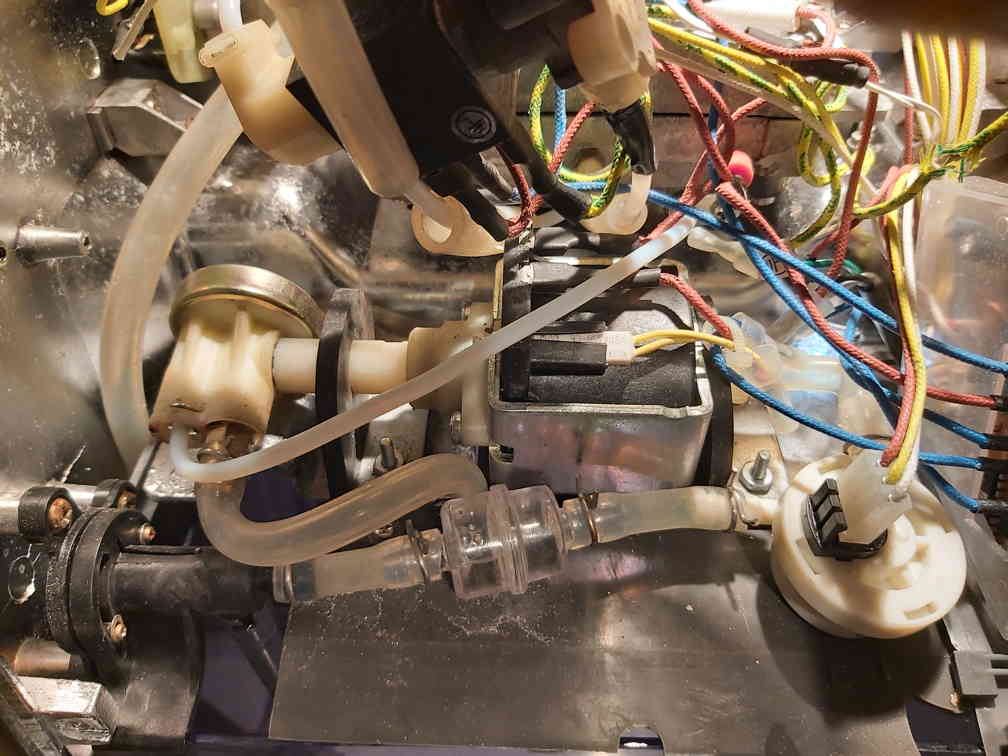
A quick WWW search on Saeco 229452100 brought up this Philips listing for part #996530031903. Thank you for all this information, bruno048!
In October 2021 El El contacted me with the following information (lightly edited):
As many other I had the valve fail on me and try epoxy and other alternatives, but none worked on the long run for me […] (B)asically most generic espresso machine “safety valve” or 3 way anti drips valve should be a perfect replacement, and have the same function as the original orange valve [device].Thank you, El El.
- Breville BES860XL Part Number: SP0001539
- Delonghi Part Number: 7313260161
The totality of this to my mind is that there exist many options for repair valves out there if one is willing to go back to basics rather than fixating on a Breville part, and especially if one does research and applies hydromechanical modification abilities.
Repair
We now have our first report that it is possible to glue/cement/epoxy the pieces back together:
I have a Breville Espresso BES 820XL; the plastic water valve broke exactly as seen in your photo where the black O ring joins the amber to white plastic pieces. This valve is the part that is now obsolete (and apparently for good reason)… so I figured I had nothing to lose. I removed the small O ring where the break was, put some quick-setting epoxy carefully around the joint and held it in place for a few minutes until it was attached. I then layered on a thick mass of epoxy around the joint; let it dry. Then another layer.
When I tried it out, it worked better than it ever had before. So this can be fixed with a few layers of epoxy (being careful not to cover the hole where the water flows).
I figured that it was either this or find a new machine. It might last — might not. But it buys me some time before spending several hundred dollars on another espresso maker.
JD
Yannick D. reports success on his 800ESXL using this method. He used 5 min. epoxy, removing the o-ring seal, pushing it together, holding it for a few minutes, then letting it cure for 2 days. He then added two more coats of epoxy to ensure that the repair held solid. In his email message, he reports the machine has been running 2 weeks without a problem. Seems like this fix is generally applicable and, with care, ought to work well.
Those of you with machining skills, equipment, and access to aluminum bar stock might be interested in Colin’s sturdy repair:
Hi, have a 800ESXL with a broken water control valve, see they are no longer available, so I checked out the options and repaired it my self, sounds like all these break at the pump extension where the valve screws into the extension 1/8 pipe thread.
I made a little adaptor from 6160 alloy bar stock, threaded one end 1/8 pipe and the other 5mmx.9 thread pitch:
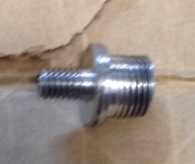
[He then tapped] the hole in the valve body 5mmx.9 pitch, no drilling was needed, a hole drilled through the center 3mm seems to be OK for operation no issues yet anyway.
Everything put back together with 30 minute epoxy, but left overnight to harden 100%.
Hope this helps other peoples’ problems.
Regards
Colin
Quebec Canada
Here’s a picture of Colin’s completed repair:
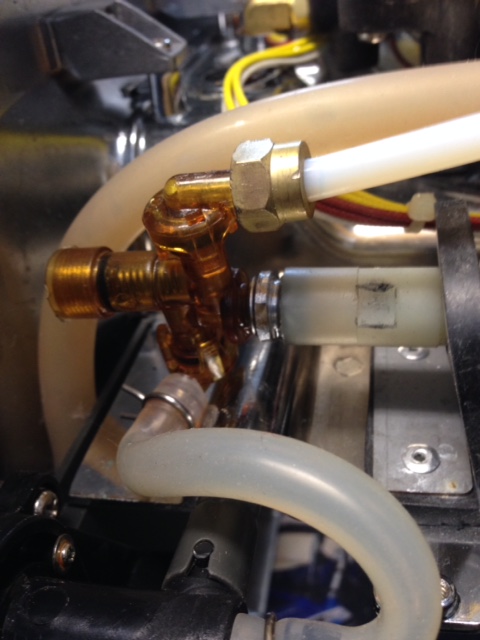
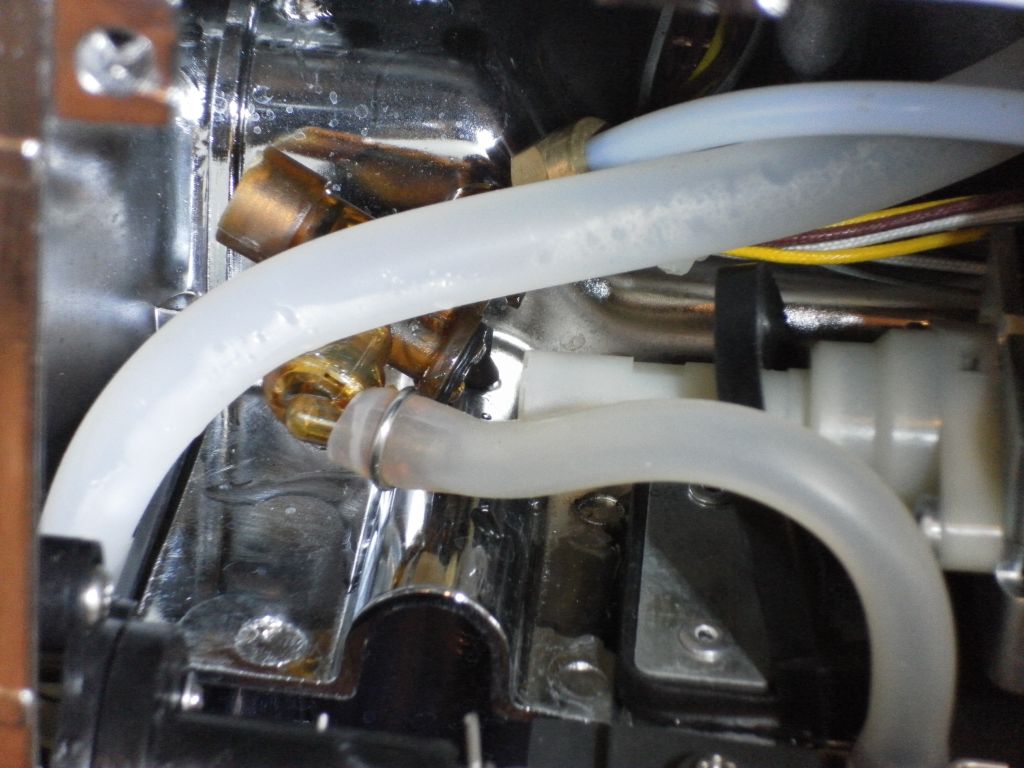
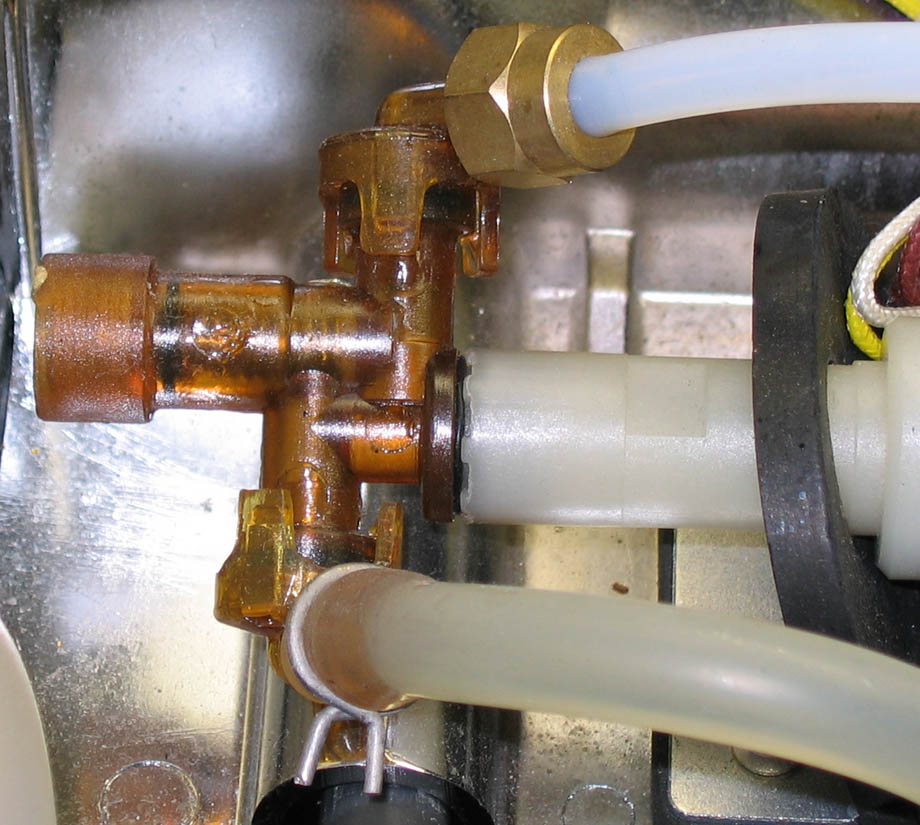
Fortunately, so far the valve has not broken here. For reference purposes for anyone else wanting to try this fix, here is a tight close-up picture of the valve assembly from our (working) machine, with the big thermal block hose disconnected (at the block) for a better view:
Failure and Repair: No Water Flow
You can hear the pump, but absolutely no water comes out of either the brew head or steam wand? Multi espresso machine fixer Dave S. suggests priming the pump:
Found it at a Thrift Shop for $9.00. I did an initial test in the store, figured it might need priming since the motor/pump was functional. I’ve fixed about 3 or 4 other models including Starbucks versions the same way. I researched the net and knew it needed priming and this trick worked! A turkey baster syringe might work if the tip is small enough to fix into the input hose. I think I forced in 10-150 ml at least, just enough to prime her. Once I started the machine the “tone” of the pump changed and it started sucking up water. Yippeeeeeeee!!!
Cheers
Dave
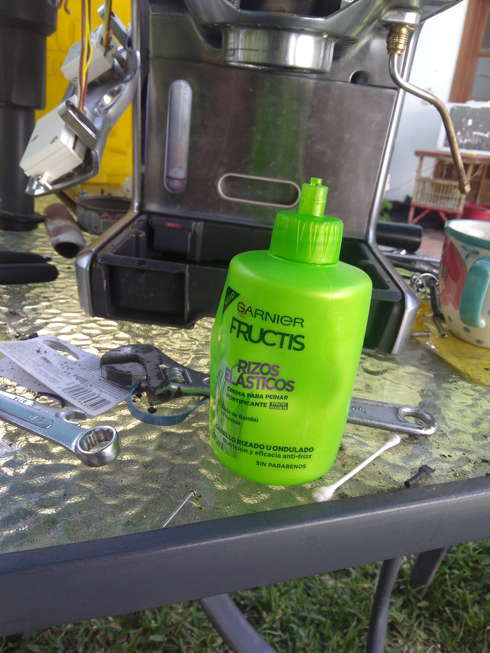
Site correspondent Mark F. found that an emptied and cleaned Garnier hair cream bottle happens to fit perfectly into the pump’s incoming pipe fitting from water pick-up tube. Here’s a pic of the bottle:
Failure and Repair: Very Low Water Flow
Coffee aficionado Serge B. found success working on the pump itself:
After testing pretty much everything suggested on this page, i still couldn’t get water to flow properly.
I dismantled every part where water flows to see if something was clogged. Boiler, water selector, pipes. I scrubbed manually, added strong vinegar to decalcify. There was calcium, but not to the point of clogging. I was really puzzled until the only thing left to check was the pump. To verify I disconnected the tube that connects the pump to the boiler, putting the end in a recipient to collect the water (just be careful not to overheat the boiler without water, you should turn the machine off rapidly). The pump was always functional: I could hear it buzz, but it was just dripping water, unable to push the water out properly. I cut the tie-wraps to remove the tubes, i gently disconnected wires and then removed the pump from its rubber base. Then i started dismantling the pump. Clever little system. If you put down each part in order, it’s rather straightforward to reassemble. Watch out for one tiny plastic ball though, it’s really easy to lose.
I’m not 100% sure what i did to fix it, or what was wrong (there was no calcium or particles or whatever dirt). But when I reassembled the pump, I did make sure that the 2 smallest springs were centered. Also, on the output side of the pump, there is a plastic part that screws inside the tube—and that seems to adjust one of the spring tension (its shape is like a wheel: a “cross inside a circle”). I think it might have become too tight, or the spring underneath might have been misaligned. When unscrewing a few rotations, i could feel a little less resistance when sucking the air through the pump. Bottom line: somehow the water flow was compromised by one of these tiny parts inside the pump.
And now that I put it back together, there is so much pressure, it feels like a brand new coffee machine.
Hope this helps!
Here’s another successful pump adventure, courtesy site correspondent Rob W.:
My Breville 800 was packed away for a few years and when I unpacked it, it would not pump water or steam. Made all the right lights and noises (although the pump was very noisy) but not a single drop would come out of the head. Nothing, nada. Noisy pumps usually mean they have air in them and need priming so I tried that first, to no avail.
I opened up the covers to expose the pump and the head and found everything externally was in excellent condition-no corrosion, no cracked or discoloured pipes. First I tried priming again (now I could see the transparent hoses) with a squeeze bottle but could get virtually no water to go into the pump. I took the inlet and outlet pipes off the header and squeezed water into the inlet-ran easily-so, so back to the pump and its clatter valves. With all pipes disconnected from the pump, I could get no water or air through it (by mouth sucking on the outlet). I removed the plastic manifold assembly on the pump outlet and tested it for flow. It allowed air and water to pass freely. Right, the pump itself. Gave it a careful little burst of compressed air up the inlet, no go, blocked solid. Serge B posted his investigation and I followed it, removing the adjuster wheel and spring on the outlet side. All looked good. Opened the rest of the pump and looked through the components-no damage, no dirt, nothing. Then I removed the spacer disc and small 'o'-ring on the front end and saw the little plastic ball (must be 3mm diameter) and a tapered spring. Took these out and that, according to me, should have cleared the line-but NO, still blocked. Too small to see inside, but I prodded a bit with 3mm drill bit and out came a little round plug that was obviously a check valve and a small piece of dirt. Re-assembling carefully, I found I could just suck a bit of air through-which I could not before. After putting it all back together it worked beautifully, and I concluded that the problem was the small piece of dirt which lodged somewhere in the pumps check valve. Finished off by doing a lemon water purge of the system and being thankful that I was taught to always work on a clean white piece of paper when stripping things with small parts-or I would never have seen the dirt and may have lost the little plastic ball as well.
Thanks to Serge B and others who left useful tips and information on this page.
There can be other causes of low water flow besides the pump, although usually the symptoms differ. Strongly recommended that you test the pump along the lines of Serge’s verification procedure before tearing into the pump. You might also consider reading the rest of the low-flow-related failures and repairs on this page before jumping on (and into) the pump. And do be sure the pump is primed.
To avoid harming the thermal block due to no water running through it during pump testing, disconnect either electrical terminal to the thermal block and ensure the removed terminal is insulated from anything conductive. Be sure to remember to reconnect it once the water is again flowing, else you’ll have stone-cold coffee!
Failure and Repair: Poor Flow from Steam Wand/General Poor Water Temperature Conditions
Not until the end of March 2020 did i receive even a single submission for any failure in this category which has had an electrical cause, and this was only known after the site correspondent did the mechanical/hydraulic work described below. Far and away the most common cause has been mineral/other crud buildup in the water passageways. You may certainly follow that link to that section of the Electrical page of this article and read whether those exact symptoms match yours, but most of the time for most people and for symptoms which don’t match what’s on the Electrical page, your issue is non-electrical and you should keep reading this section and the one beneath.
Water Matters!
…And not just for brew taste! The composition of the water you put into your 800-series machine has a dramatic effect on its performance, especially over the long term.
Related to correspondence in early 2012 between myself and Grant Ball, i did some reasonably in-depth studying of cleaning out mineral buildup in espresso machines. Out of all i read, the very best and most informative document (in my opinion) is Jim Schulman’s Insanely Long Water FAQ. It dates back many years, all the way to the Usenet Newsgroup alt.coffee, yet i found nothing newer that even touched it and the information in most part seems nearly timeless. Once you’ve read that FAQ, you’ll understand why i cannot possibly answer any specific questions you may have regarding water issues and your 800ESXL or other 800-series espresso machine: there are simply too many critical variables related to the water!
Decalcifying/De-Scaling/De-Mineralizing/Cleaning
Have you flushed recently? In your kitchen, or wherever you keep your 800? Page 27 of the 2/05 North American issue of the Breville Espresso Machine owner’s manual discusses decalcifying (their preferred term) the machine “on a regular basis (every 2-3 months) using a liquid decalcifying agent”. If you’ve read the Insanely Long Water FAQ, you know that it may or may not be necessary to decalcify your particular machine that often… or more often.
I’d happily neglected decalcifying our 800ESXL forever, since it was new! We’d had several problems with the steam wand plugging up (alternative remedy for that discussed below), yet no other issues. On a sunny day in March 2012, i decalcified our machine for the first time and…… nothing came out. Nothing human-eye visible. This didn’t entirely surprise me, given that reports from the coffee drinker here were that the machine was working just fine.
How could this be? Readers of Jim’s FAQ know: the water. Our City of Pasadena, California tap water run through our Brita charcoal-based water pitcher filtration system produces slightly acidic water, which apparently keeps the Breville plumbing quite clean without the need for decalcification. Nearly all the credit goes to the Brita: before we had the Brita, we used a tap-mounted Pur filter. Great-tasting water, yet lots of mineral buildup visible on the heating element of another appliance (a now-retired Bodum water boiler. We’re using a Breville BKE820XL for that function now, which is superior in every way). Within weeks after switching water filters, the mineral deposits on the heating element of the Bodum began flaking off. Within a month or two, the element was like-new clean, with no cleaning effort on our part. Water matters!
Compare and contrast my experience with that of Grant Ball, whose Breville 800 went from having an unusable steam wand to full steam ahead, thanks to a decalcification in which “a huge amount of brown gunk [was] dislodged”. Here’s a lightly edited version of his message to me:
I got completely ahead of myself…. This machine hasn’t had a de-scale in a very long time.
It appears that the water circuit through the boiler for steam is different to the brew head path. Based on my feeling that there was a blockage and there was no problem with the high-limit thermostat [discussed on the Normal Sequence of Operations page —Sonic], I decided to try some Scalex through the machine and focused on the steam water path.
To my amazement, there was a huge amount of brown gunk dislodged. I tried various ways to shift it like running steam then switching on the hot water mode. After two full tanks of Scalex and then another 3 of clean water the gunk was mostly removed.
I also cleaned the brew head path but there was minimal scale and residue coming from this water path.
My conclusion is this:The steaming capacity of these machines is borderline from the outset. After some accumulation of residue in the thermoblock water circuit, the ability to transfer heat to the water is lost and steaming capacity is very reduced. Regular de-scaling will dramatically improve steam production.
I actually think that a longer preheating period which would give a hotter thermoblock before starting to pump would give a quicker start to steaming and a more solid flow, but the Breville guys must have their reasons for the programming they chose….
If you’re having water (steam) flow and/or water (steam) temperature problems, your first step towards resolution is to ensure that the water pathways are clear. The fastest and easiest way to do this on a whole-machine basis is to run a decalcification cleaning cycle. (If you have steam wand-only problems, i have an alternative method which is even faster, below.)
Decalcifying the Breville 800-series Espresso Machine
The following is my modification of Breville’s instructions, the modifications based upon fairly extensive reading about decalcifying/de-scaling espresso machines in general. The original Breville instructions are in the same standard black text color as this paragraph. My modified instructions, comments, and notes are this color green.
- Ensure the Selector Control is in the ‘Standby’ position, the Power On/Off button is set to the ‘Off’ position so that the machine is switched off and unplugged. I ignored this step. Do so at your own risk!
- Remove the Filter Holder and Frothing Attachment. Pour the decalcifying agent into the water tank. (I discuss options for the decalcifying agent at the end of these instructions.)
- Plug the machine into the power outlet and switch on.
- Set Power On/Off button to the ‘On’ position and the Selector Control to the ‘Standby’ position (center position between brew head and steam wand).
- Place a large container under both the Brew Head and the Steam Wand.
- Unscrew Steam Wand tip, to prevent its plugging up with chunks of crud.
- When the brewing temperature is reached the ‘Heating’ light will switch off. Set the Selector Control to the ‘Espresso’ position and let half 1/4 of the decalcifying solution run through the Brew Head. Monitor the water level closely. It will drop quickly!
- Set the Selector Control to ‘Standby’ and allow the machine to rest for at least as long as it just ran. This is a home machine—the pump is not rated for continuous duty! Letting it rest will reduce pump stress.
- Set the Selector Control to the ‘Steam’ position and allow another 1/4 of the remaining solution to run through the Steam Wand. When the solution stops flowing, set the Selector Control back to the ‘Standby’ position. Elsewhere on this same page (p. 27), in large text, Breville cautions against letting the water tank run dry. I believe that warning supersedes their recommendation to run until “the solution stops flowing” at any time in this whole procedure. Note that water consumption is vastly less per minute in the Steam position vs. the Espresso position. Many minutes will pass before the water level noticeably drops. Consuming 1/4 of the fluid level will take a long time. I chose to run it about 5 min., let it rest 5 min., and repeat, until the 1/4 level drop point was reached, so as not to over-stress the pump.
- Leave the machine to sit on hot (powered on) Standby for 15-20 minutes. This allows time for the decalcifying agent to chemically act inside the boiler unit and other internal water passageways.
- Reinstall the Steam Wand tip. (This can be done any time during the 15-20 minute rest period.)
- Set the Selector Control to the ‘Espresso’ position and let half of the remaining (1/4 of the original) decalcifying solution run through the Brew Head.
- Set the Selector Control to ‘Standby’ and allow the machine to rest for at least as long as it just ran.
- Set the Selector Control to the ‘Steam’ position and allow the remaining solution (final 1/4 of the original amount) to run through the Steam Wand.
- After decalcifying, turn the machine off and let it rest for 15-20 minutes. During that time, remove the Water Tank and rinse thoroughly then re-fill with fresh cold water. To rinse the machine, run half the water through the Brew Head (and watch the level because it will drop quickly!) and half through the Steam Wand (giving the machine frequent rest breaks because the water level in Steam Wand mode drops so slowly).
- The machine is now ready for use.
Other Warnings from Breville
From p. 27 of our paper manual:- Cautions
- Do not immerse cord, plug or appliance in water or any other liquid.
- The water tank should never be removed or completely emptied during decalcifying.
- Notes
- The stainless steel Filters should not come in contact with any decalcifying agents.
- Do not use powdered decalcifying agents.
Decalcifying Agents
Per Breville, powdered materials such as Dezcal and Scalex (to name just two of many) should not be used. Yet correspondent Grant Ball used Scalex with great success and no reported issues (he reports that Scalex is composed primarily of sulfamic acid).
Liquid decalcifying agents—recommended by Breville—include purpose-made products such as Durgol Swiss, and generics such as citric acid. Based upon Jim Schulman’s recommendation of citric acid in his FAQ, and the preponderance of free lemons on the lemon trees in our back yard, i chose to use lemon juice. Following recommendations in Jim’s FAQ, i used approximately 3 tablespoons of lemon juice in a full 2.2 L Breville 800 espresso machine tank of filtered water. I was careful to ensure that there were no seeds nor >2 mm in any direction pulp or other particles. One medium-sized Meyer lemon yielded just slightly more than the required 3 tablespoons of clean juice. I found it entirely satisfactory and would use it in the future.
Alternative Quick Cleaning of the Steam Wand
During the many years i was completely ignoring Breville’s decalcification recommendations, there were several times that steam production from the wand dropped to a very low and wholly unsatisfactory level. Cleaning the tip, either in-place or removed, did not improve things. The following obvious-to-me procedure successfully solved the problem, each time:
- Turn off the machine and let it cool.
- Remove the steam wand tip, per Breville’s instructions (lacking those, use common sense. It unscrews).
- Using an appropriate flat-sided wrench (spanner)(18 mm per site correspondent David T.) and a reasonable (tending gentle) amount of torque, unscrew the large nut out of which the steam wand exits the machine. The brass fitting into which the nut screws attaches to an easily breakable nipple. Please read the cautionary discussion below before continuing. If you’ve not done this before, it is probably worth the trouble to unplug the machine, remove all water and drain tanks, and flip the machine over to truly see what’s going on and have gravity work with you so you can take things apart slowly and see how they fit together. When the machine is flipped over with its top on the work surface, the nut unscrews in the usual direction (counterclockwise = loosens).
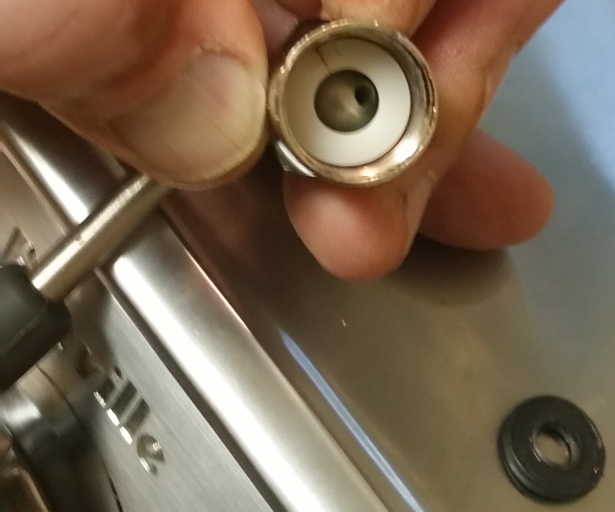
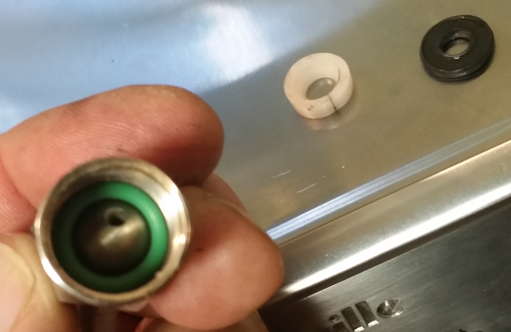
- Carefully remove the nut and wand as an assembly. Be sure to note the orientation of the white (turns brown as it ages) plastic cone washer—it only fits properly one way: concave/cone side against the ball on the wand.
 The rubber washer sits atop the flat side of the cone washer which sits atop the metal ball of the wand. Set the rubber washer and cone washer aside.
 - Using a pipe cleaner or a chenille stick or similar, gently ream out the entire length of the interior of the steam wand until it is clean. Expect a lot of crud to come out. Consider using a cleaning liquid/solvent. Soap and warm water would be the minimum at the gentle end. I’ve used a proprietary petroleum-based solvent i happen to have, called Fedron®. Fedron is not a food-safe chemical, so it is probably a poor choice on my part. I’ve always rinsed the inside of the wand with a clean chenille stick and lots of soap and water for some time, after the Fedron treatment. Diluted lemon juice would be a better choice. I like to blow through the steam wand to test it to ensure that it is completely clear of obstructions.
- Flip the machine back over, reinstall the tanks, plug it in, and run steam out the nozzle hole with the nozzle still removed. I believe this helps better clear the internal steam passageways. Turn the machine back off.
- If the machine is hot near the steam wand mounting, allow it to cool. Reinstall the steam wand, being careful to restore the original orientation of the cone washer, and to have the rubber washer atop the cone washer, ready to press against the mounting in the main unit. Tighten the nut until the steam wand holds its position without letting gravity flop it down. It should be easy to move around as desired, yet stay in the position to which it is moved.
- Turn the machine back on. Run steam through the wand for, say, a minute. It should be strong.
- Reinstall the tip on the end of the steam wand. Test the steam wand for proper operation. It should now have a nice, strong steam stream as it used to. If it does not and you are certain that the wand itself is completely clear, proceed with the full decalcification procedure.
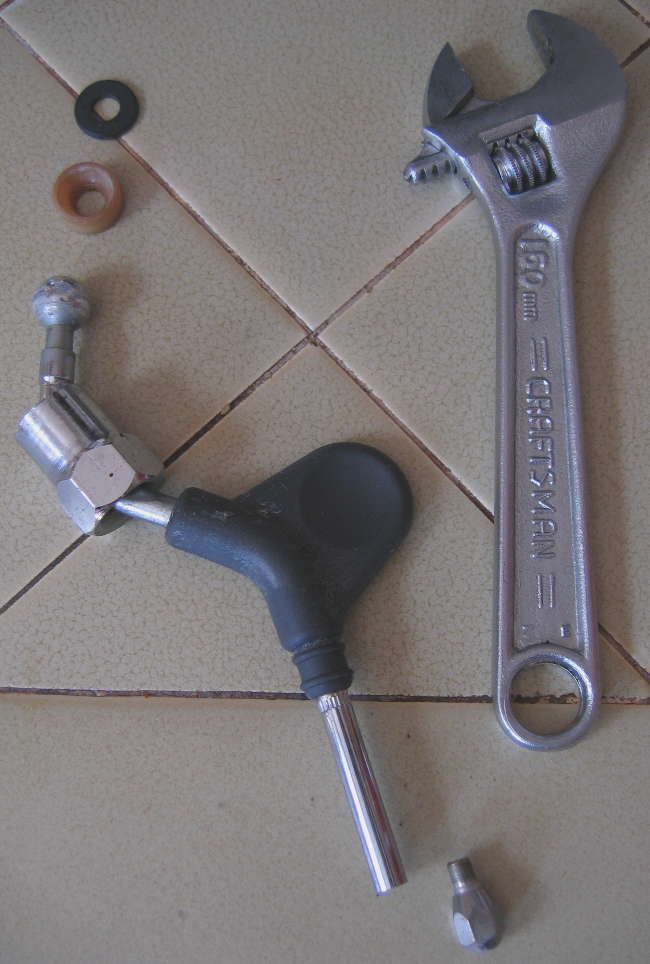
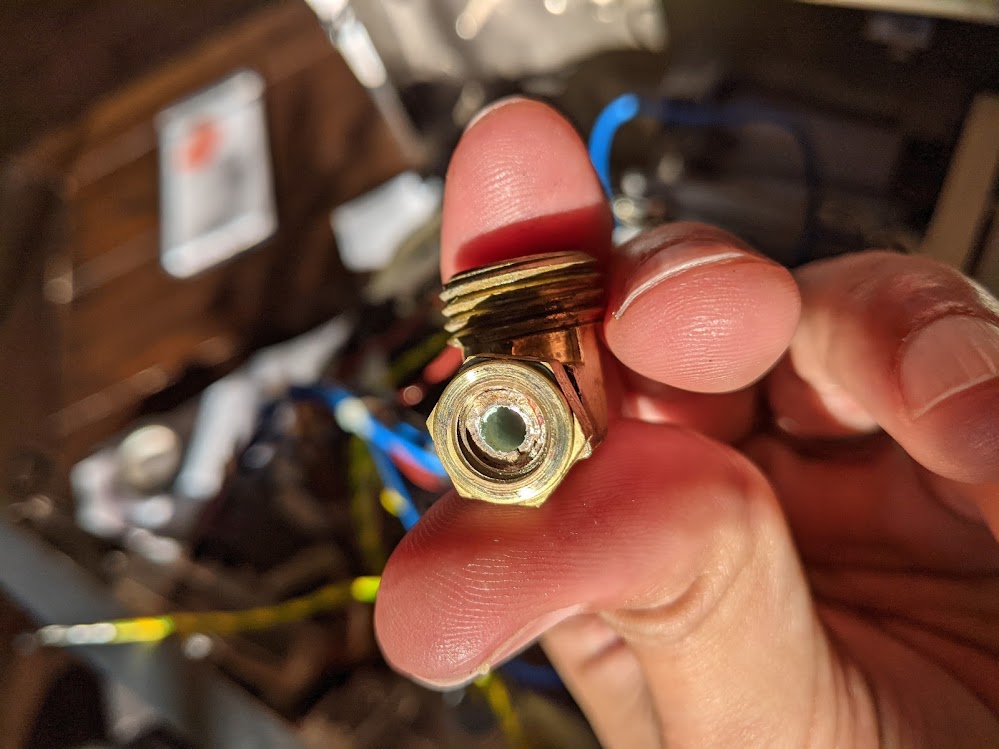
Please be careful and wish yourself luck when removing the steam wand! Despite his skills and care, correspondent Curtis C. reports that the threaded brass fitting inside the machine to which the wand attaches snapped off inside his fairly new 800 series machine:
I got the machine opened, but found that the brass fitting on the steam valve is only attached to a [very small] nipple, which (if I’m lucky) I could extract with a pair of vise grips, or else I’d need to remove the pump, use an ez out or similar tool.Here’s the broken fitting in Curtis’ hand:

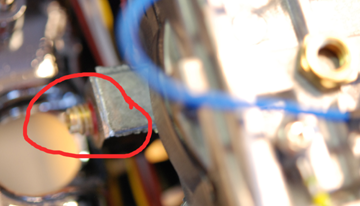
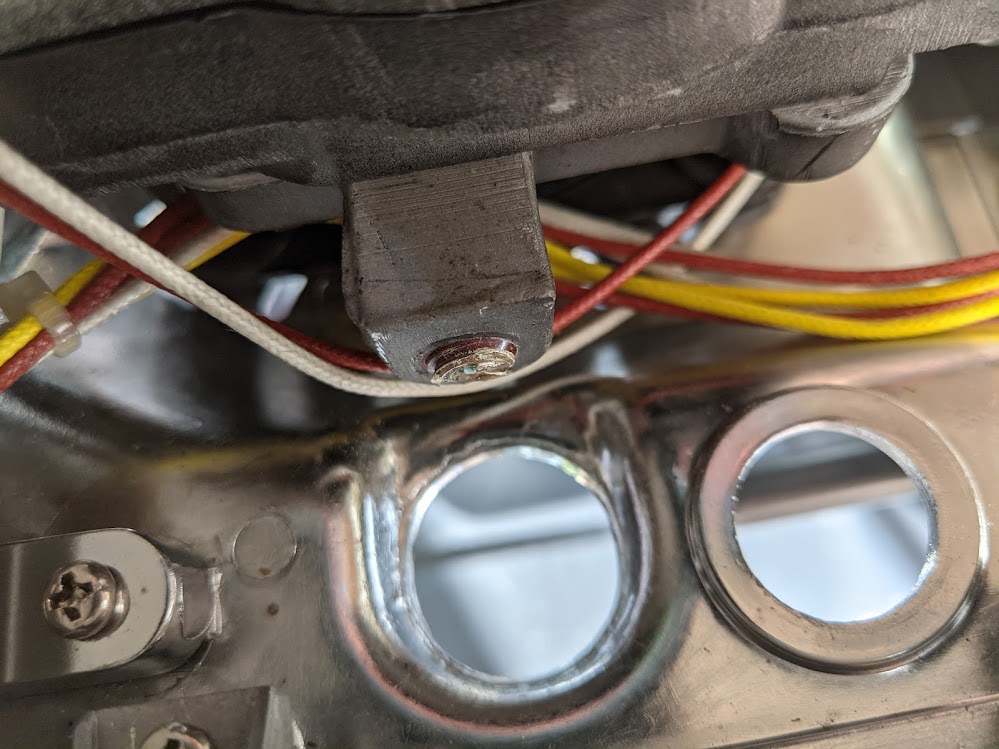
Here is [a view] from the top of the machine, looking down to where the steam want exits. Circle in red is the stub of the nipple that sheared off, with, on the right, the brass "lock nut" that presumably anchored the nipple into the right hand 90 degree elbow. Both these parts are blurry—sorry about that.
While i have not personally tried the following recommendation, it makes sense to do what plumbers do: have another tool holding the brass fitting inside the machine stationary and applying opposite torque to the turning torque being used on the nut. I welcome any further/alternative suggestions on how to minimize breakage.
Site correspondent Jay T. shares these very clear pictures of his similar mishap:
Just wanted to share that I tried Cameron R.’s thermal block repair but snapped the brass fitting while removing the the steam wand attachment.
I think this means the end of my 800esxl unless you or your readers have tips on where to find parts as the parts are discontinued after an internet search.
Proceed with caution trying to remove that fitting!
Jay
Has anyone else had this issue and worked out a repair? let me know and i’ll see about adding your findings here.
Failure and Repair: Poor or No Flow from Steam Wand Even After Wand Cleaning/Decalcification
Plugged-Up Valve Fix
Toronto or Toronto-adjacent coffeephile Jamie performed all the work in the last section and still had no wand steam. Here’s his story:
So I have the 800 as I was telling you, but the problem was that there was no steam from the steam wand or it barely trickled through. The steam would instead come out in the drip tray and out of the top of the water reservoir. But mostly the drip tray. I disassembled my unit. And took off the brass piece that connects the steam wand to the thermoblock. It was clear. I descaled and decalcified with lemon, then vinegar, then CLR. Still nothing. I knew something was blocked because it was producing the steam just not putting it where it needed to go. So, I took it apart again (as now I am confident in taking it apart and putting it back together again thanks in no small part to your site) but this time went after the selector knob on the front. After removing the knob, I removed the plastic selector assembly from the thermoblock (just the plastic, held in by 3 screws) and discovered 3 porcelain discs (maybe it was 4) anyway, I separated the top one as I was turning it to see how it operated. I thought I broke it. But I moved the one below the top one to see how it moved also. I guess I freed something up because at that point I was discouraged that I couldn’t see anything wrong and was worried that I had totally screwed the machine up. So I put it back together. Turned it on. Selected the steam. And voilà: It ran full steam ahead.
I guess the discs weren’t turning to open to allow the water through the correct path. They somehow became stuck together.
I should mention that I picked this machine up of kijiji for $40 because the guy couldn’t get the steam to function properly but it produced good espresso. So it was a steal.
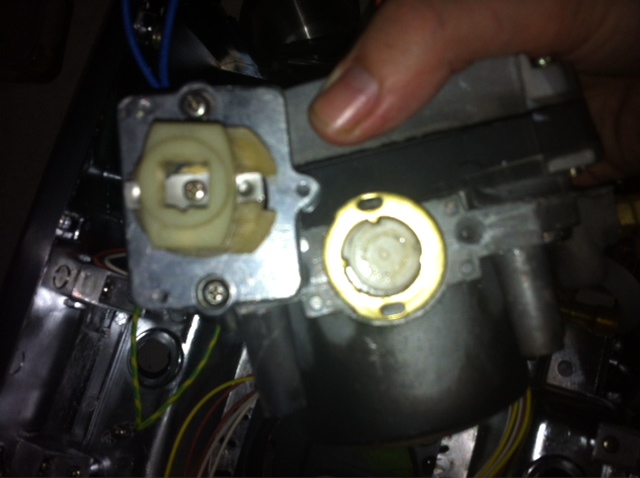
Here’s the view with the selector knob removed:
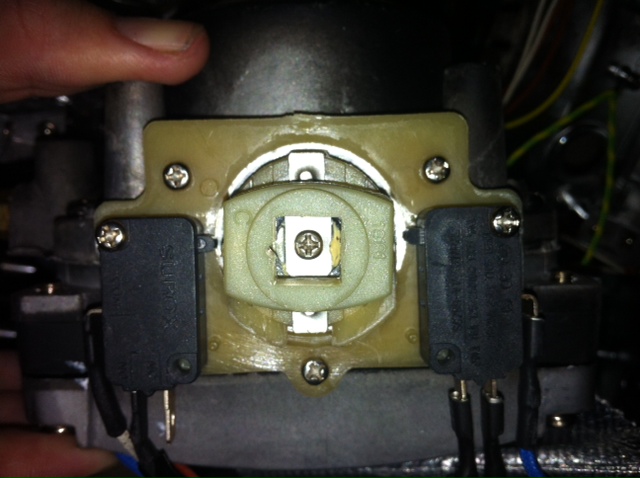
Plastic selector switch plate assembly removed:
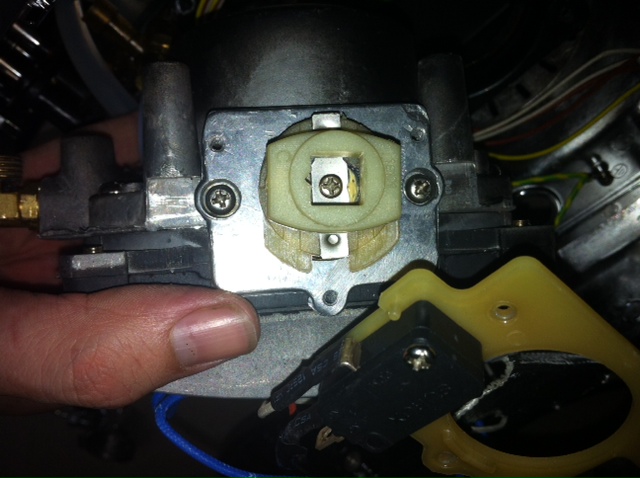
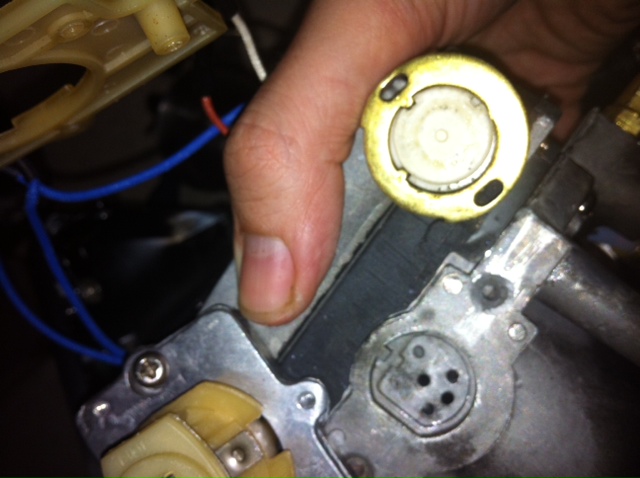
Selector knob linkage removed, revealing ceramic discs:
“These are the discs. The top one comes off, the ones underneath slide. I wound up taking the ones under the top one apart.” Ceramic discs removed from thermal block:
Pictures and quoted text courtesy Jamie W.
My take-away from Jamie’s dedicated efforts is that sometimes it may be necessary to completely disassemble the selector switching mechanism all the way down to the ceramic discs (the actual water switching elements, just like the valves in many modern kitchen and bathroom faucets) to get in and clean out stubborn mineral or other debris clogs.
Plugged-Up Thermal Block Fix
Site correspondent Cameron R. instead found a different part of the machine’s plumbing plugged up:
On our unit the steam wand had ceased functioning some time ago. The pump would run and everything sounded normal, but nothing out the wand. After switching the dial back to the neutral position steam would vent from another location, so we knew it was generating steam.
After checking the easy fix of the wand itself being clogged with no luck, I found the problem after some hunting. Here was our fix:
After opening the unit and detaching the outside steam wand, loosen the entire heating block via the four screws surrounding the main brewing port on the underside of the top of the unit.
Once the heating block is loose, lift slightly and tilt towards the left (looking from front) to allow removing the brass fittings that attach the steam wand to the block.
Once the brass was removed, I could see the steam channel inside the heating block was completely clogged with mineral buildup.
Using drill bits, twisting by hand, start with the tiniest size and “drill” into the buildup. Once a small channel is partially clear, work your way up in size until you are confident you have “drilled” all the way to the midpoint of the heating block. The largest size bit should match the interior size of the steam wand.
Finally use a pipe cleaner to fully clear out the remaining debris. Reassemble, rinse, and steam away.
Our unit is well over 10 years old at this point, so this issue takes years, and probably hard water conditions, to develop.
Failure and Repair: Leaking Steam Wand
Paul Glenn of Spring, Texas has a great explanation of his (former) steam wand leak and his fix:
I had a steam leak due to split nylon washers on either side of the ball on the steam wand. Both of them were split (probably due to overtightening the nut on my part, I admit). This was causing steam flow to be pretty weak.
Took the nut all the way off today, and figured what I needed in between the two existing nylon cones is an o-ring. Just happened to have one just the right size in one of my parts bins – this particular o-ring came in a seal kit of air conditioner overhaul for Toyota. McMaster would have the standard o-ring, I’m sure. The o-ring fits perfectly in the ID of the nut, on top of the small end of the existing nylon cone and perfectly resting on the ball.
Excellent fix, and (more) proof that saving usable spare parts from other projects is useful.With a right angle grinder with cutoff wheel, by pushing the cone against the wheel with my finger, I ground a little more of a flat on the small end of the machine side cone, so it would have more bearing surface to push against the o-ring – probably about 3/32 off the overall length.
When tightened, the O-ring provides just enough friction on the machine side of the ball to make a seal as well as to add just the right amount of tension to the wand. Finger tight works great, and it’s frothing like new!
Failure and Repair: Poor Flow from Brew Head
Site correspondents Michel M. and Joe L. sent in handy tips regarding poor flow through the Brew Head.
Problem
When using the brew head (filter holder) to brew espresso—not the steam wand—the water flow is greatly reduced. Instead of flowing freely through the bottom holes of the filter holder into the cup, the water trickles and sometimes drips.
Michel’s Repair: Plugged Mesh Filter
The metal mesh filter in the brew head may be partially plugged with coffee grounds, possibly from overpacking coffee in the filter. To fix, just remove the screw in the middle of the mesh filter and pop it out gently by pulling in the screw hole, using the screwdriver for example. Clean the coffee grounds from the mesh filter “grid” and screw it back onto the Breville, and voilà! The water flow is back to normal.
I am delighted that this proved to be an easy fix for Michel. On the unit here, that center screw is seized. I tried removing it on the unit here in July 2015, and absolutely could not get it out. Tried letting penetrating oil soak into it: didn’t help. Very likely the years of high heat and heat cycling seized it. I strongly urge you to use the very best-fitting, torquey screwdriver you have. I had to disassemble the bottom and sides to get my best Fiskars rubber-grip-handle screwdriver to fit, and even then, using the technique of “cracking” a fastener via turning it only about 10 to 15 degrees, it would not move. My intent was to see whether ours was plugged at all and take some new pictures, but since that’s not happening, please refer to the first photo under Top Cover on the Disassembly page, to see the mesh and the center screw.
Once one has this screw out, it would be a very good idea to put anti-seize compound on the threads before putting things back together, so that any future repairs will be easier and faster. Site correspondent Chris Robinson has excellent advice for this on the Disassembly page.
Joe’s Repair: Plugged Brew Head Behind the Mesh Filter
Joe’s report, slightly re-worded:After de-calcifying the wand worked fine, but the head dripped slowly, also back-pressure was causing the head to leak a little from the top gasket.
Not sure if this is wise but working a 1/8" drill bit with my hand only I was able to pull a lot of grayish stuff out of the head after removing the shower head [a.k.a the mesh filter—Sonic]. Eventually crammed a q-tip in as well [to remove more debris]. This fixed the issue.
Failure and Repair: Low, Surging Steam. Low Brew (Group) Head Pressure
Coffee fan Carl F.’s domestic 800ES started having low steam: “the steam would surge and give a little on each stroke of the pump but reduce over time”. Then, low group head pressure appeared. Descaling did not help either problem.
On testing with the covers off i noticed bubbles in the pipes. When i moved it next i didn’t move the cup under it and the pick up tube fell off. i refitted the tube and now it’s fixed: good water and steam flow.
Hope this helps someone else.
Repair: Replacing Thermal Block (Boiler) Assembly
Site correspondent Paul has provided enough information on this that i feel it best to present it on a separate page.
Improvement: Reduce Pump Noise
Site correspondent Brennan had a noise problem and has a fix:
I recently was annoyed that my 800esxl sounded like it was falling apart when the pump was running. I found that the noise was coming from the fixture that holds the tube that pulls water from the reservoir. In order to stop the noise I used some electrical tape to pull the flex tube leading to the pump up further which resulted in a large decrease in the noise.
A more precise variation on this theme—with captioned photos!—comes to us thanks to site correspondent Olivier, who goes into detail about the physics [my added comments in square brackets like this]:

The water pump A sends vibrations through the water hose B [which the official Breville service manual calls 800ES/153 (AU/NZ part #) Silicone Tube – Tank To Pump]. It travels to the rotating water pick-up pipe C [a.k.a. 800ES/252 Water Feeder Assembly]. The tank pick-up pipe is loose to allow its rotation [as the water tank is removed and inserted] but that looseness creates noise when the vibrations [traveling along hose] B reach it. I secured the hose to the bottom plastic plate [looks like 800ES/126 Tank Panel – Up] using tie wrap D. Noise is gone.
Olivier further notes that the location of the tie wrap along the length of hose B is important. Here he provides a captioned photo of what does NOT work:

Information: Water in Bottom Tray
It is normal for Breville 800 series espresso machines to deposit water in the bottom tray as part of their normal operation. What is not clear at this time is how much is normal, under what circumstances.
Site correspondent Jean G. reports:
Of a full tank of water (8 cups), 25% escape to the bottom tray (2 cups).
On the unit here, i tried the following test:
- Filled the water tank with approximately 2 liters (roughly 8 cups) of water.
- Ran hot water through the brew head with no insert nor content, to brew tea a mugful at a time[1].
- Ran tank water down to the Minimum mark.
The mug i used hold 4 dl (=400 ml) or approximately 1 2/3rds. cups of liquid, thus i ran 4 + a partial mug fill cycles. Result: approximately 1 dl (more commonly thought of as 100 ml, or about half a cup) in the bottom water tray.
The amount is going to depend upon what cycles are used. Jean reported that he does not use the steam wand, which is why i performed the test the way i did. It might be that a normal coffee + insert load increases the amount of water in the tray. I welcome further submissions on this topic.
Have any Breville 800ESXL repair tips? Send ’em in! I’ll endeavor to add the seemingly good ones to these pages, at my usual glacial pace. (Please let me know if you want to be credited or remain anonymous. Thanks!)
[1] One of the great ironies of my having put up this Breville 800 series espresso machine article is that i basically never drink coffee. The machine belongs to the other resident of this house, who is the coffee drinker. I normally use a Breville BKE830XL water boiler/teakettle, which works very well.
- Breville 800 Repair Home
- Normal Sequence of Operations
- Disassembly
- Electrical/Electronic Issues
- Mechanical/Water/Hydraulic Issues
- Modifications
 World O’ Appliances/Household/Plumbing/Irrigation/HVAC/Hardware