Secure Email Setup for Mail 13 & OS 10.15 Catalina
Dogalina Catalina: No Better Than Mojave, And That’s Not Good
“Bug fixes? Why, when we at Apple have all sorts of Service Crap to shove down your throat to support our Bu$ine$$ Model?” ⇦ imagined, not literally known, quote.
In terms of the parts of the user experience which still work, the Catalina experience looks and works like the rest of the re-flattened-to-2D screw skeuomorphism 10.1x series: OS X 10.10 Yosemite and 10.11 El Capitan, and macOS 10.12 Sierra through 10.14 Mojave. Even though the major version numbers of Certificate Assistant and Keychain Access are identical to their Mojave counterparts, the build numbers are different, so assuredly there can be differences.
As with macOS versions since 10.12 Sierra, Mail 13 and the security infrastructure in macOS 10.15 Catalina require the Key Usage Extension (KUE) to exist and be properly filled out for there to be any hope of S/MIME to work in Mail. If your existing certificates have the KUE, you’re good to go—and if you’ve been successfully using secure S/MIME email in Mac Mail in macOS 10.12 Sierra or newer, this is already true for you. If you’ve used this set of articles after August 2017 to make your self-signed certificate, you’re good. If you followed the instructions on this series of articles in the past (through end of August 2017) recommending omitting the KUE and have been living in a pre-Sierra Mac universe, you’re hosed: you need to make new self-signed certificates with a proper KUE.
The following instructions have been formulated running macOS 10.15.6, its Mail 13.4, Safari 13.1.2 (15609.3.5.1.3), Keychain Access 10.5 (55270.0.1), Certificate Assistant 5.0 (55188), and all current updates to these items as of 3 August 2020. They will likely work the same with earlier versions of OS 10.15 and its components, but i never tested those earlier versions. These instructions will probably continue to apply to any later updates as well, though versions newer than those listed above have not been explicitly tested by me.
These instructions assume you already have at least one working email account set up and properly operating in Mail (in the usual insecure manner of standard Internet email). If you don’t, please go set it up and test it now, following Apple’s/other’s instructions.
Creating a Self-Signed S/MIME Certificate-key pair
- Quit Mail, if it is running.
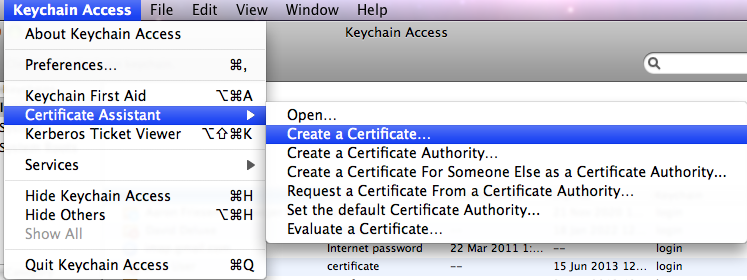
- Open Keychain Access (from the Utilities folder). From its eponymous menu, select and :
- Certificate Assistant version 5.0 will run. You’ll be presented with the window:
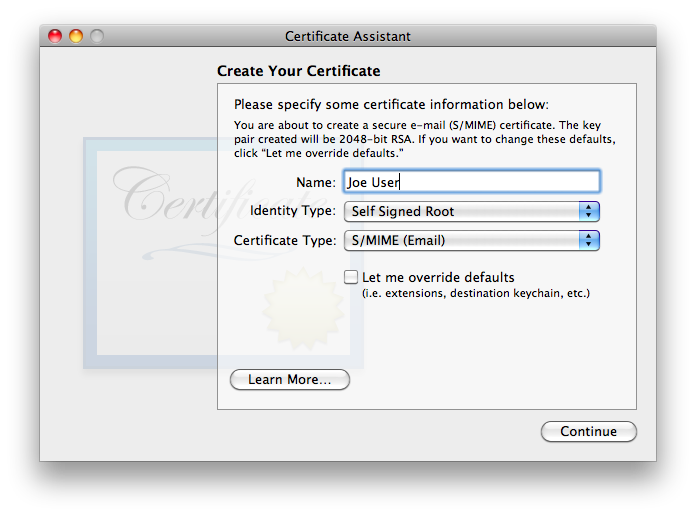
is exactly the type of certificate we wish to create. Given that S/MIME (Email) is most definitely the Certificate Type we want, one might think that it would be OK to merely verify the name and click . Starting with Keychain Access 9.0 (55208.60.1) and Certificate Assistant 5.0 (55165.50.2) included with macOS 10.13 High Sierra and continuing through to macOS 10.15 Catalina, Apple has made significant improvements, fixing a longstanding bug with broken-by-default Key Usage Extensions. The biggest problem remains that Certificate Assistant never asks for/confirms the email address, without which the certificate is useless for email! In many (but not all) cases, Certificate Assistant fails to insert any email address whatsoever into a default certificate, rendering it useless for email. Even in cases where Certificate Assistant finds one or more email addresses, when there is more than one, Certificate Assistant does not allow the user to select which one to use. Even with the significant progress of other major bugs being fixed, as of this writing, Apple has not fixed this intermittent (mostly failing) lack-of-email-address problem, all the way through the most recent version tested as of the latest revision of this page: OS 10.15 Catalina. Note that even though OS X versions 10.6 through 10.15 contain one or more added layers of complexity to work around these mistakes, these added layers are not backward-compatible with older OS X versions, nor in my testing with Catalina and its Mail itself! It is also extremely unlikely to be compatible with non-Apple systems.Even if Apple hadn’t made the absent email address error which renders a default certificate useless for secure email, the default lifetime for the certificate is set for one year. Most people will find renewing their certificate each year—and getting all their correspondents to renew it as well!—a huge hassle not worth undertaking. For all these reasons, be sure to check .
- Click , and you’ll see:
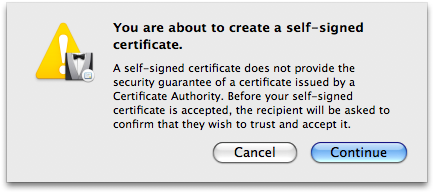
If, after reading Apple’s warning, any of you are not comfortable at this point and want to go to the trouble of paying a reliable Certificate Authority (CA) for a guaranteed certificate and following their instructions for installation, or wish to hunt around for any CAs who may be still offering free certificates for personal use (and jump through their hoops), by all means go ahead… see ya ’round! The rest of us will simply click and move on. - Because of the necessity of overriding the defaults, you’ll now be presented with a series of detailed settings windows. The first of the series of detail windows——asks you to fill in basic information:
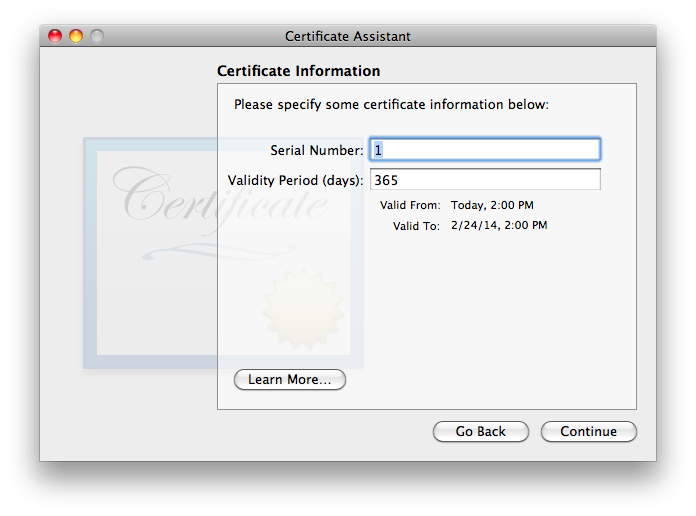
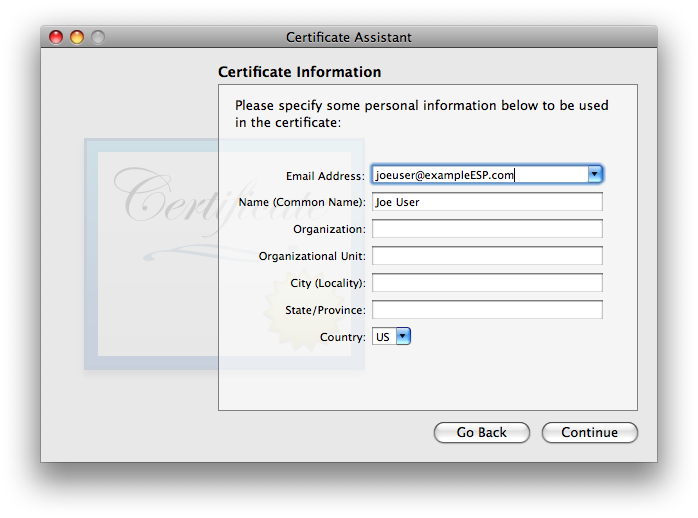
I have not found that the Serial Number matters, in my testing. If you think you may wind up having multiple certificates for the same user name and/or email address on one system, it is probably a good idea to ensure that the serial numbers differ (though i did not find any issues in brief testing where they were the same). I strongly recommend choosing a longer Validity Period, to minimize the hassle of re-creating a new certificate, distributing it to all your secure correspondents, and getting them to do the work to get the new one trusted on their system(s). The tradeoff with a longer time is that there is a much longer time span over which the valid certificate may be compromised by some malefactor getting ahold of your security credential set (certificate + public & private keys) and pretending to be you. I’m finding that 10 years is working as a decent compromise, so i usually fill in the box with 3652 (approximately 10 years, measured in days). Once these items are verified/set, go ahead and click . - The second Certificate Information window asks for “personal information […] to be used in the certificate”. As discussed in the Points common to all OS versions section, the only essential item is the email address. Entering a Common Name is highly recommended, as it will make it easier to find the certificate in keychains, on backups, etc. The other items are optional. They may be filled out frivolously, though if the certificate might ever be used for other purposes or on non-Apple systems, there might be cases of failure if certain fields do not match reality (or at least expectations). Note that all this information becomes part of the certificate you’ll be sharing with the outer world.
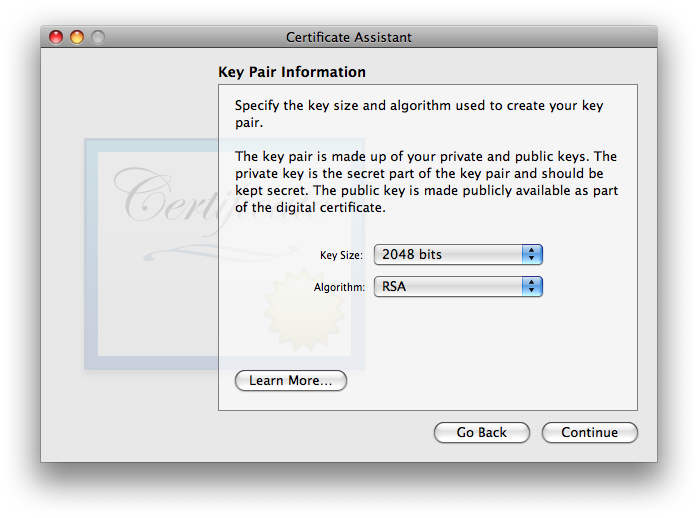
click when finished. - You will now be asked to approve . The defaults of 2048 bits key size and RSA algorithm is the only choice that is backwards-compatible all the way to OS 10.4 Tiger systems, though thanks to icky bugs introduced in Mojave and still present in Catalina, Catalina’s S/MIME abilities aren’t backwards-compatible as far as Tiger. Starting with macOS 10.13 High Sierra and its Certificate Assistant, two longer key length options of 4096 and 8192 bits exist for RSA. Details of the available key size and algorithms options in an all-Mac environment are on that separate page, broken out by how far back in terms of Mail/Mac OS versions you wish to support. If highest compatibility with all systems Apple and otherwise is your priority, stay with Apple’s default choice of the RSA algorithm and your choice of 2048 or 4096 bits. I’ll use 2048 bits in this example.
Click . - Next you’ll be offered the settings. Details for this extension are discussed on the separate page X.509 v3 Certificate Extensions. Thankfully Apple retained the default settings fix in this pane, corrected in High Sierra. Just to be certain, ensure that your settings match the screenshot below:
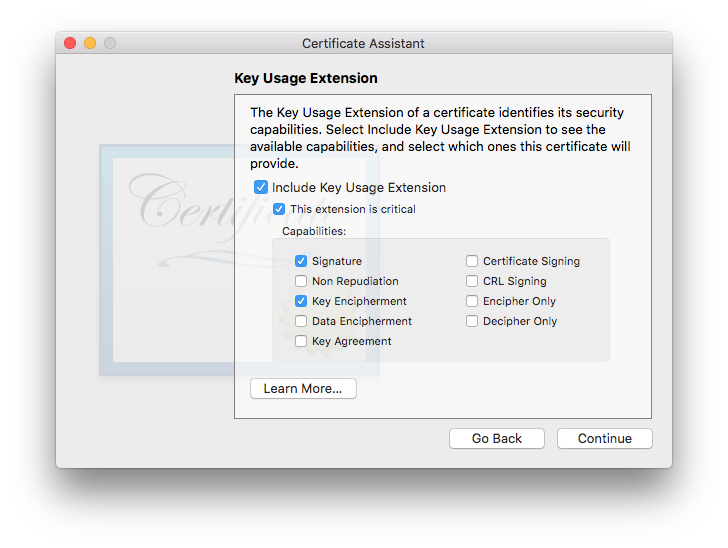
Due to changes made by Apple as of 10.12 Sierra, the Key Usage Extension MUST be included for a certificate to be valid. If you wish for your certificate to work on all versions of OS X/macOS and Apple Mail versions from Catalina back to 10.6 Snow Leopard/Mail 4, you must ensure that the following 4 items are checked:- Include Key Usage Extension
- This extension is critical
- Signature
- Key Encipherment
- Next you’ll be hit with the settings:
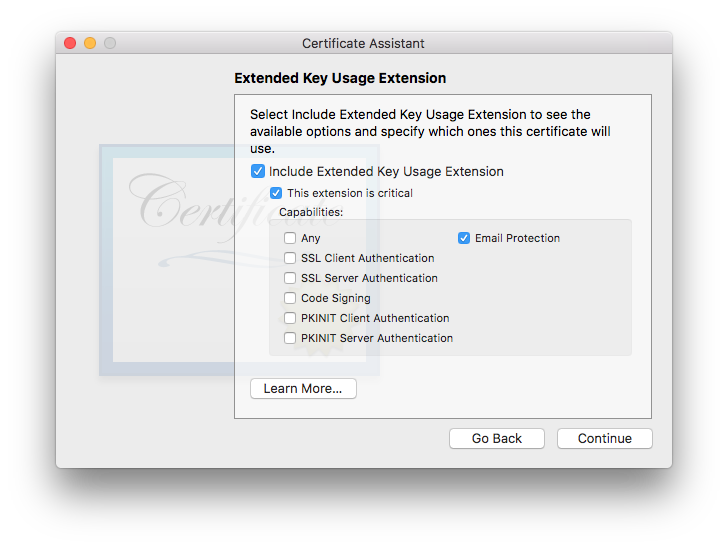
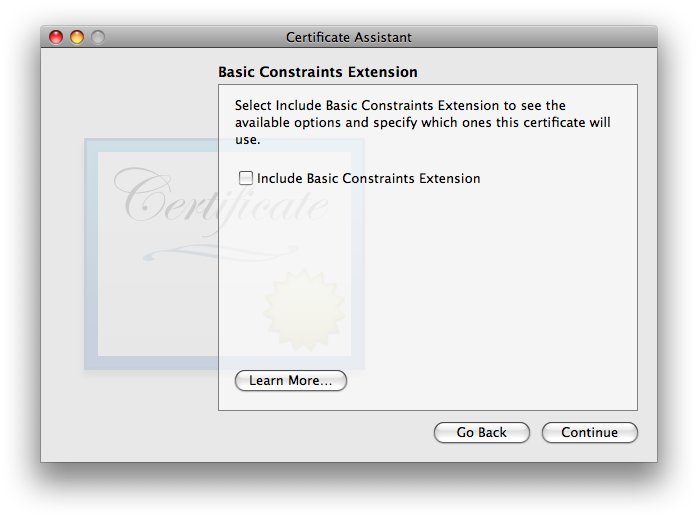
This one’s defaults are OK. It is OK to include it if you want, or disable it if you want—both ways work, in my testing. I tend to leave it engaged with settings as shown, in case future software starts to get picky about seeing specific usages indicated within certificates. Given that Apple has included it as a default in all OSes since the EKUE became available, the wise money might want to leave it at the default and include it. As always, click to move on. - The gets us back into a controversial area where the experts are not in agreement. Some say that this extension should always be enabled and “Use this certificate as a certificate authority” (which will appear in this window when Basic Constraints is enabled) should be checked, for all self-signed certificates. Others disagree. In my testing, i left it at its default—disabled—and things worked fine.
- The last of the array of extra-work-making extensions is the (which i’ll abbreviate: SANE):
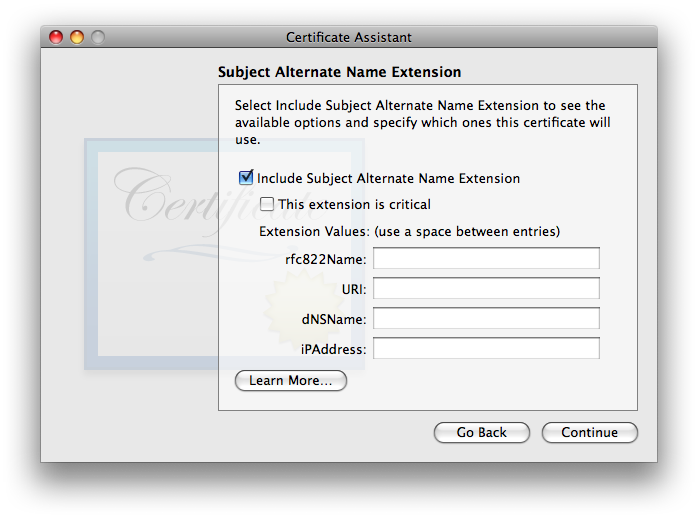
It used to be that the SANE extension was not required, and i likely still make that claim in the SANE section of the X.509 v3 Certificate Extensions page. I did a lot of testing with and without it, with no difference in results—up through 10.13 High Sierra. To be honest, i haven’t spent time testing without it for 10.14 Mojave nor 10.15 Catalina: not enough time in my life to spend more doing uncompensated testing for likely little to no purpose. So: all my testing on Mojave and later always include it. If it is used, it is essential that the rfc822Name field include the same exact email address as listed above under Certificate Information. Normally, Certificate Assistant fills this in automatically and correctly, so all you’ll need to do is double-check it. If for some reason it shows up empty as in the screenshot above, carefully type it in, correctly: just the you@youresp.com part… nothing else. Once you’ve made your choices, click . - Finally, Certificate Assistant will ask you to :
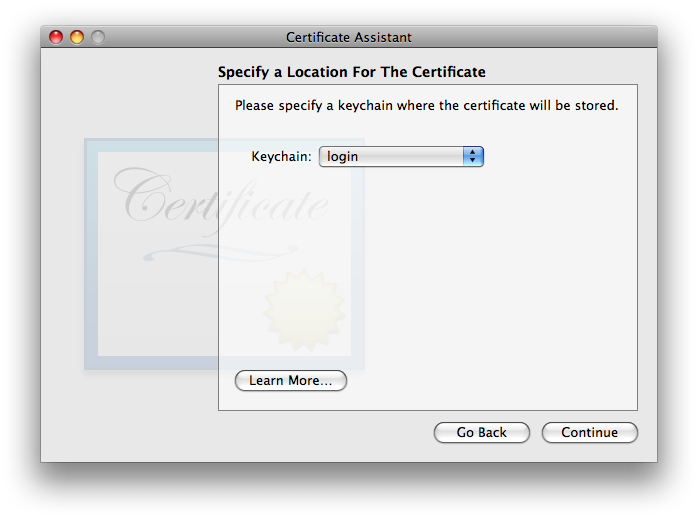
The default location of the login keychain is the correct answer. When you click , Certificate Assistant will now (finally) create the usual three items in your login keychain: the certificate, your public key, and your private key. See New Security Credentials part of the Points common to all OS versions section of the main article for further information.
Trusting a Certificate
Your public and private keys need no further attention—they’re ready to run. All they need to do is sit there on your system and work.
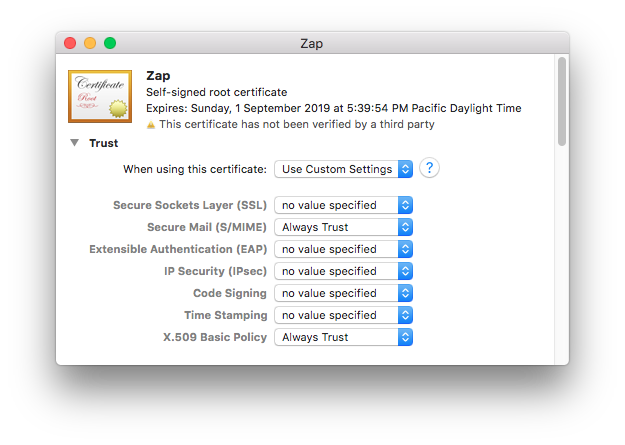
In Keychain Access, looking at your login keychain, double-click your newly-made certificate. You can select the category in the lower left column to filter out items in the main window frame which are not certificates, to make it easier to find. Click the arrow next to the word Trust just below the certificate icon, and the trust options will be revealed. Here’s what they’ll look like at first:
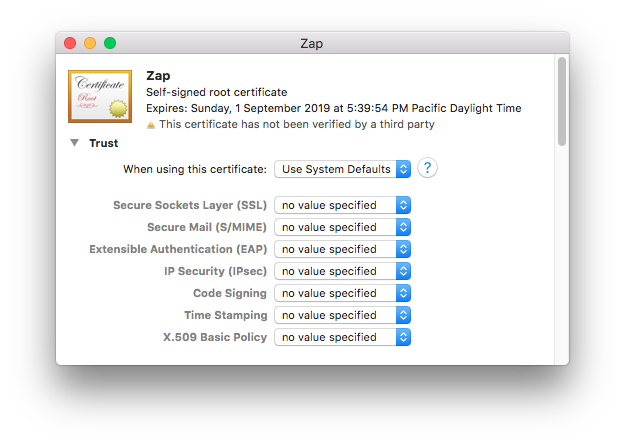
- Secure Mail (S/MIME)
- X.509 Basic Policy
Preserve Your New Security Credentials: Back Up!
Now is the time to back up your new certificate, public key, and private key, archive them, or both!
Please see Backing up your new security credentials on the common page for all the step-by-step details.
Other Machines?
As discussed in the Sharing One Set of Credentials with Other Machines part of the Points common to all OS versions section of the main article page, one set of email security credentials should be used on all devices you own.
The easiest and possibly best way to do this is to place a copy of the keychain you made with your 3 security credentials on each device and import the items from there. Here’s how it works moving these credentials to a different Mac:
- Place a copy of your secure email credentials keychain on the Mac. I tend to put it on the desktop.
- Double-click the credentials keychain file. Keychain Access should open, and the keychain should be visible in the list, shown locked.

- Select the credentials keychain. Select two of the 3 items: certificate and private key, within the keychain and drag them to the login keychain. The public key is contained in the certificate, and in my testing you’ll get an obscure error message if you attempt to bring it along as well. It is useful to have in your credential archive in case you move to a PGP variant or somesuch which uses public keys instead of certificates with embedded public keys.
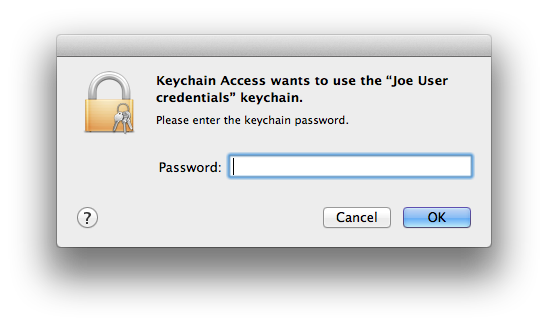
- Keychain Access will now ask for the password/passphrase for the credentials keychain. Enter it.
- The certificate and private key will move out of the importing keychain into the login keychain.
- The certificate is not ready for email yet. Double-click it in the login keychain. Be sure both and are set to . Close the window.
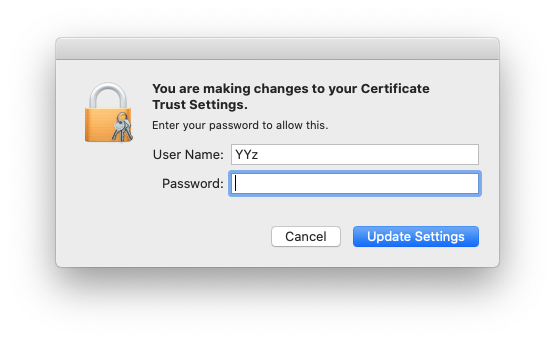
- You will see the change to certificate trust settings window. OK the change of certificate trust settings with your current macOS user credentials.
- Delete the credentials keychain (now with just the public key) from within Keychain Access via the option in the menu.
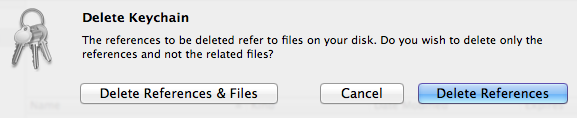
Select to get rid of both the references inside the Keychain Access application itself and the actual credentials file, now nearly empty (you did use a copy of this file in the first step of this sequence, didn’t you?). The deleted keychain might vanish immediately or remain in the list of keychains until Keychain Access is quit and reopened (no need to do that now), depending on things like permissions. - Quit Keychain Access. Done!
If instead of saving the 3 credential items in a separate keychain you exported each item individually, you will need to use in Keychain Access on each of your backed up/archived .cer and .p12 files for the certificate and private key, respectively. Don’t bother exporting the public key (.pem) for S/MIME usage, as it’s more work, is not needed, and you’ll only get an error message.
Due to bugs in Keychain Assistant (and/or the security infrastructure) for OS X all the way from Tiger through Lion (at which point i ceased testing this individual item method), then again when i tested Sierra (have not tested since), during my testing the certificate went in to the new system just fine, but there was an error message for both the public and private keys (i only tested the private key on Sierra, and the wording may not be identical, but is close):
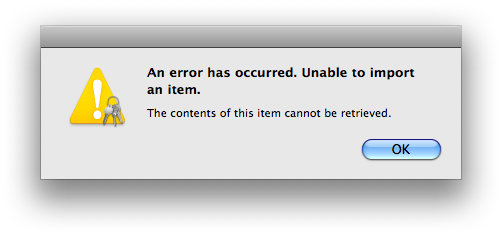
The private key went in despite this error message; the public key did not. This problem occurs whether i double-click the file in Finder or use within Keychain Access. Thankfully the public key truly is redundant, and the private key does import despite the error message!
Verify that Setup is Complete
This completes the setup for your email security credentials at your end. Quit Keychain Access. Launch Mail, and open a new message form. If all is well, you should see a new pair of icons in the lower right part of the header area, just above the white message body area:
![]()
Yours may or may not look like the screenshot: your seal may have an x in it instead of a checkmark. If you have more than one email account and the currently-selected account in Mail is not the one for which you just created security credentials, both icons may be grayed out. As long as you see these two icons in some form (gray, black, or your chosen accent color, selected or not selected), you have successfully completed setup. The final step is to exchange certificates with your correspondents.
Trusting Others’ Certificates
When you first receive an email message with a new, self-signed certificate, Mail will not be able to trust the certificate and will alert you to this fact, first with a banner:
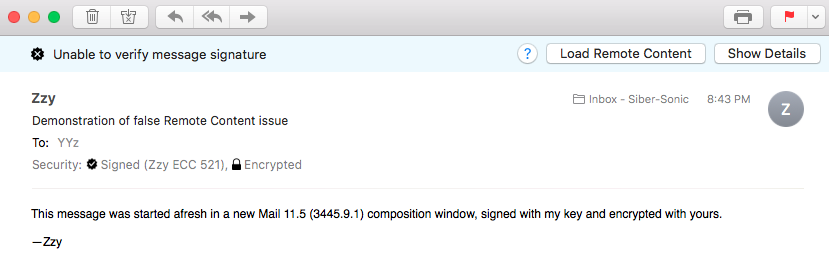
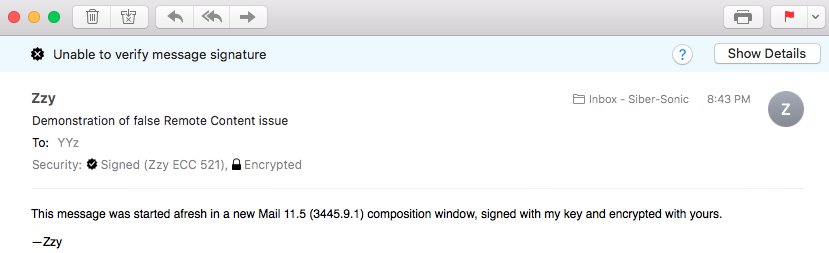
One very interesting thing about this banner is the button: This message has no remote content! This annoying and deleterious bug introduced in OS 10.13 High Sierra continues in full ugly effect in OS 10.15 Catalina. You will only see this if you’re a punctilious privacy person and have disabled in Mail’s Viewing preference panel. If you see this, go ahead and click the Load Remote Content button, then you should see the same thing without that button:
Due to at least one straggling bug amazingly still in place in OS 10.15 Catalina which was one of many also in OS 10.7 Lion through 10.14 Mojave, do Not do Not do Not go through the process of showing details and eventually trusting the certificate from within Mail—it’s broken and it doesn’t work! Actually as of High Sierra, it’s a different bug which at least fails so spectacularly that everyone knows nothing has improved. Specifically, as soon as one lets Mail try to fix the problem, nothing has changed: the signature is still untrusted. Going back and looking at the security settings show them reverted to defaults. Indeed, letting Mail attempt to “fix” a certificate’s trust can break the trust settings that may already exist! See “Mail offered to change the Trust Settings to fix the problem and Didn’t, or Made Things Worse!” below, for more information. (If you want to see what it would look like if it did work, go to this section on the page in this series of articles for OS 10.6 Snow Leopard.)
Quit Mail and follow the same instructions above to use Keychain Access to trust the certificate, as you did previously for your own.
Bugs and Problems
Mail 2 in OS X Tiger Crashes When Opening Signed Catalina-sent Emails! AAAAAAGGHH!
I concur with your AAAAAAGGHH!: it’s an icky bug! The days of full OS X/macOS forward- and backward-compatibility with Apple Mail and OS-included S/MIME functionality came to an ignoble end with macOS 10.14 Mojave, and remain equally busted in 10.15 Dogalina Catalina.
Due to un-publicly-documented changes in Mail 12 for macOS 10.14 Mojave which continue into Mail 13 for 10.15 Catalina, any emails it sends signed with the Catalina user’s RSA 2048 or RSA 4096-encoded certificate will crash Mail 2.1.3 on Tiger systems whenever such a message is opened. This is a repeatable bug, and to me the crash log looks the same each time, so it’s a matter of Apple having zero interest in dealing with a bug on an older OS they don’t want anyone to use rather than it being difficult to reproduce. Note that this is for signed messages, using the Catalina sender’s certificate. It is entirely possible to send encrypted emails from Catalina to the Tiger user using the Tiger user’s certificate, as long as they’re not signed. (Due to the limited utility of this option, i did not test repeated full-cycle sending-responding-responding back and forth messaging.)
Further note that it’s not a matter of how Catalina’s Certificate Assistant is making certificates: a perfectly viable, working RSA 2048 certificate created on macOS 10.12 Sierra when copied to a Catalina test system and installed and used with its Mail still crashes the clean Tiger test system in the identical manner. Inspection of the raw email source coming into the Tiger machine from a working Sierra system and the failing Catalina system reveals no human-discernible differences: the messages seem basically identical (for the identical working certificate and message content). There is something going on with the incoming certificate hand-off done by all versions of macOS Mail from 2 through the present that differs, and is causing the crash.
Whether or not this works on 10.5 Leopard systems is moot, since their S/MIME hasn’t worked since early in their lifespan, before a Safari update and its system-wide WebKit update (used by Mail) made secure email on Leopard wholly unusable. So, the next-oldest OS is 10.6 Snow Leopard, and the entirety of the Catalina OS/certificate creation/Mail infrastructure continues to be fully backwards-compatible with this OS. It is assumed and expected that this is true of all in-between newer versions of OS X/macOS, but i have not explicitly tested this.
I’m not even bothering to file a bug, because it’s a waste of my and Apple’s time, since i know they barely remember OS 10.11 El Capitan at this point, much less 10.4 that they stopped updating around 2010. If you’re someone like me who needs backwards- and forwards-compatibility across what Apple considers an extreme range of macOS versions, you will have to either downgrade to High Sierra or earlier if you must continue interacting with Tiger systems, else abandon the Tiger systems/move them up to/replace them with a newer Mac running at least 10.6 Snow Leopard.
Further information may possibly be found in the Secure Email in Mail Chart (especially the footnotes) in the Key Size, Algorithm, Security, and Compatibility Considerations [etc.] page of this article.
I’ve carefully done everything properly, but Mail keeps telling me that it’s “Unable to verify message signature”. And it’s telling me there’s remote content to load when there’s no remote content! Gaaaaaaaah!
Yes, Gaaaaaaaah! is a suitable response for this icky Apple bug carried over from High Sierra and still unfixed. Until they fix it, consider downgrading to macOS 10.12 Sierra, or work around the problem by always tapping/clicking the spurious and extremely misleading button. At that point, one of two things will happen:
- The whole false banner will disappear and accurate security status will be indicated.
- or
- The banner will remain the same, other than the button will vanish.
For case #1, you’re all done, other than sending feedback to Apple regarding how awful, unnecessary, and annoying this bug is!
For case #2, there actually is almost certainly something wrong. Quite likely, you’ve hit one of Apple’s other bugs related to secure email. Most likely, you or someone accepted Mail’s kind and generous offer to take care of fixing trust settings, which hasn’t worked properly for about a decade now (since OS X 10.6 Snow Leopard and its Mail, keychain, and certificate systems). Even if the symptom is different, try the workaround under Mail offered to change the Trust Settings to fix the problem and Didn’t, or Made Things Worse!, 2 items below here. (There are also screenshots down there, showing the buttons discussed both there and here.)
If you’re quite sure no one on your local Mac in the current OS user account has let Mail touch any trust settings, consider reviewing the certificate trusting procedure.
Note that this bug is only triggered by message signatures, signed with the sender’s public key. Receiving an encrypted message sent by someone else encrypted with your own public key does not trigger the bug. Most people most of the time both sign (with their own public key) and encrypt (with the recipient’s public key), so this is going to show up often.
People who leave the Mail Viewing preference for checked (enabled) will not see this problem. They also will be much less private and easily traceable, for whose emails they’ve opened when (those using invisible pixels and other stealth tracking arrangements). It’s sadly ironic that the security-minded people most likely to uncheck this box and experience this bug are the very same people most likely to set up S/MIME and expect it to work.
Security credentials which worked perfectly between OS 10.4 Tiger and OS 10.11 El Capitan no longer work!
As of macOS 10.12 Sierra and all macOS versions released since, Apple changed the security requirements Mail 10 and later consider acceptable for a properly formed S/MIME certificate. On the older OSes and versions of Mail, it did not matter whether the Key Usage Extension (KUE) was present or not. Now it matters. Unfortunately if your existing certificate lacks a properly filled out KUE (signature and key encipherment checked), it cannot be made to work with Mail 10 in OS 10.12 nor any newer version released to date (last update date of this article), including Catalina. You will need to create/obtain a new certificate with a proper KUE. As of end of August 2017, i have updated the older pre-Sierra OS/Mail pages with the currently-correct KUE information, with the Sierra and later pages having the correct information since initial release, to help with the process. The good news is that your new cert will not only work on the newer macOS versions, but will work all the way back to OS X Tiger 10.4.11/Mail 2.1.3, like your old KUE-less one used to.
As of the moment, the Extended Key Usage Extension (EKUE) remains optional, as does the Subject Alternate Name Extension (SANE). It may not hurt to leave them at the Certificate Assistant defaults, which don’t harm anything and look legit moving forward to the future, in case either or both become requirements later on.
Mail offered to change the Trust Settings to fix the problem and Didn’t, or Made Things Worse!
Allowing Mail to change the trust settings of a certificate has not worked correctly since OS 10.6 Snow Leopard, and since 10.13 High Sierra, things have been worse (see earlier OS articles for what used to happen on those).
No matter what is going on with security, when you first open an email message with a signature, as described in the second item in this section, you will always see this banner:
Per the second bug listed in this section, always, before doing anything else, tap the button. You may still see this:
It’s OK if you want to look at the details, but do not under any circumstances use the handy and extremely broken checkbox Mail gives you to fix the problem. This would be very elegant if it actually worked, but as noted, it hasn’t ever actually worked except in the OS 10.6.x Snow Leopard series (and maybe in early 10.5.x Leopard before Apple totally 100% broke S/MIME in that OS).
The bottom line is that Mail cannot be trusted to modify certificates. If you find yourself needing to make changes, you must make them in Keychain Access if you want things to work properly:
- Quit Mail, if it is running.
- Open Keychain Access. Double-click the troublesome certificate (the one you received from someone else and mistakenly tried to trust within Mail).
- You should see “When using this certificate” set to “Use System Defaults”, and all items beneath set for “no value specified”. If so, skip to step 5. Otherwise continue.
- Change “When using this certificate” to “Use System Defaults”. Close the certificate window to save the changes (very important), authenticating as needed.
- Open or re-open (double-click) the certificate and its trust settings area. Change both and to . Close the certificate window to save the changes.
Anyone at Apple wanting to look into this should check my Radar bug, #11742852. This bug was reported 25 June 2012 and as of 1 August 2020 is still not fixed, making me wonder whether 20-teens 2020s Apple ever fixes its bugs (wrote the former 1990s Apple software QA tester). The new bug for the spurious Load Remote Content issue was 44211476, which was closed as a duplicate of 40092662 which i’m not allowed to see because that one’s not my bug, though it too appears to be closed and things are not working.
It would be really nice if Apple finally fixed these bugs, before Apple abandons Catalina… Mojave… High Sierra… Sierra… El Capitan… Yosemite… Mavericks… (etc. sigh etc.). Feel encouraged to send Apple feedback if you’d like to see these bugs fixed.
Can’t Encrypt an outgoing email message: Can’t Lock Padlock
Many things can cause this failure, esp. in Lion and all newer OS X and macOS versions, so far. Here are the ones i know:
- Do Not change Trust settings via Mail! See the item above.
- With Lion and all newer OS X/macOS versions through (so far) Catalina, one has to explicitly trust both the recipient’s and the sender’s security credentials in Keychain Access. Even though the message is being encrypted to the recipient using the recipient’s public key (in their certificate), i have seen a case where the sender’s Mail refused to allow the padlock to be locked until the sender’s certificate was fully and correctly trusted in Keychain Access.
- Verify that the recipient’s certificate allows for encryption. For Sierra and newer, the certificate must have the Key Usage Extension, and Key Encipherment must be selected (the default since High Sierra, but not Sierra or earlier).
Comments? Found an error? Let me know, and i’ll see what i can do.