Secure Email Setup for Mail 4 & OS 10.6 Snow Leopard
Snow Leopard Works!
Snow Leopard OS 10.6 is the first OS X version with the revised security interface which actually works, thanks to the end-of-run crasher bugs which broke OS 10.5 Leopard. This new security arrangement has been successful enough that it has been retained, with few alterations, through at least OS 10.9 Mavericks.
The following instructions have been formulated running OS 10.6.8, its Mail 4.5, Safari 5.1.7 (should still work with 5.1.10), Keychain Access 4.1.1, Certificate Assistant 3.0, and all current updates to these items as of 23 Feb. 2013. They should work with any earlier versions of OS 10.6 and its components, though these have not been tested thoroughly. These instructions will probably continue to apply to any later updates as well, though versions newer than those listed above have not been explicitly tested by me.
These instructions assume you already have at least one working email account set up and properly operating in Mail (in the usual insecure manner of standard Internet email). If you don’t, please go set it up and test it now, following Apple’s/other’s instructions.
Creating a Self-Signed S/MIME Certificate-key pair
- Quit Mail, if it is running.
- Open Keychain Access (from the Utilities folder). From its eponymous menu, select and :
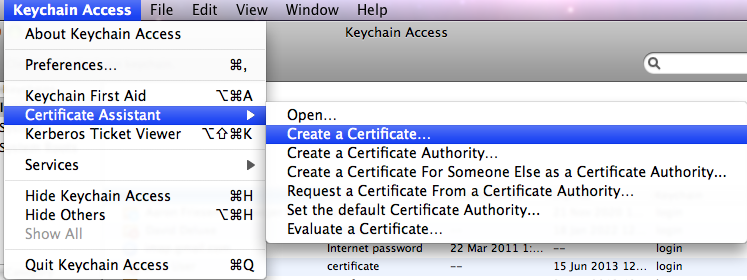
- You’ll be presented with the window:
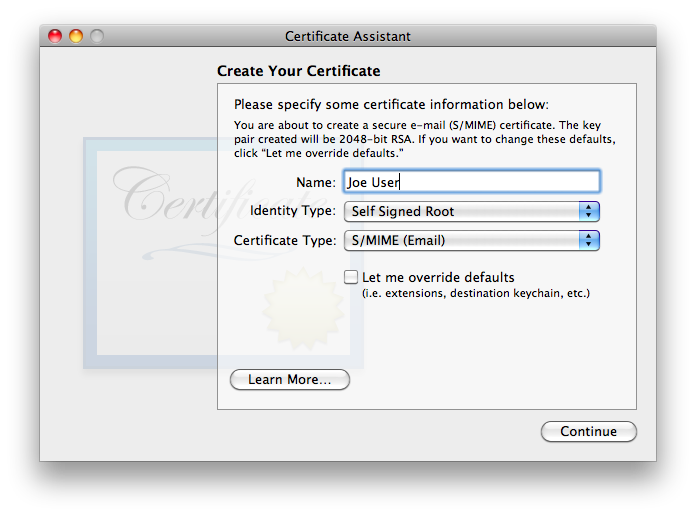
is exactly the type of certificate we wish to create. Given that S/MIME (Email) is most definitely the Certificate Type we want, one might think that it would be OK to merely verify the name and click . But Apple chose inappropriate default settings, so default certificates can never work correctly! The biggest problem is that Certificate Assistant never asks for/confirms the email address, without which the certificate is useless for email! In many (but not all) cases, Certificate Assistant fails to insert any email address whatsoever into a default certificate, rendering it useless for email. Even in cases where Certificate Assistant finds one or more email addresses, when there is more than one, Certificate Assistant does not allow the user to select which one to use. Equally severe, Apple neglected to default select Key Encipherment for the Key Usage Extension, so even if the email address is present and correct in the default certificate, it cannot be used for encrypting outgoing messages… only for signing them. As of this writing, Apple has not fixed this problem, all the way through the most recent version tested, OS 10.9 Mavericks. Note that even though OS X versions 10.6 and later now contain an added layer of complexity to work around these mistakes, this added layer is not backward-compatible with older OS X versions! It is also unlikely to be compatible with non-Apple systems.Even if Apple hadn’t made the several errors which render a default certificate useless for secure email, the default lifetime for the certificate is set for one year. Most people will find renewing their certificate each year—and getting all their correspondents to renew it as well!—a huge hassle not worth undertaking. For all these reasons, be sure to check .
- Click , and you’ll see:
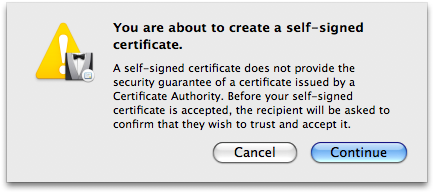
If, after reading Apple’s warning, any of you are not comfortable at this point and want to go to the trouble of paying a reliable Certificate Authority (CA) for a guaranteed certificate and following their instructions for installation, or wish to hunt around for any CAs who may be still offering free certificates for personal use (and jump through their hoops), by all means go ahead… see ya ’round! The rest of us will simply click and move on. - Because of the necessity of overriding the defaults, you’ll now be presented with a series of detailed settings windows. The first of the series of detail windows——asks you to fill in basic information:
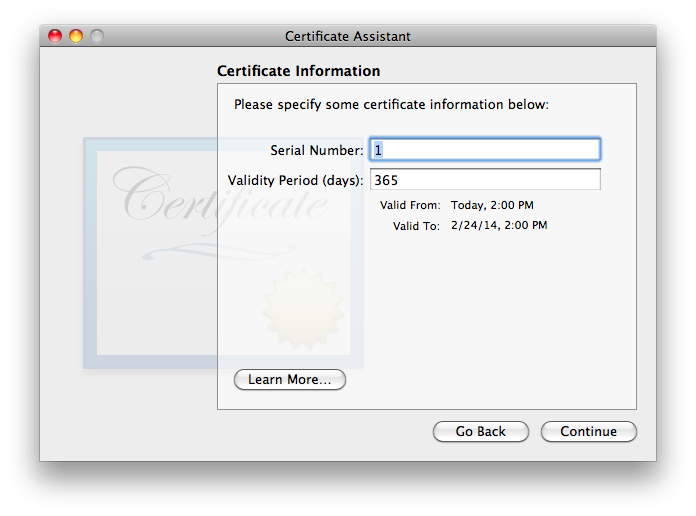
I have not found that the Serial Number matters, in my testing. If you think you may wind up having multiple certificates for the same user name and/or email address on one system, it is probably a good idea to ensure that the serial numbers differ (though i did not find any issues in brief testing where they were the same). I strongly recommend choosing a longer Validity Period, to minimize the hassle of re-creating a new certificate, distributing it to all your secure correspondents, and getting them to do the work to get the new one trusted on their system(s). The tradeoff with a longer time is that there is a much longer time span over which the valid certificate may be compromised by some malefactor getting ahold of your security credential set (certificate + public & private keys) and pretending to be you. I’m finding that 10 years is working as a decent compromise, so i usually fill in the box with 3652 (approximately 10 years, measured in days). Once these items are verified/set, go ahead and click . - The second Certificate Information window asks for “personal information […] to be used in the certificate”. As discussed in the Points common to all OS versions section, the only essential item is the email address. Entering a Common Name is highly recommended, as it will make it easier to find the certificate in keychains, on backups, etc. The other items are optional. They may be filled out frivolously, though if the certificate might ever be used for other purposes or on non-Apple systems, there might be cases of failure if certain fields do not match reality (or at least expectations). Note that all this information becomes part of the certificate you’ll be sharing with the outer world.
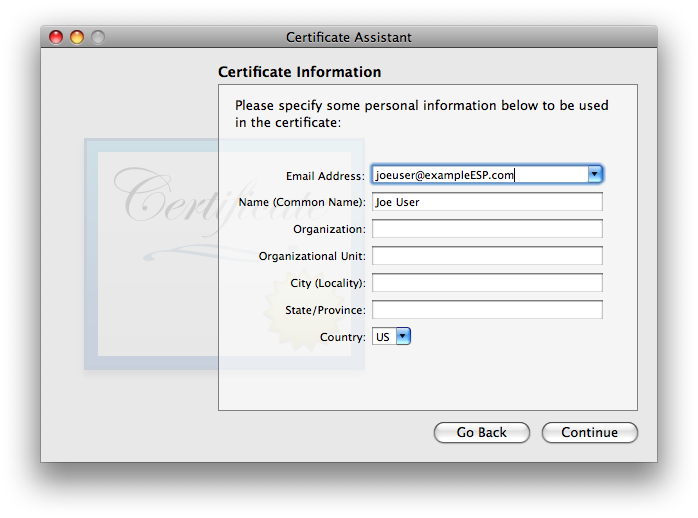
click when finished. - You will now be asked to approve . The defaults of 2048 bits key size and RSA algorithm are good (to the point that i did not bother testing any other options. The new ECC option looks intriguing, but it would not be backwards-compatible with Leopard 10.5 nor Tiger 10.4 systems, and possibly not with non-Apple systems, therefore i cannot recommend it). These values are generally regarded as secure (as of the creation date of this article). 2048 bits is the largest (most secure) option for RSA on all versions of OS X from Tiger through Mavericks (and hopefully will remain compatible with newer OS X/Mail versions released in the future).
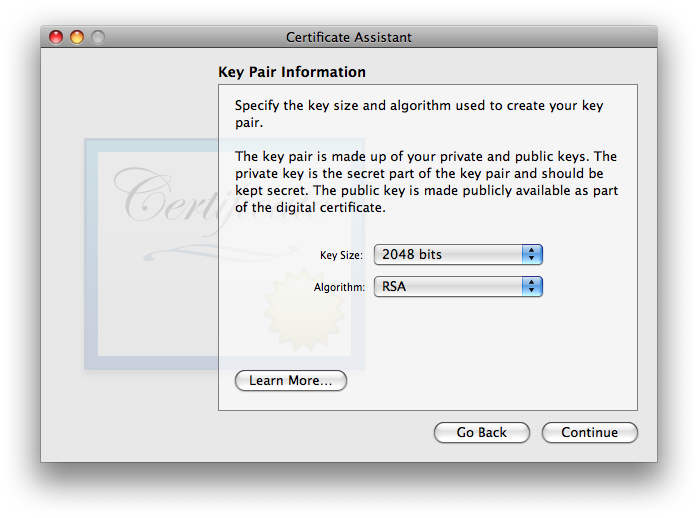
Click . - Next you’ll be offered the settings. Details for this extension are discussed on the separate page X.509 v3 Certificate Extensions. Here again, Apple made a mistake: the certificate cannot work for encrypting outgoing email messages unless Key Encipherment is selected!
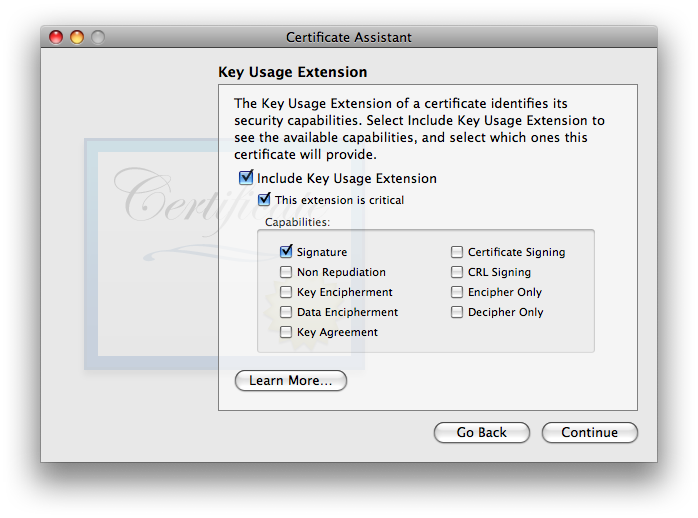
I used to recommend disabling (unchecking) “Include Key Usage Extension”, however due to changes made by Apple as of 10.12 Sierra, the Key Usage Extension MUST be included for a certificate to be valid. If you wish for your certificate to work on Sierra or newer as well as all OS X/Mail versions back to 10.4 Tiger/Mail 2, you must enable Key Encipherment (and leave Signature enabled). Once you’ve made your selection(s), click . - Next you’ll be hit with the settings:
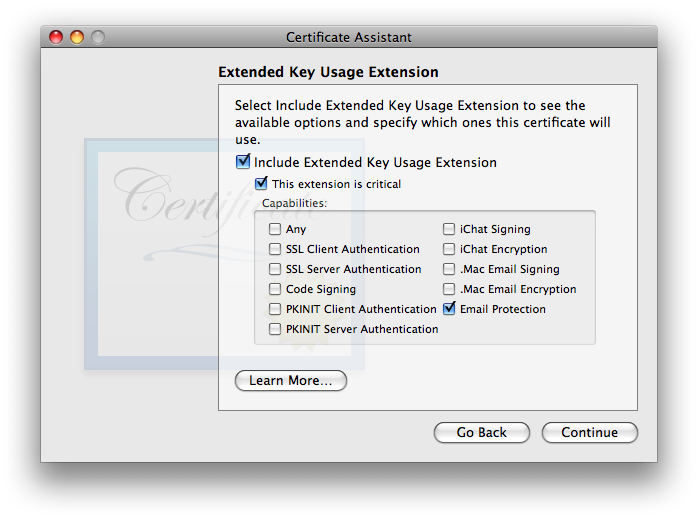
This one’s defaults are OK. It is OK to include it if you want, or disable it if you want—both ways work, in my testing. I tend to leave it engaged with settings as shown, in case future software starts to get picky about seeing specific usages indicated within certificates. As always, click to move on. - The gets us back into a controversial area where the experts are not in agreement. Some say that this extension should always be enabled and “Use this certificate as a certificate authority” (which will appear in this window when Basic Constraints is enabled) should be checked, for all self-signed certificates. Others disagree. In my testing, i left it at its default—disabled—and things worked fine.
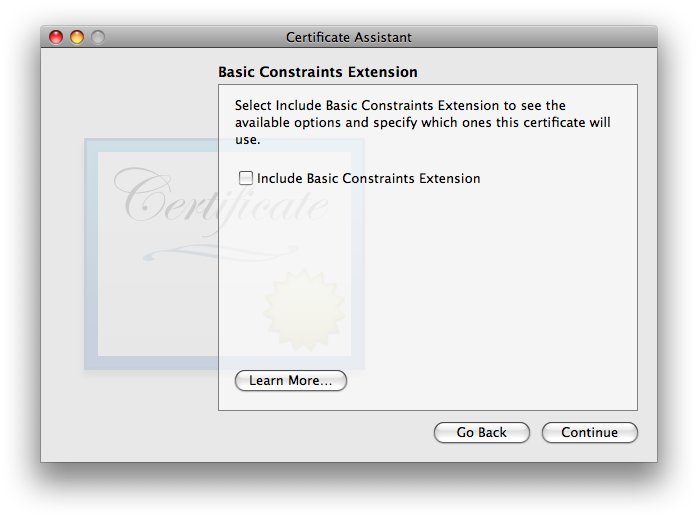
- The last of the array of extra-work-making extensions is the (which i’ll abbreviate: SANE):
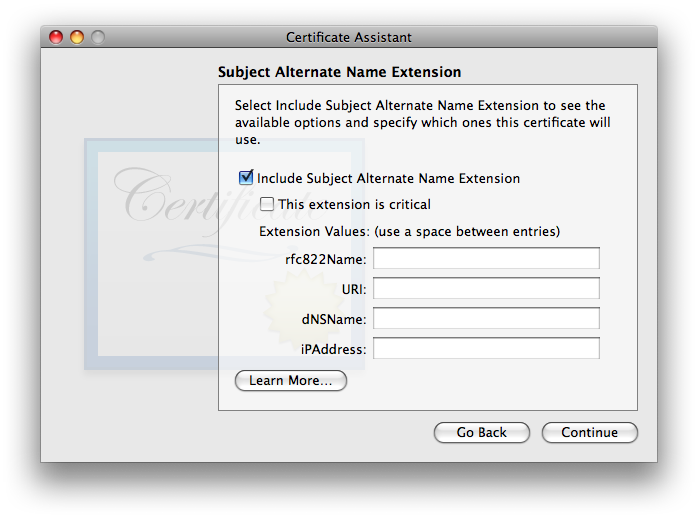
As discussed in the SANE section of the X.509 v3 Certificate Extensions page, SANE is not required. I did a lot of testing with and without it, with no difference in results. If it is used, it is essential that the rfc822Name field include the same exact email address as listed above under Certificate Information. Normally, Certificate Assistant fills this in automatically and correctly, so all you’ll need to do is double-check it. If for some reason it shows up empty as in the screenshot above, carefully type it in, correctly: just the you@youresp.com part… nothing else. Once you’ve made your choices, click . - Finally, Certificate Assistant will ask you to :
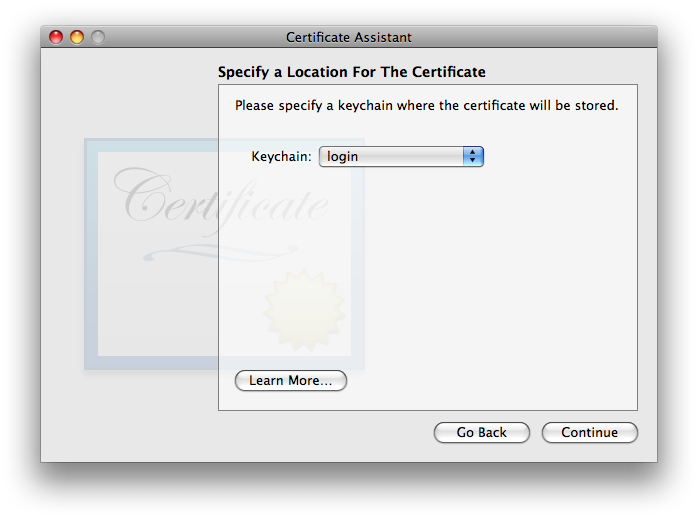
The default location of the login keychain is the correct answer. When you click , Certificate Assistant will now (finally) create the usual three items in your login keychain: the certificate, your public key, and your private key. See New Security Credentials part of the Points common to all OS versions section of the main article for further information.
Trusting a Certificate
Your public and private keys need no further attention—they’re ready to run. All they need to do is sit there on your system and work.
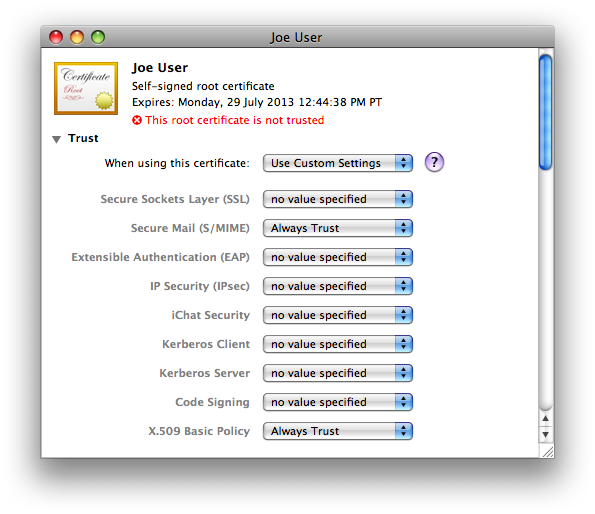
In Keychain Access, looking at your login keychain, double-click your newly-made certificate. The red x on it should make it easy to find, or you can select the category in the lower left column to filter out items in the main window frame which are not certificates, to make it easier to find. Click the arrow next to the word Trust just below the certificate icon, and the trust options will be revealed. Here’s what they’ll look like at first:
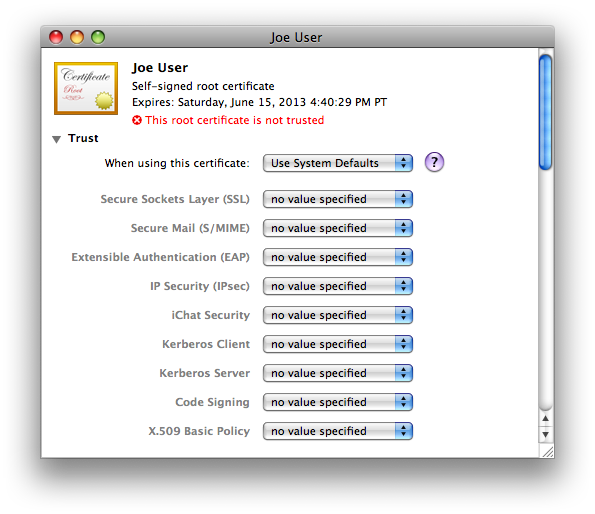
- Secure Mail (S/MIME)
- X.509 Basic Policy
Preserve Your New Security Credentials: Back Up!
Now is the time to back up your new certificate, public key, and private key, archive them, or both!
Please see Backing up your new security credentials on the common page for all the step-by-step details.
Other Machines?
As discussed in the Sharing One Set of Credentials with Other Machines part of the Points common to all OS versions section of the main article page, one set of email security credentials should be used on all devices you own.
The easiest and possibly best way to do this is to place a copy of the keychain you made with your 3 security credentials on each device and import the items from there. Here’s how it works moving these credentials to a different Mac:
- Place a copy of your secure email credentials keychain on the Mac. I tend to put it on the desktop.
- Double-click the credentials keychain file. Keychain Access should open, and the keychain should be visible in the list, shown locked.
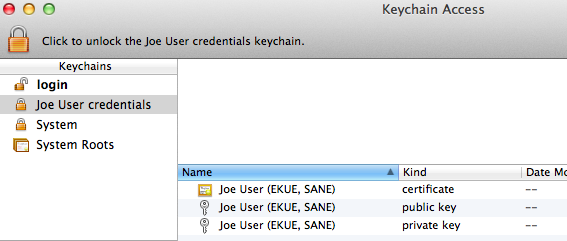
- Select the credentials keychain. Select all 3 items (certificate, public key, private key) within the keychain and drag them to the login keychain.
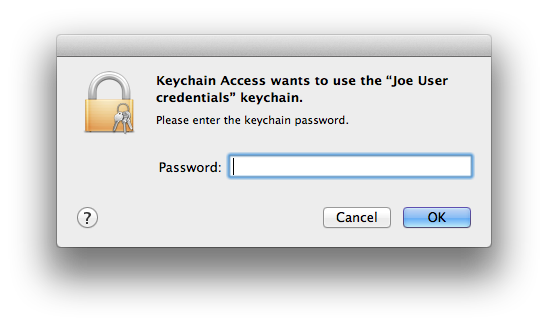
- Keychain Access will now ask for the password/passphrase for the credentials keychain. Enter it.
- A sheet will drop down in Keychain Access asking whether you want to trust the imported certificate. Interestingly, the only option listed is X.509 Basic Policy. It doesn’t really matter whether you select or cancel out of this offer by selecting .
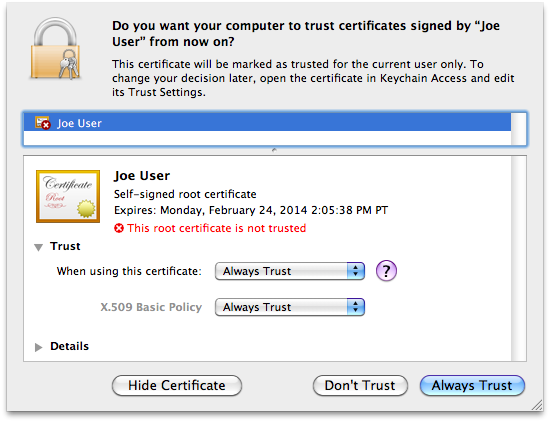
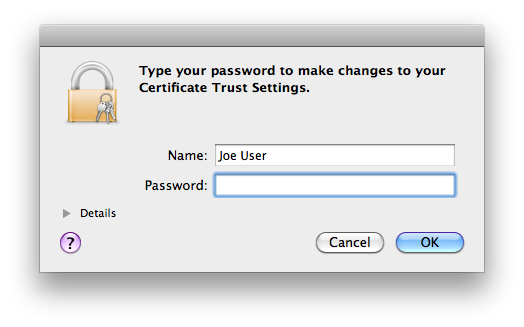
- If you chose to Always Trust in the last step, you’ll now need to OK a change of certificate trust settings with your current OS X user credentials.

- The certificate is not ready for email yet. Double-click it in the login keychain. Be sure both and are set to . Close the window.
- You will (maybe again) see the change to certificate trust settings window. OK the change of certificate trust settings with your current OS X user credentials.
- Delete the credentials keychain (now empty) from within Keychain Access via the option in the menu.

Select to get rid of both the references inside the Keychain Access application itself and the actual credentials file, now empty (you did use a copy of this file in the first step of this sequence, didn’t you?). The deleted keychain might vanish immediately or remain in the list of keychains until Keychain Access is quit and reopened (no need to do that now), depending on things like permissions. - Quit Keychain Access. Done!
If instead of saving the 3 credential items in a separate keychain you exported each item individually, you will need to use in Keychain Access on each of your backed up/archived .cer, .pem, and .p12 files for the certificate, public key, and private key, respectively.
Due to bugs in Keychain Assistant (and/or the security infrastructure) for OS X all the way from Tiger through Lion, during my testing the certificate went in to the new system just fine, but there was an error message for both the public and private keys:
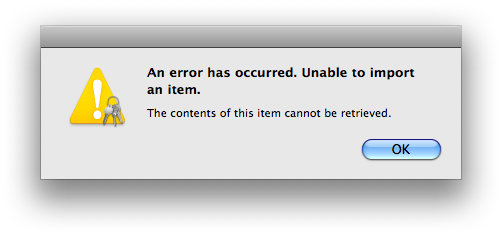
The private key went in despite this error message; the public key did not. This problem occurs whether i double-click the file in Finder or use within Keychain Access. Guess we’d better hope that the public key truly is redundant when importing to Snow Leopard systems!
Verify that Setup is Complete
This completes the setup for your email security credentials at your end. Quit Keychain Access. Launch Mail, and open a new message form. If all is well, you should see a new pair of icons in the lower right part of the header area, just above the white message body area:
![]()
Yours may or may not look exactly like the screenshot: your seal may have an x in it instead of a checkmark. If you have more than one email account and the currently-selected account in Mail is not the one for which you just created security credentials, both icons may be grayed out. As long as you see these two icons in some form (gray or black, selected or not selected), you have successfully completed setup. The final step is to exchange certificates with your correspondents.
Trusting Others’ Certificates
When you first receive an email message with a new, self-signed certificate, Mail will not be able to trust the certificate and will alert you to this fact, first with a banner:
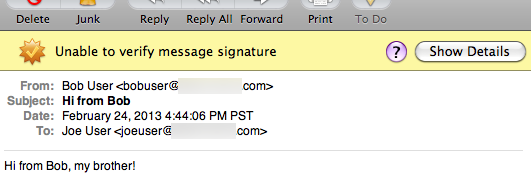
Click “Show Details” for a bit more information:
![“Mail was unable to verify the authenticity of the S/MIME certificate provided by [sender’s email address]…”](etc/Unabletoverifyinitial.png)
Finally, click Show Certificate:
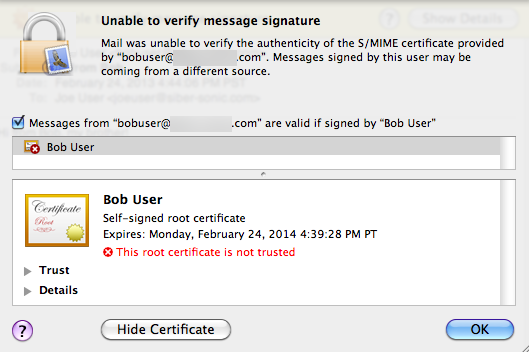
Starting with OS 10.6 Snow Leopard, this alert sheet contains a handy checkbox item: “Messages from ‘[other person’s email address here]’ are valid if signed by ‘[name of certificate associated with other person’s email address]’. Select this checkbox and OK the notification. You’ll be presented with your OS X user account authentication dialog window:

Close the message in Mail, reopen it, and you’re all good (and yes i did test logging out/in on the OS X user account as well as restarting the Mac: unlike the earlier OSes, the change holds: bug fixed!). You’ll see that it is now trusted—the warning banner will be gone and the message will be marked “Signed”.
This new checkbox in Mail is making the same changes behind the scenes that were made manually for trusting one’s own certificate: selecting “Always Trust” for Secure Mail (S/MIME) and X.509 Basic Policy.
Bugs and Problems
Elliptical Keys Don’t Work
By chance, i discovered this during late summer 2018 testing. The whole elliptical key infrastructure was new as of Snow Leopard, so sadly we’ve been brainwashed acclimated to “1.0” releases not actually working. Such is the case here. Actually, Keychain Access and Certificate Assistant are all good with all 3 ECC key size options. It’s Mail that can’t handle them. Specifically, Mail can’t decrypt messages encrypted with the user’s own public key.
If elliptical key support is important to you, Snow Leopard and its Mail are not the choice for you. Read the Key Size, Algorithm, Security, and Compatibility Considerations for S/MIME in Apple Mail Mac article to find out which version might work for you.
Sent messages fail to display their security line until they are closed and reopened
This one to me is trivial enough that i did not come across it until doing some retesting in summer 2016. Let’s say a user wants to check their Sent messages, to find out whether they signed, or encrypted, or both, a particular outgoing message. The bug: the first time the message is opened, in the sender’s Sent box, no Security line displays, no matter whether the message is signed, encrypted, or both—or neither. Closing and re-opening the message shows the correct Security line. Once this is done, this user can re-open the message any time just once as usual, and see the correct Security line. Quitting Mail and/or signing out of their OS X account do not change this: every single time after that first opening, the Security line will display correctly.
To clarify, this is for sent messages in that user’s Sent box. Incoming messages in the Inbox display correctly first time, every time.
As of the most recent revision of this article, i am not aware of any other bugs (beyond the incorrect certificate extension defaults discussed above) in Apple’s self-signed secure email implementation for OS 10.6 Snow Leopard and Mail 4 (and only one related to running a Certificate Authority, covered in that article). If you’re very, very sure you’ve found one, let me know, and i’ll consider adding it here if it seems to be of general interest and i can reproduce it.