Be Your Own Certificate Authority
Create/distribute S/MIME secure email certificates for others
Without question one of the greatest challenges in terms of real-world usage of secure email is getting your correspondents to set things up on their end. People are busy and have other interests, and may not share your personal desire to securely exchange email messages unless you make it dirt-easy for them.
Fortunately, Apple seems to have considered precisely this situation! They’ve built in some very nice abilities into their Certificate Assistant software, allowing you to become your own Certificate Authority (CA) and create viable S/MIME email security credentials on behalf of other Mac users—securely and remotely—with little effort on their part.
Unfortunately, Certificate Assistant and Keychain Access and the whole security infrastructure remain a buggy minefield of GOTCHAs. I’ve done the best i can (as an uncompensated volunteer documenter) to find, track, and test various functions, but there are simply too many possible ways of doing things and too many bugs which i find hard to reproduce to provide you an iron-clad, guaranteed path to success. What lies below is my best effort, with all the workarounds i could find.
Overview
- Set yourself up as a Certificate Authority
- Let your correspondents know that you’re now a CA and ready to create certificates for them. Normally when you do this, you’ll include a configuration file which will make the process easier for them.
- Have each of them send you a Certificate Signing Request (CSR), which process itself securely generates their public and private key pair right there on their machine
- Use their CSR and your Certificate Assistant software to create their signed certificate, and send it to them
Warning: Serial Numbers Matter when you’re your own Certificate Authority! I found out the hard way that Certificate Assistant and Keychain Access will not allow more than one certificate from a given CA to share the same serial number—including the root CA certificate.
Be certain you keep track of serial numbers for all certificates issued by your CA! By default, copies of certificates you create for others are placed in your own default keychain (except in OS 10.4 Tiger), so right there we have the potential for massive conflict!
Certificate Assistant’s counter for tracking serial numbers lives in its configuration file ([Name of CA].certAuthorityConfig). The counter intermittently counts when defaults are overridden when making certificates from this CA in Certificate Assistant, on a version-specific basis:
- 10.15, 10.14: fail with either kind of override: leaf certificate or CSR. Fabulous! 🙄
- 10.13, 10.12, 10.11, 10.10: works correctly with a leaf certificate override. Fails with a CSR override. Same as for 10.7 and 10.8, and likely 10.9.
- 10.9: not tested.
- 10.8, 10.7: works correctly with a leaf certificate override. Fails with a CSR override.
- 10.5, 10.6: fails with a leaf certificate override. Works correctly with CSR override.
- 10.4: works correctly with a leaf certificate (there really is not such a thing as defaults to override). Works correctly with CSR (there really is not such a thing as defaults to override).
Any certificates made with defaults overridden may not increment this counter! For this reason, carefully track all serial numbers on all certificates made by Certificate Assistant as a CA. You may need to re-do a certificate which pops out with an already-used number, overriding defaults or manually incrementing the counter in the .certAuthorityConfig (Plist format) file.
Warning 2: Back up your entire macOS before experimenting with this in macOS High Sierra, Mojave, or Catalina. There exists a bug which can create a Certificate Authority certificate which cannot be properly trusted and cannot be removed. If you get yourself into this bind, you’ll have to either go really deep into Terminal Land (e.g. Super Duper User), or revert to your backup from before you started playing with making a Certificate Authority in any of these affected OS versions. (It would be kind of you not to ask me how i know this.![]() ) While backing up is always a good idea, it’s far less dire a problem on OS 10.12 and earlier.
) While backing up is always a good idea, it’s far less dire a problem on OS 10.12 and earlier.
Create a Certificate Authority
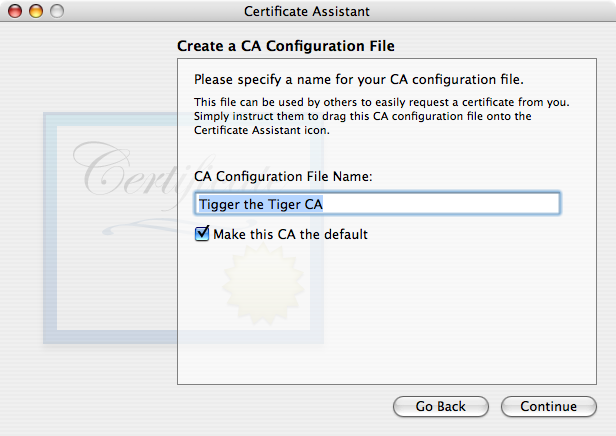
The steps are nearly identical for OS 10.5 Leopard through 10.15 Catalina. Tiger differs somewhat, though not enough that i feel the need to write out separate instructions. If in doubt for any OS version, compare these instructions for those for your OS and self-signed certificates and interpolate. Here’s how it works for OS 10.8 Mountain Lion (OS 10.8.3 and its Certificate Assistant 5.0):- If you would like to send out certificate invitations via email to other users immediately at the end of the setup process (not required), be certain that the email address you intend to use for your Certificate Authority is all set up and working in Mail.
- Launch Certificate Assistant (directly or through the menu of Keychain Access. Select .
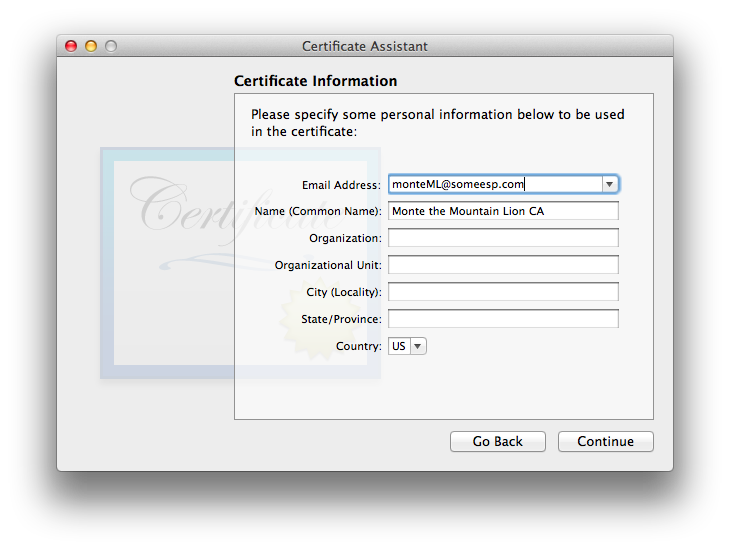
- Make the basic choices, such as the name of your CA and its email address.
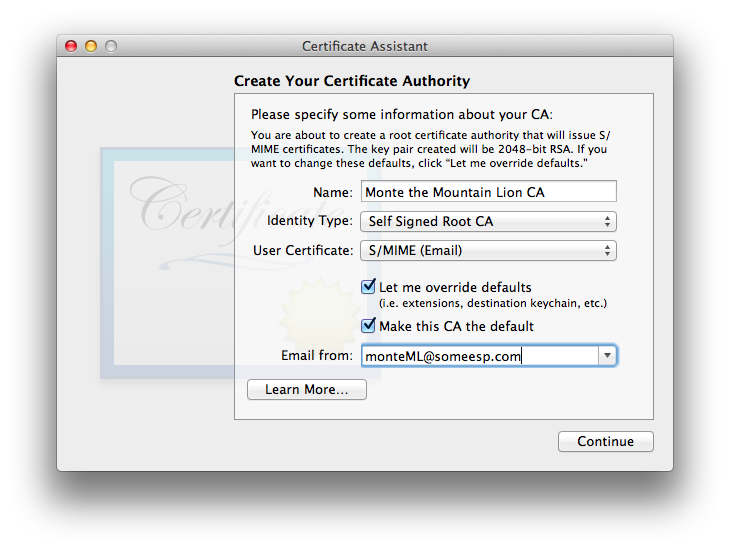
Be sure to check ! - Set the Serial Number and the Validity Period for your CA. Note that when your CA’s certificate expires, so do all subsidiary certificates created with it, so be sure to choose a sufficiently long time for the validity period.
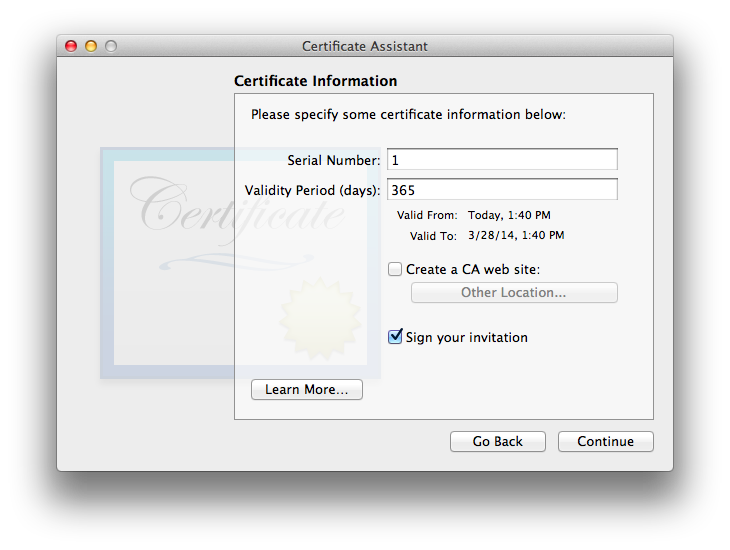
There is an option (default disabled) to “Create a CA web site”. This might be useful if you’re able to set up a secure website and plan to distribute certificates to a large number of people. I did not test this option.
There is also an option to “Sign your invitation”. This option will ensure that invitation emails you send out will be signed with one of your own pre-existing certificates (if you have any), so recipients will know that it came from you and was not altered in transit. Note that it is not an option to use the CA certificate itself for this purpose, as it has not yet been created. Even though it is shown selected in the screenshot, i do not recommend using this option. (I’ve found what i think is a better method, which i’ll explain below. You’ll sign, but not via this checkbox option. This option might also prevent interoperation with older OS X versions predating its existence, based upon limited testing i did.)
Note that issues new in macOS 10.14 Mojave and ongoing 10.15 Catalina make attempting to send an invitation email an exercise in futility. More exciting?: Certificate Assistant with these same OS versions insists on an email address in this window, even though it’s unusable for this purpose.
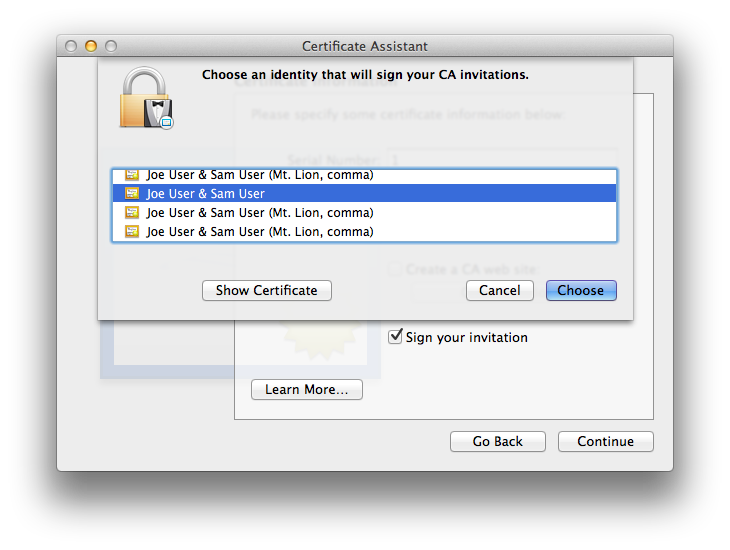
- If you have elected (against my advice) to sign your invitation(s) with a non-CA ID and Certificate Assistant finds you have at least one existing identity (set of certificate and key credentials for S/MIME secure email), a sheet will drop down asking you to select the identity which will be used to sign the invitation(s)(even if there is only one). Here is an example where there are several pre-existing options:
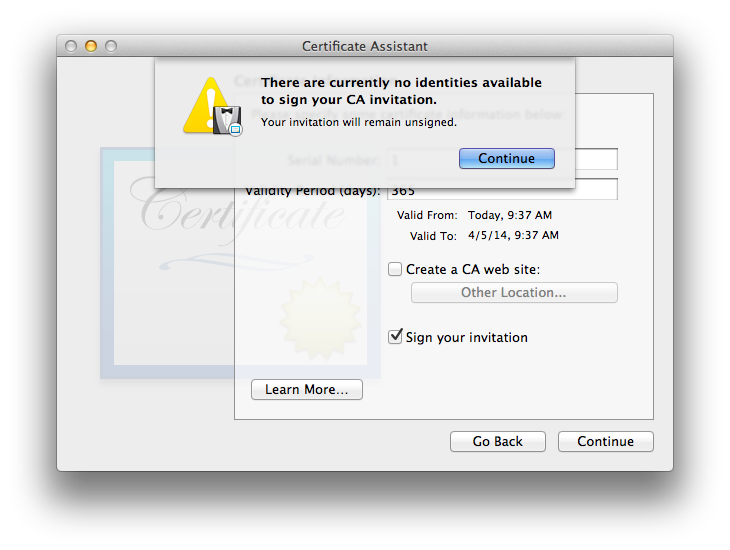
If Certificate Assistant finds no currently existing identity it can use, instead you’ll see:
- Fill out personal information for the CA, as you’d do for a personal self-signed certificate. This information will be part of all certificates your CA creates, as well as your own CA certificate. Consult the main article for further information if necessary.
- Next is the usual Key Pair window, this one for the CA itself:
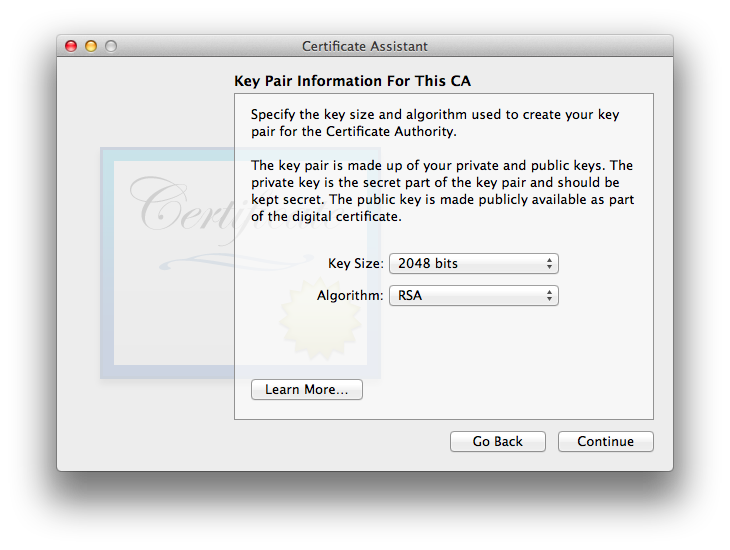
For greatest compatibility with other systems, i suggest using the defaults of 2048 bit Key Size and the RSA Algorithm. Actually, unless you’re only working with 10.13 High Sierra and newer systems, you will have to stick to 2048 for RSA when acting as a CA rather than each person doing self-signed certificates. If you’d rather use ECC, you may step one additional OS version back to 10.12 Sierra, but no further. These limitations are because the keys are actually generated on the end user’s system, so if it is an older OS, the older OS’s Certificate Assistant, Keychain Access, and Mail limitations all apply (mostly the first of those Cert. Asst. limitations).
Confused? Consult Key Size, Algorithm, Security, and Compatibility Considerations for S/MIME in Apple Mail Mac to ensure your choice will be compatible with and possible to implement on the macOS versions you wish to cover. Start with the Certificate Assistant Key Generation Options Chart to ascertain the capabilities of the older system, then check both the Keychain Access Ability to Utilize Chart and the Secure Email in Mail Chart to ensure there are no Fail indications for the key length and algorithm you wish to use (or if there is one, do your own testing if you want to try to work around it).
- You might think you have deja vu all over again when you click Continue and again see the Key Pair window. Notice that this time you’re making settings for your user’s credentials: the ones your CA will be making for them.
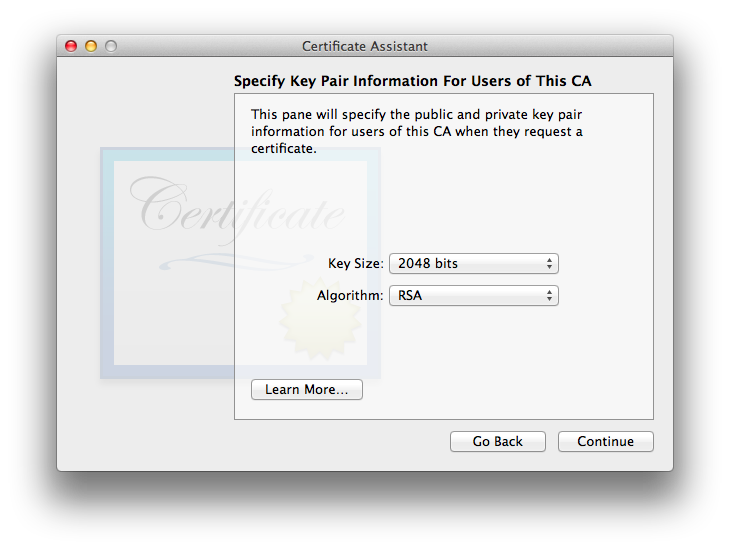
This information will go into the settings file on your system and to be sent to your “customers”.Note that some OS versions including 10.14 Mojave and 10.15 Catalina ignore this setting. - Next you’ll be setting up the Key Usage Extension (KUE) for this CA, if you use it.
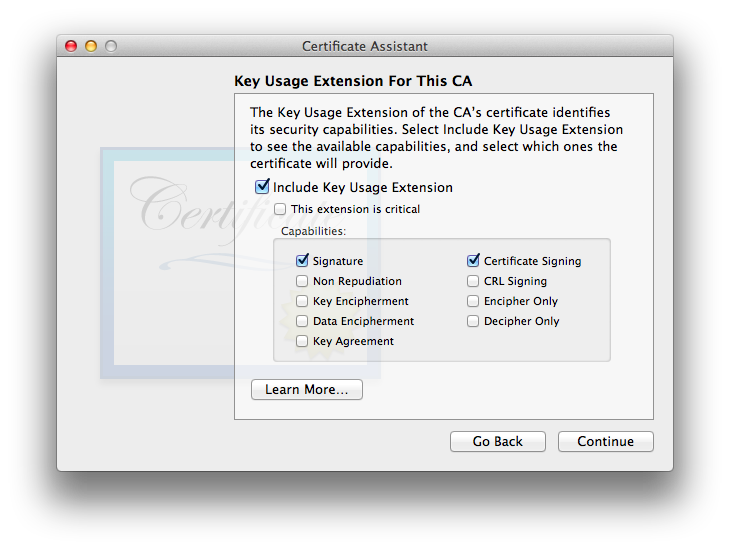
Believe it or not, the defaults as shown will actually work, as long as the CA certificate is not itself used for S/MIME. The general idea is that the CA certificate is reserved for only creating and signing other certificates, in which case the defaults as shown are fine. It is also OK to omit the KUE entirely, again as long as you’re not using it for S/MIME, or at least not on OS 10.12 and newer. (Most of my testing included the KUE for the CA, with the defaults shown and most often additionally Key Encipherment, to allow others to encrypt messages to the CA email address.)If you intend to use one certificate for the CA and as an end-user certificate for S/MIME email, you will need to select if you choose to use this extension, as is the case for individual self-signed certificates, or omit this extension entirely (no longer recommended, since Mail for Sierra requires a valid S/MIME KUE). (I did very little testing omitting the KUE entirely for a CA certificate.)
Note: This is currently an exercise in futility with Certificate Assistant 5.0 for Mountain Lion through El Capitan, as it has a bug. Read all about it below.Thankfully this bug appears fixed with the newer build of Certificate Assistant 5.0 included with OS 10.12.The new(er) bug in Certificate Assistant 5.0 with macOS 10.14 Mojave and newer (tested through Catalina) is that even when Key Encipherment is not selected (as shown in this screenshot), the resultant certificate has it anyway. So much for Apple’s working “engine” code respecting its own GUI! - Since you’re also creating a template (settings) file for your CA users as well as creating your own certificate, you’ll now be presented for the KUE options for your users. The same considerations as for a self-signed KUE apply here, which is to say: be certain to additionally check if it is not already checked. If you have any doubt, please re-read the KUE information in the main article. I’m omitting a screenshot of the User KUE window as it looks exactly the same, other than its title and explanatory text (user vs. CA).
- Next is the Extended Key Usage Extension (EKUE) for the CA (except on Tiger. See Version Quirks):
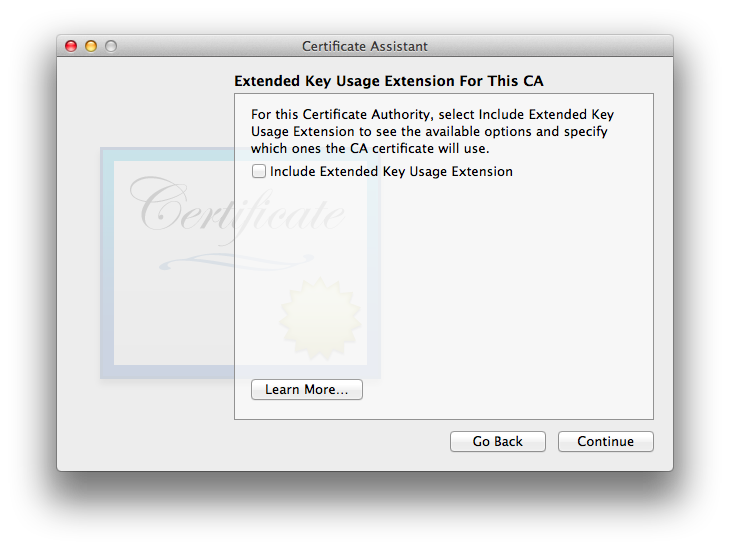
Interestingly, the EKUE is not included by default for the CA, and if one enables it, its default option is “Any”, which is nearly (but not exactly) the same as not having the EKUE at all… the difference being that having the EKUE set to “Any” explicitly declares any ability for the certificate, whereas having no EKUE leaves things undefined. From what i’ve read, in most cases the real-world interpretation of no EKUE is the same as having it and explicitly allowing any abilities for it. I suggest going with Apple’s default of omitting it for the CA. - Points to you if you already know that you will now see the EKUE options for the CA’s users. No screenshot because it is the same EKUE window as for a self-signed certificate, other than the title. The defaults are the usual Apple S/MIME defaults of including the EKUE, marking the extension as critical, and assigning (limiting) “Email Protection” capabilities to the certificate.
You may leave it at its defaults or disable the EKUE entirely, as you wish. As of this writing, i find no particular benefit to either option (tested only between various Macs running various OS X and Mail versions). As of about 2018 i stopped testing omitting the EKUE: Apple has repeatedly included it as the default, so whether or not it is required today (or recently), it likely will be required in the future. My testing since this time always included/includes the EKUE.
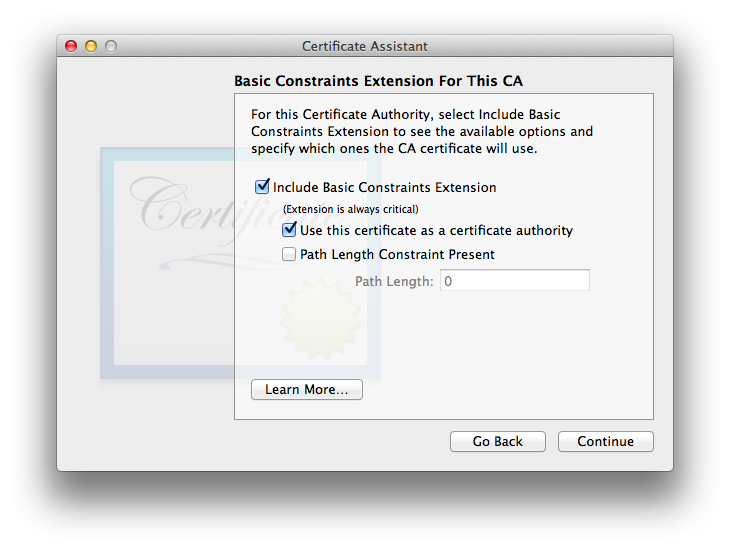
- The Basic Constraints extension for your CA is absolutely essential! You should not touch its default settings (enabled, “Use this certificate as a certificate authority”).
The Path Length Constraint Present setting exists to place a limit on the number of certificates which may be in a certificate chain and still be considered legitimate. It is beyond the scope of this article. Its default (omitted) allows certificate chains of any length. - Once again you will now see the same thing for your users: the user option for the Basic Constraints extension. As discussed in the sections on individual self-signed certificates, the Apple default is to omit the Basic Constraints extension for end-user certificates, and i’ve found that doing so works well. Again, no screenshot because it looks the same other than being disabled by default and the title indicating that it is for the end user, not the CA itself.
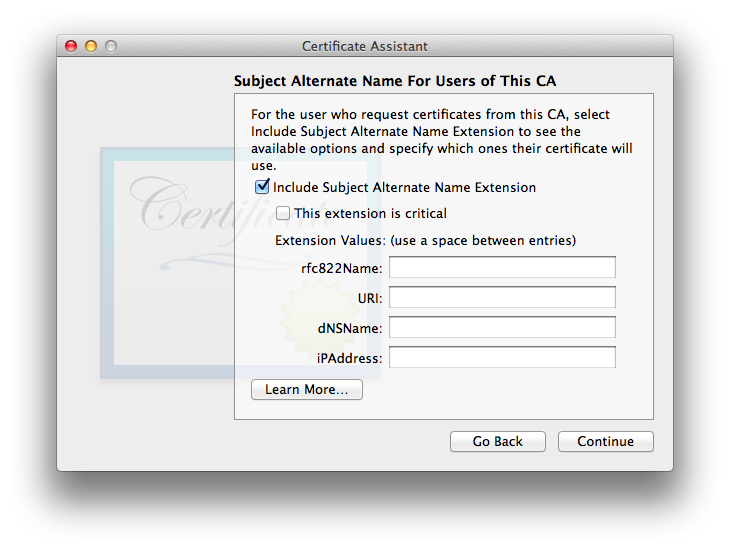
- The Subject Alternate Name Extension (SANE) for this CA is disabled by default (and for that reason, no screenshot here). I recommend leaving it this way and moving on.
- The SANE for the users of the CA presents an interesting conundrum: is the Apple Certificate Assistant template smart enough to drop in the correct email address for each end user as their new certificate is created by this CA? Answer: Yes, it is… at least in my testing (single email address per user), for Certificate Assistant 2.0 (Leopard 10.5) and newer (but not Certificate Assistant 1.0 for 10.4 Tiger).
- Now you’ll need to specify a location for the CA certificate (and keys). The default is the OS X user login keychain, and so far in my testing that appears to be the correct location.
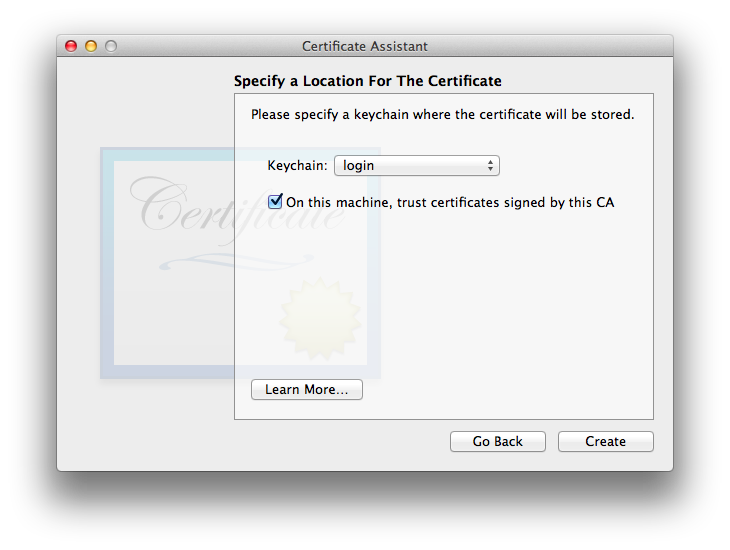
As long as you’re on OS 10.12 Sierra or earlier, might as well select the checkbox for “On this machine, trust certificates signed by this CA”, where it is available (All OS X and Certificate Assistant versions except Tiger and its Cert. Asst. 1.0). Do not do this on OS 10.13 High Sierra or later (tested through 10.15 Catalina)! Apparently this wasn’t tested (or not sufficiently tested) with the improved security infrastructure of these more recent OSes. See the trust bug for details. - One OSes with the checkbox, when the box is checked we just made a change to System Certificate Trust Settings, so we’ll see the dialog:
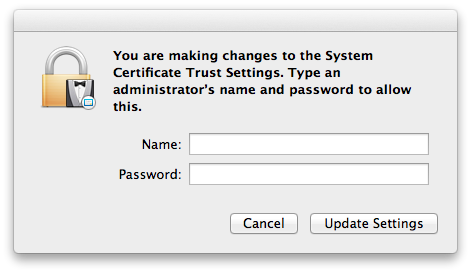
The exact wording and appearance of this dialog window differ across OS X versions, but the general idea is as shown above for Mountain Lion. Cancel this in High Sierra or newer macOS versions (at least through Catalina, the most recent version tested so far) if you make a mistake and wind up here, or you’ll be in a world of woe! - Tiger Only presents a window for the user to diddle with the configuration file name.
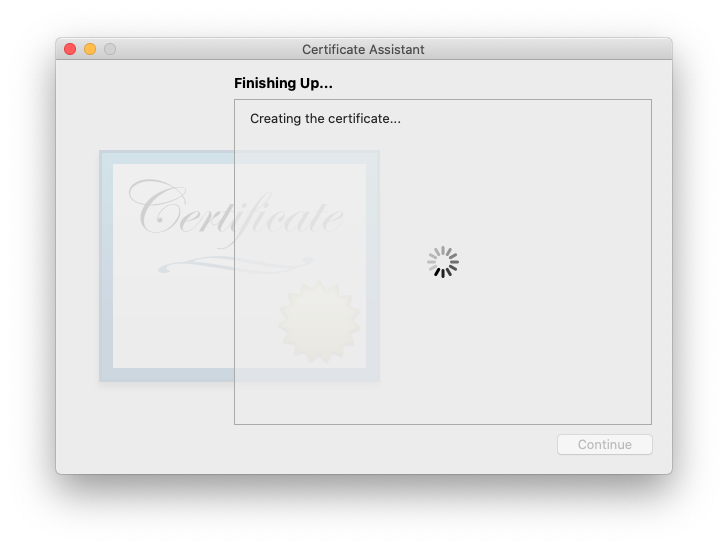
- Finally, we’re done: the Conclusion window appears:
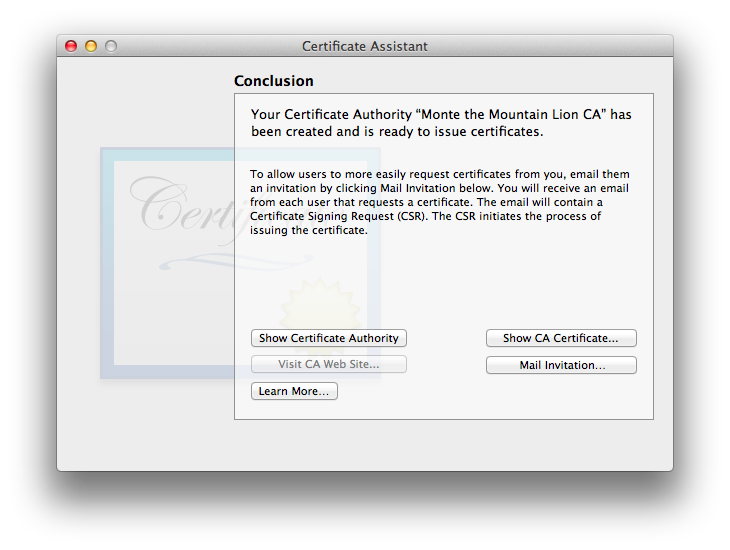
Besides letting you know you’ve been successful creating your CA, this window has several buttons (4 for all OSes except Tiger) plus a “Learn More” button with helpful additional information.There is a button to , which opens up the Finder window with the CA settings file and certificate. This window is the same for Certificate Assistant 2.0 for Leopard through Cert. Asst. 5.0 for Mountain Lion and newer to date (example just below. Tiger has a more primitive version of the same idea, also discussed below). On all versions except Tiger, if a website was set up for the CA, the button will be enabled. Also on non-Tiger versions, there’s a button, which shows the content of the new CA certificate. Finally, and potentially most usefully, there is a button to (says “Mail Configuration File…” on Tiger Certificate Assistant version 1.0). This option will be discussed further in the section CA-Initiated Email, below, and in the next item.
Due to the Certificate Assistant vs. Mail bug in OS 10.14 Mojave and 10.15 Catalina (and maybe later), the Mail Invitation… button is broken. You’ll have to create and send your invitations manually. - Before closing the Conclusion window or quitting Certificate Assistant, you may want to click the button, since there’s no good easy way to get back to this point once the CA creation process is finished, to obtain Apple’s (mostly) nicely-worded text. What happens next depends whether or not you previously set up the CA’s email address (the one you just typed into this new CA certificate).
- If the CA’s email address on the certificate is already properly entered into Mail, you may see (depending on your OS version) the padlock (unlocked, because you have no existing S/MIME certificate for the user you’re inviting, else why would you be creating one as a CA?) and starburst seal (checked) icons in the Mail invitation message form. (If you have more than one email address set up in Mail, be certain you’ve selected the CA’s email address as the From: address.) If this is what you see and you have all the recipient email addresses ready to go for people for whom you’ll be making certificates (at least right now), go ahead and enter their information into the To: and/or CC: lines and send out this invitation message.
- If you do not see the security icons or do not have the recipient addresses available or for any other reason are not ready to send out invitations, Save the message as a Draft—don’t send it just yet! (You don’t even need to enter recipient email addresses at this time.) I’ll explain below.
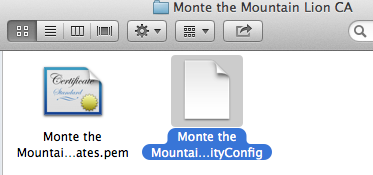
Certificate Assistant successfully creates (except on Tiger) both the settings configuration file and the .pem (Privacy Enhanced Mail) certificate file in the default location:
~/Library/Application Support/Certificate Authority/[folder: name of CA]
which, for the Finder screenshots below, is literally:
~/Library/Application Support/Certificate Authority/Monte the Mountain Lion CA

Tiger (in my testing) creates the following:
~/Library/Application Support/Certificate Authority
successfully puts the settings configuration file in that folder, but fails on its promise to put any sort of CA certificate into this folder. See Version Quirks below for additional information.
Trusting the CA Certificate on the CA’s System
On OS 10.5 through 10.12, assuming you checked the “On this machine, trust certificates signed by this CA” when setting up the CA, you should be all set. Verify this by opening up the CA’s certificate (in Keychain Access) and checking the trust settings. Apple’s default is to Always Trust for every possible option. If yours is not set this way, make this change now (or if you have specific needs/goals, make changes as you require). If you neglected to check that box during setup or intentionally did not do so because you’re on High Sierra or newer and being wise, you will definitely need to make this change manually before continuing. At this point it is safe even in High Sierra and newer (tested through Catalina), which will trust it only for this specific macOS user account, which in my testing will work properly.
Due to severe bugs, Tiger users will need to do the dance of putting a copy of the CA root certificate in the X509Anchors keychain, using the same method as for self-signed certificates on that OS. The Trust settings override options in Tiger are virtually nonfunctional in my experience.
I am finding some severe bugs in the keychain infrastructure on the newer OSes prior to 10.13 (confirmed in Mountain Lion) whereby failing to select during CA setup may lead to a situation where the CA root certificate will not function properly. I have yet to find a workaround for this bug, which unfortunately blocks certificates from working on the system(s) where it happens.
If you have multiple Macs and you use these other Macs for CA work and/or use that same email address for everyday secure email and/or you will be corresponding with other people for whom your CA issues certificates on these other machines, you’ll want to move a copy of your CA credentials (or at least the certificate) over to these other systems and trust the certificate on them. Check out the section “Other Machines?” on the self-signed certificates page for your particular OS X version for details. The same information applies as for self-signed certificates + their matching keys.
Preserve your CA Credentials—Back Up!
If a self-signed certificate user fails to adequately back up their credentials (certificate and private key at least, though also saving the public key is advised), they’re only screwing themselves over. A Certificate Authority is screwing over not only themselves but also all their users. Don’t… use a sane, reliable, redundant backup arrangement. If you’re not up to it, you might want to re-think acting as a CA.
It is up to each end user to back up their own credentials, though you should back up the piece you have on your CA system (other than Tiger): each of their signed-by-you certificates. They’ll still be screwed if they lose their private key (and their correspondents are using encryption on messages sent to them), but since that key is normally not on the CA’s system, it isn’t strictly your problem. Use your discretion for family/small business situations where you may want to take on the additional responsibility of backing up your users’ private keys, and be sure that if you do this you do so very securely!
The mechanics are identical to what is needed for self-signed certificates. Please refer to the Back Up! section of the main article.
Use your Certificate Authority to Create a User Certificate for Yourself (maybe)
It is possible to create one certificate which can be utilized as both a CA and end-user S/MIME email certificate—and in fact Certificate Assistant for 10.14 Mojave & 10.15 Catalina force this, whether you want it or not. I have read in the past (and didn’t save the sources so can’t cite them here) that it is unwise to have one certificate do both: it is better to keep the CA and end-user functions separated, in separate certificates. My vague recollection is that this prevents cross-contamination, such as the CA certificate going down in flames (and taking with it all certificates it has ever signed as well as itself) if it somehow becomes compromised, possibly related to its secure email or other functions. There may also be an argument regarding granularity of certificate ability permissions. In any case, for the purposes of this section i’m assuming there exist one or more good reasons to separate the functions.
Of course, if you’ve previously created your own self-signed certificate you may continue to use that. However if you’re just getting started with secure email and hoping to have many people participate with you making certificates for most or all of them, it will be easier on everyone to have your own S/MIME secure email user certificate be either your CA root certificate or a “leaf” (derivative, subordinate) certificate of your Certificate Authority.
Please note that i’m distinguishing a user’s CA function from their personal daily use of secure email. I’ve learned over the course of testing that letting the CA have a full set of secure email credentials in its own root certificate makes the process easier for setting up other users of the CA. If that is all that this particular user identity does, there may be no need to make one’s own secure email user certificate. Or, if the person acting as CA is using only one email address for being CA and in their everyday life, adding another certificate for the same email address is likely to only confuse OS X and its bundled software, so it is better to just use the CA root certificate for both functions. If there are different email addresses the person uses as CA and in their daily life, given the vague memory of the un-cited references i recommend creating a certificate separate from the CA certificate for non-CA secure email uses. If you fall in this latter category, read on and make a separate leaf certificate for your (distinct) daily use email address. If you fall in one of the other two categories (single email address for CA only or CA + daily use) or you have the misfortune to be doing all this under macOS 10.14 or 10.15 (most recent tested; may still apply to newer versions) where you have no choice in the matter, skip this section and just use the CA root certificate you already made for both CA and everyday secure email purposes.
The procedure is mostly similar to, yet slightly different from, creating one’s own self-signed certificate. Whenever you see me type “the usual” and rather terse information below, this procedure exactly matches the self-signed procedure. You’ll be able to see full details with (usually) OS-appropriate screenshots in the Detailed Setup Information section of the main article, for your particular OS version.
- Open Certificate Assistant and select .
- In the “Please specify a name…” or “Please specify some certificate information…” window where they ask for the name, be sure to select “Leaf” as the certificate (Identity) Type and “Let me override defaults”. Be sure that the name differs from the one you’re using for your CA (which ideally ought to have “CA” or “Certificate Authority” or some variant in it). (Certificate) Type will be S/MIME (if this isn’t listed here on your Certificate Assistant version, it will be in the next step)
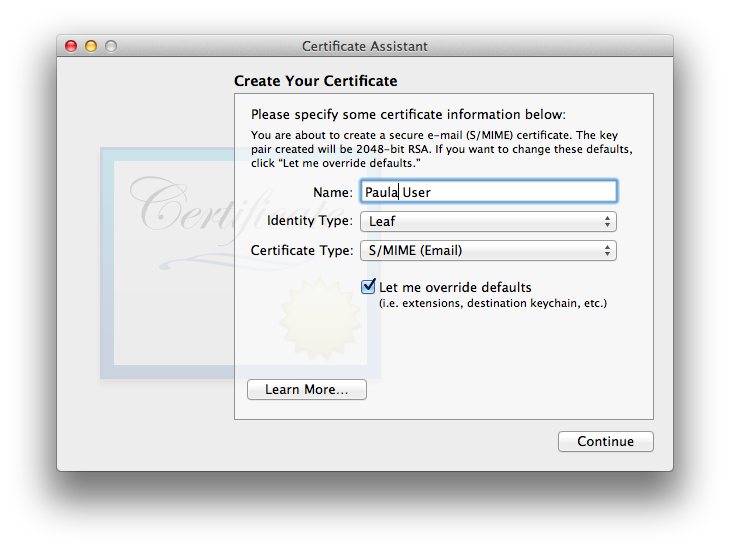
As nearly always is the case for end-user certificates, be certain to tick . - Now type in the usual certificate information: a new, unique serial number, a decently long validity period (but no longer than your parent CA certificate).
- The usual personal information comes next: email address, common name, etc.
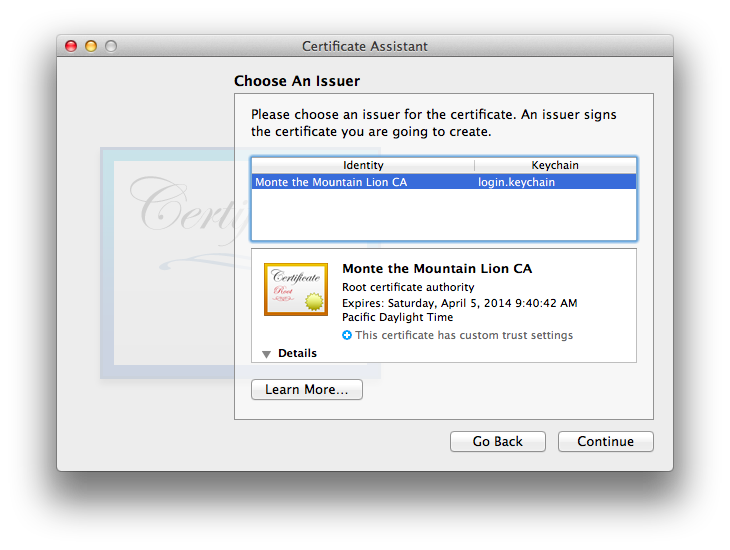
- The window is next. For you as a CA yourself, it will default to your own CA.
- The usual Key Pair window is next, and as always, the usual key length and algorithm considerations as for other certificates apply.
- Now we have the usual Key Usage Extension (KUE), through 10.12 with the usual end-user doofy defaults which don’t allow the certificate to operate properly. I used to disable it, until Mail 10 for Sierra started requiring it, so do keep it enabled and do check Key Encipherment if it is not already checked.
- The usual Extended Key Usage Extension (EKUE) for end-user is next (except on Tiger, which lacks this extension). I tend to leave it at its defaults: critical, Email Protection, though in self-signed testing i also tested disabling it and that worked fine as well.
- The usual Basic Constraints option is presented, not included by default (my recommendation and how i left it).
- OSes Leopard 10.5 and newer present the Subject Alternate Name Extension (SANE) included, not critical, and with the rfc822name correctly filled in (verify this!). I left it this way in my testing. Certificate Assistant 1.0 for Tiger leaves default not included, which is fine as well (for any OS version through 10.13, after which for Tiger 10.4 it no longer matters).
- The usual Specify Location window appears. As usual, the login keychain is the correct location for the completed certificate.
- Certificate Assistant creates the credentials (ID)—user certificate, public key, private key. Done!
Use your Certificate Authority to Create Certificates for Others
Method 1: CA-Initiated Email
This is a great way to go when your correspondent is too far away for easy in-person contact—as long as neither you nor they are using 10.14 Mojave or 10.15 Catalina (maybe newer). For these OS versions, any time Certificate Assistant is run, the items created Must be saved to disk rather than emailed directly from Certificate Assistant. See Endless spoked wheel wait indicator in Certificate Assistant: endless loop! bug details below.
Here are the detailed steps for OS 10.8.3 Mountain Lion and its Certificate Assistant version 5.0 and Mail 6.3 (in places interacting with OS 10.4.11 Tiger, Mail 2.1.3, and Certificate Assistant 1.0 acting as the CA):
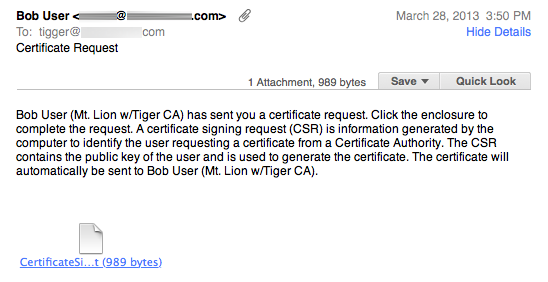
- If you used the option in the window when you originally set up the CA but did not send out messages at that time (for whatever reason), go back into Mail and re-open the Draft message you saved but did not send. This message announces that your CA is open and ready to create certificates, and will include the settings configuration file:
![Subject: “[name of CA] Certificate Authority is now available”. Message body: “The “[name of CA]” Certificate Authority is now available to accept certificate requests from you. Click the attachment and the Certificate Assistant will guide you through this process.” [name of CA].certAuthorityConfig file attached](etc/CertAuthMtLion/CAnowavailable.png)
Note that the text is in error: it says “Click the attachment” when in fact the recipient needs to double-click the attachment to open it. This same mis-statement reappears throughout this process in the various email messages sent out by Certificate Assistant. You may wish to edit “Click” to “Double-click” before sending. - Also before sending, i very much recommend signing your outgoing email invitation message with your CA’s root certificate. This will provide your root certificate to your correspondent(s), which they will need to have in place on their system for their own certificate to operate.
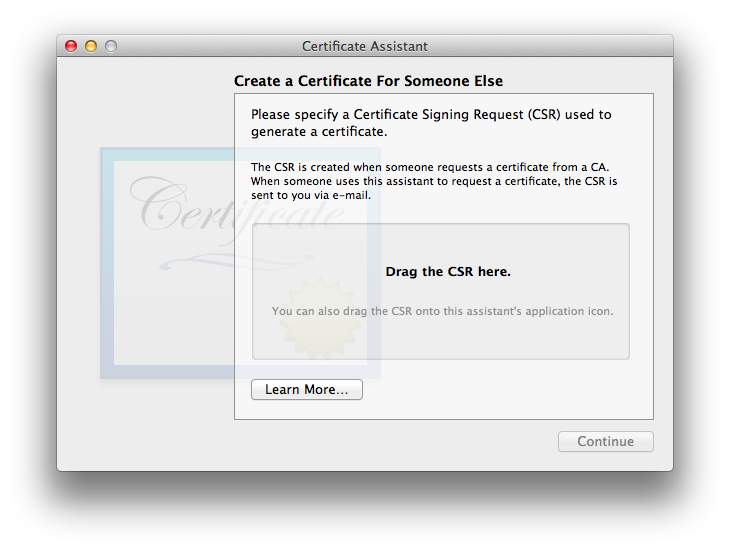
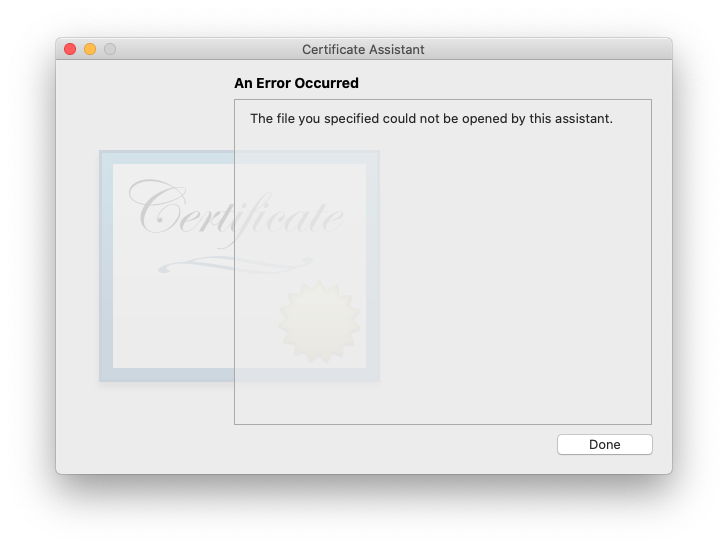
One might think that if the window is already closed and no draft email was saved that it would make sense to re-open Certificate Assistant, and select . The problem with doing so is that Certificate Assistant asks for an existing CSR from the end user rather than once again making the offer to email a settings file to the end user.
Instead, manually create an email message to your correspondent(s), sign it with your CA certificate, and be sure to attach the configuration file (file suffix .certAuthorityConfig) inside the folder with the name of your CA (full path is at the end of the section above).
If you’d like to use Apple’s invitation message text but didn’t save a draft, here it is (corrected to say “double-click”). Be sure to fill in your actual CA’s name in place of [the placeholder text box, like this]:
The “[name of CA goes here]” Certificate Authority is now available to accept certificate requests from you. Double click the attachment and the Certificate Assistant will guide you through this process.
- When your correspondent receives your invitation, your self-signed certificate will be new to them and not trusted on their system (unless you’ve used it to correspond with them in email previously and they trusted it at that time). They will need to follow the instructions for their particular OS for trusting a self-signed certificate, with the important difference that they need to set everything to via making that selection in the top-most “When using this certificate:” pop-up list at the top of the certificate’s section. This is in case your CA creates user certificates for them with additional functions beyond S/MIME email.
- Once your invitation shows as trusted on your correspondent’s system, they will open the attached configuration file, which will launch their Certificate Assistant. They will fill out the necessary information for their Certificate Assistant to generate a public and private key pair (automatically installed into their default [usually: login] keychain) and complete their CSR:
- Their Cert. Asst. will create a CSR with their public key, put up a Conclusion window with explanatory text, and create an outgoing email message with the CSR attached for them to email back to you (the CA). Here is what the outbound message with attached CSR looks like in Mail 6 for Mountain Lion:
The user sees the Certificate Assistant Conclusion window, with instructions about what they’ll do next. - You (the CA) will open the CSR in the email you receive from your correspondent, which re-launches your Certificate Assistant to generate their finished authenticated certificate. The attachment is:
CertificateSigningRequest.certSigningRequest
The CA sees the Issuing Certificate Authority window:
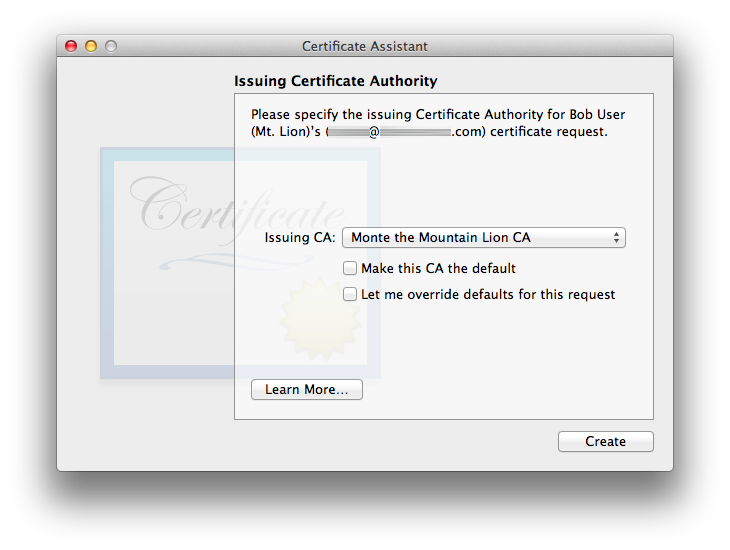
With all OS versions so far except 10.4 Tiger, using the defaults will use the information from the CA’s configuration file: Certificate Assistant successfully respected my CA’s choices for omitting KUE and including the SANE, properly filled in. Certificate Assistant also successfully increments the serial number to the next non-conflicting value when using defaults, in my tests.People acting as CAs need to pay careful attention: there is a bug in some versions of Certificate Assistant (confirmed on versions 2.0, 3.0, and 4.4) whereby the CA’s copy sometimes generates a new, spurious set of user keys along with a certificate in the CA’s keychain. The CA’s Certificate Assistant should only generate a new user certificate (in the CA’s keychain and in an outgoing Mail message form). If you the CA see a pair of new user keys appear in your own CA keychain on this step, please immediately detour to User Certificate Fails to Work and/or CA Certificate Assistant Generates Spurious User Keys.
- Cert. Asst. 2.0 and newer uses Mail to pre-fill an outgoing message with the completed user certificate in a certificate.pem file. A copy of this user cert. is also placed into the CA’s login keychain (and shows as valid since the CA’s credentials are already there and trusted).
Note: the CA may be given the option to encrypt (padlock icon) the outgoing email message to the user, containing the user’s new signed certificate. DON’T: the end user does not have their certificate yet, which is in this very email message and not yet installed! Leave the padlock unlocked for this message!This completes the process at the CA end.
- Your correspondent will receive one final email with their completed, authenticated certificate, ready to be double-clicked:
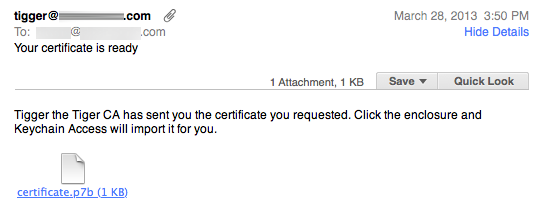
It will be installed into their login keychain, next to their keys which were generated earlier in the process on their own system, for a complete credential set. (The screenshot shows a Tiger-created certificate in .p7b format. Leopard 10.5 and newer will supply the final user certificate in .pem format. Either one should work properly.) The process is now complete at both ends.
Note that in this process, the user’s (remote correspondent’s) private key is generated on their own system via their own Certificate Assistant utility program, using the CA’s configuration file initially emailed. Their private key never leaves their system and remains secure. Clever!
Done Yet?
Maybe Yes
If the CA followed the instructions carefully and everything went well, the CA’s certificate should have been provided to the user via the initial email invitation, when that message was sent out signed with the CA’s self-signed root certificate. Or, if not on the initial message, perhaps the one conveying the newly-signed certificate. Assuming this happened and the user trusted the incoming CA certificate on their system, the process is now complete at both ends. Remember that it will be necessary to Quit Mail (all OS X versions to date, and maybe maybe not the newer macOS-named versions—try it!) and restart it before secure email options appear.
Maybe No
If the CA failed to send out a properly signed invitation, or if the recipient user had reasons not to trust the certificate (maybe they were not expecting the invitation, which could come from anyone) or had trouble trusting it, the user will have to obtain the CA’s root certificate (if they don’t already have it) and trust it on their system. Because the CA certificate is not yet in the user’s system or is not yet trusted, they will see a warning on their own certificate regarding its being signed by an unknown CA:
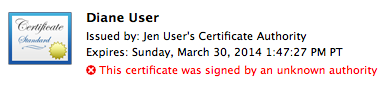
Leopard screenshot
Apple’s original intent (judging from Help file content and other explanatory text) appears to have been that the CA would make its certificate available on a secure server of some kind. Seems to me that the main issue with sending a CA certificate via email is knowing whether it actually came from the CA, and whether or not a “man-in-the-middle” may have modified it. This same situation arises with individual self-signed certificates and i propose the same solution:
- The CA and user set up a time they can work together.
- The CA emails their certificate to the user, via signing a message to them with this certificate (skip this step if they already have it but have not trusted it). If you attempt to attach the certificate manually instead of simply signing the outgoing message, you are on your own. That isn’t Apple’s design intent and i have done absolutely no testing of this. Signed certificates automatically go into the user’s keychain; attached certificates probably will not.
- The CA and user communicate via some other channel, such as a voice telephone call or video chat, where they both can have high confidence that the other person is who they claim to be.
- The user imports the CA certificate into their keychain (if it is not already there). The specific keychain into which to place the CA certificate varies with OS version and whether the CA certificate will apply to this OS X user account only, or machine-wide. See Version Quirks for specifics for your OS version.
- The CA reads off one of the two digital fingerprints for their certificate, the user confirming that what the CA is reading matches what they are seeing on their copy of the CA’s certificate’s fingerprint.
This verification procedure is discussed further in the main article section ID Verification. (The main article discusses two-way verification. It is only necessary to one-way verify the CA certificate for the setup procedure we’re describing here.)
The final step is the user manually trusting the CA’s certificate on their system. Follow the steps for your particular OS version, same as for a self-signed certificate, other than CA root certificates are normally trusted for all abilities, in case the CA issues a user certificate for other/additional functions.
Method 2: Correspondent (end user)-Initiated Certificate Signing Request (CSR) Email
It is not necessary for an end user to receive an invitation from a CA with a settings file as the first step. It is entirely possible for the end user to use their copy of Certificate Assistant to create a key pair for themself, generate a CSR, and send it to the CA (if they have the CA’s email address) or via some other means (if they don’t have the CA’s email address). We’ll cover each of these cases, starting with the first.
Once again, with feeling: because late 20-teens—2020 Apple apparently likes to break their own software, anything involving 10.14 Mojave or 10.15 Catalina (and possibly later) cannot involve Certificate Assistant emailing anything. Y’all need to skip this option and move down to Method 3 below.
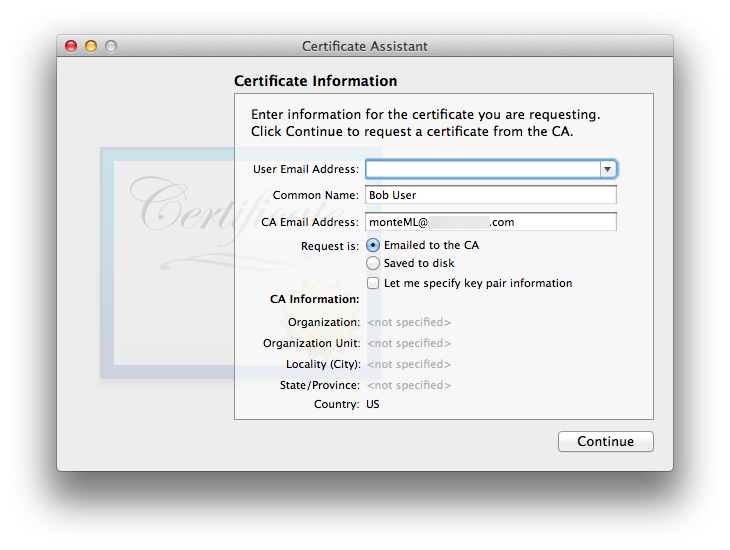
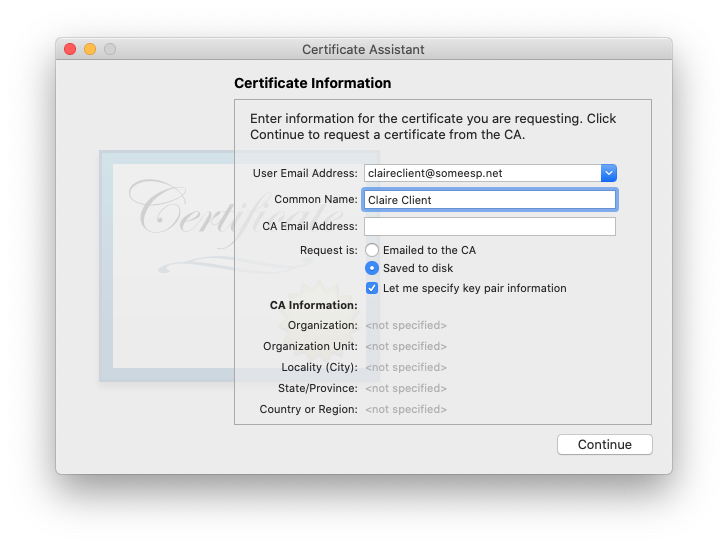
- User picks in their copy of Certificate Assistant.
- The usual User CSR information window appears:
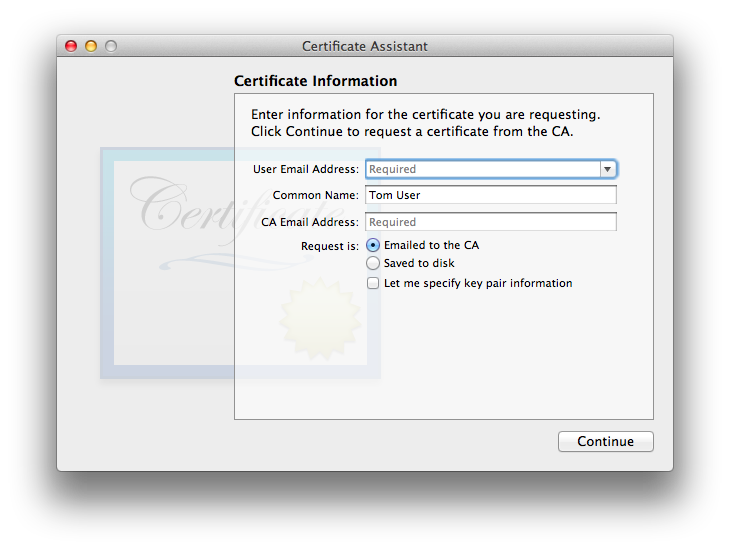
The default of “Request is: Emailed to the CA” is what we’re discussing in this section. The user is given the option to override the default key pair information. Through macOS 10.12 Sierra the default on all versions of Certificate Assistant is the strongest RSA key pair Certificate Assistant can make (same as for the CA itself): 2048 bit length, so the default is as good as it gets. Unless the CA is insane and goes with a less secure key pair, there really is no point to override. macOS 10.13 and newer (tested through 10.15) Certificate Assistants allow stronger RSA options, and for those only supporting 10.12 Sierra and newer, the ECC algorithm and its various key lengths are viable options. If the user chooses to override, the CA can look at the final cert. before sending it out to verify its settings, and refuse to email the finished cert. back to the user who sent in the CSR, if the CA disagrees with the user’s key override choices. - The usual Conclusion window is next. Depending upon the Certificate Assistant version, Cert. Asst. will either direct-email the CSR to the CA itself, or invoke Mail with a pre-filled outgoing message to the CA for the user to send manually. Public and Private keys for the user are already generated and placed into the default (almost always: login) keychain.
- The CA opens the received CSR. The Issuing Certificate Authority window opens in their copy of Certificate Assistant. This is one case where i found that Certificate Assistant did the correct thing with the defaults. You can always try the defaults then inspect the certificate carefully before emailing it back to the user. If it is faulty, delete the outgoing email message draft, delete the new user certificate from your keychain, and run the CSR again, overriding defaults. The CA’s Certificate Assistant will email the completed, signed certificate to the user who submitted the CSR, to the email address on the certificate. Be sure to sign the outgoing messages with the CA’s certificate! (for Certificate Assistant versions which use Mail to send rather than direct-sending themselves).
- If the CA’s root certificate is not already properly installed in the user’s system, this will need to be done before the user’s newly signed certificate can be used. The user will know because the CA’s signature will show as “Unable to verify message signature” in the incoming message containing the signed certificate, if it is not currently trusted. The user needs to trust the CA’s certificate using the usual methods.
- The user will double-click the attached certificate (.pem) and put it into their default (login) keychain.
- User quits and re-launches Mail: secure email is available.
Method 3: Correspondent (end user)-Initiated Certificate Signing Request (CSR) (non-email)
It may be the case that an end user knows of a Certificate Authority (CA) but does not have their email address or for some reason wishes not to use email to convey the CSR to the CA—or as in one of my testing cases with earlier versions and perpetually every time in 10.14 Mojave and newer (tested through 10.15 Catalina), Certificate Assistant may/will fail on the emailing out step, requiring a workaround. All versions of Certificate Assistant provide for this scenario as well. The procedure in this case is very close to that described above, for email submission of the CSR to the CA.
- User picks in their copy of Certificate Assistant.
- The usual User CSR information window appears:
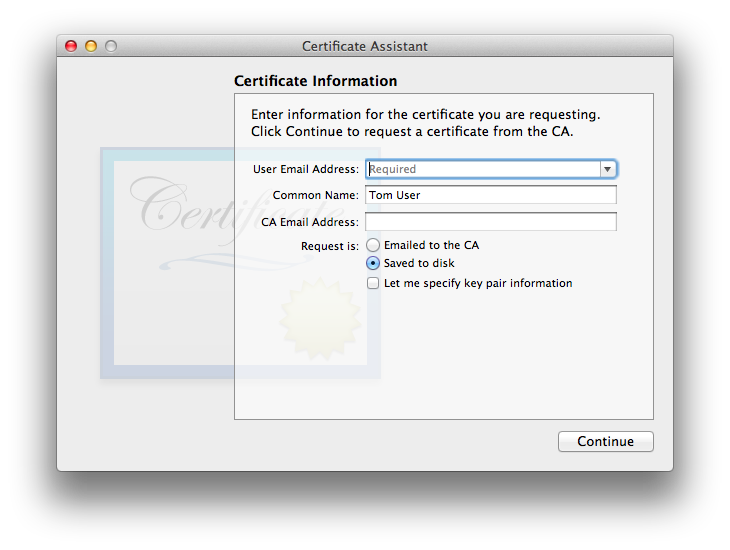
The default is “Request is: Emailed to the CA”, but there is also an option “Request is: Saved to disk”, which is what we’re discussing in this section. There is no need to fill in the CA Email Address, though as always the User Email Address is mandatory. The user is given the option to override the default key pair information. Through macOS 10.12 Sierra the default on all versions of Certificate Assistant is the strongest RSA key pair Certificate Assistant can make (same as for the CA itself), and i mainly tested this particular function on these older versions, thus i did not experiment with this override in my testing, other than to see that it brings up the very same Key Pair window as appears when creating a CA and creating a self-signed certificate. macOS 10.13 and newer (tested through 10.15) Certificate Assistants allow stronger RSA options, and for those only supporting 10.12 Sierra and newer, the ECC algorithm and its various key lengths are viable options, which the user seeking certification may wish to utilize if limited to the newer systems. If the user chooses to override, the CA can look at the final cert. before sending it out to verify its settings, and refuse to email the finished cert. back to the user who sent in the CSR, if the CA disagrees with the user’s key override choices. - The usual OS window appears, allowing the user to select where to save their CSR. This might be a flash drive or some other removable mass storage medium if the user intends to personally deliver the CSR to the CA. (I simply put the file on the desktop and used home network file sharing for my testing.)
- The usual window is next, with a handy button in case the user was not careful picking a location in the Save As… window, or for whatever reason cannot locate the new CSR file. Public and Private keys for the user are already generated and placed into the default (almost always: login) keychain. Now the user gets the CSR file to the CA via whatever means they choose.
- The CA opens the received CSR. The Issuing Certificate Authority window opens in their copy of Certificate Assistant. This is one case where i found that Certificate Assistant did the correct thing with the defaults. You can always try the defaults then inspect the certificate carefully before emailing or otherwise getting it back to the user. Even though the CSR was delivered via a mechanism other than email, the CA’s Certificate Assistant will email the completed, signed certificate to the user who submitted the CSR, to the email address on the certificate. For Certificate Assistant 2.0 or later (OS 10.5 Leopard and later), this is done via Mail, so it is possible to cancel the outgoing email message before it is sent, if for some reason a non-email method of delivering the completed signed certificate to the user is desired. I’ve seen later versions (2.0+) of Certificate Assistant default to .pem format for certificates, so that’s the format i’d tend to choose for certificate export, lacking other information/concerns. Distribution to the user via secure file server, physical media exchange, or other method are all options. If the CA is not returning a signed email message and is instead using some other form of file transfer, they need to include their CA root certificate in the package in addition to the user’s new signed certificate. Once again, anything involving Certificate Assistant and email in macOS 10.14 Mojave and 10.15 Catalina (possibly newer too) is brrrrroken, so you’ll never make it to the point of having an email message to send.
- Once the user obtains the signed certificate package from the CA, they will first need to install and/or trust the CA’s root certificate if it is not already properly installed in the user’s system. This will need to be done before the user’s newly signed certificate can be used. The user needs to trust the CA’s certificate using the usual methods.
- With the CA’s certificate installed and trusted, the user will double-click their own (new) certificate and put it into their default (login) keychain.
- User quits and re-launches Mail: secure email is available.
Make Them Back Up!
Whichever method is used to generate end-user correspondents’ security credentials, they have the same need as you to ensure that they don’t lose them. Especially their private key, without which they cannot decrypt and read existing encrypted email messages sent to them!
Unless you have secure remote access to their system (in which case this whole credential-making procedure could be handled many different ways), you’ll need to count on them to follow the same steps as users of self-signed credentials do, discussed in the main article, to back them up. Or, make that long-overdue in-person visit and fix that garage light while you’re there!![]()
Interoperation
I successfully tested the full process from CA invitation through installation and testing of a new user CA-signed certificate between each version of OS X from 10.4.11 Tiger through 10.8.3 Mountain Lion, in both directions (in other words: with each OS taking a turn as both CA and end user)—all 20 combinations. In all cases the process worked correctly.
Given the changes in security credential handling in Mail 10 for macOS 10.12 Sierra, i retested between it (as the CA) and OS 10.4.11 Tiger. Again, the process worked correctly. Presumably this “longest reach” test covers the intermediate OS and bundled software versions too.
While they were busy breaking their own software, Apple made sure that in addition to having 10.14 Mojave and 10.15 Catalina (and maybe newer) incapable of full CA functionality within the same OS version, they’d break the ability for 10.4 Tiger to work. Nothing new: the same issue with Tiger Mail crashing when opening a signed email sent from these newer OSes, covered in the respective 10.14 and 10.15 self-signed certificate sections. Theoretically backwards-compatibility exists to 10.6 Snow Leopard, though my testing of this was minimal and perfunctory, not extensive. Minimal basic tests did work correctly.
Problems?
Can’t create certificate/place in keychain
Certificate serial numbers matter for your own CA-generated certificates—all of them, including the root CA certificate! Track them and do not duplicate them in any certificates issued by your CA. Failure to mind this point is likely to lead to failure of Certificate Assistant to successfully create or install some certificates. See the note near the page top for more.
User’s Certificate Assistant Fails to Work with CA’s Configuration File
First observation: CA 1.0 (Tiger) with CA 5.0 (likely Mountain Lion) settings file
I saw one case where Certificate Assistant 1.0 for Tiger could not open a Certificate Assistant 5.0 settings file. Yet when i tested this combination later, it worked fine. I did not thoroughly re-test (i need to get back to the rest of my life), but my suspicion is that the configuration file which could not be opened may have been due to that file being signed by the CA using the handy checkbox during CA setup.
Now, my understanding is imperfect. I thought that the checkbox during CA setup would not affect the configuration file itself, but only what happens in Mail such that the outgoing message is signed or not signed. I’ve seen a couple of configuration files with “garbage” in them before and after the properly formatted Property List content. I do not know whether this is intentional or a bug.
In my testing, if the configuration file from the CA is a clean Property List file with nothing preceding nor following the <?xml…>… </plist> content, it should work correctly.
Second observation: Same CA 5.0 on 10.11 El Capitan
Testing between Certificate Asssistant 5.0 on OS 10.11.6 El Capitan between two different user accounts on the same Mac. I created a CA in a user account which already had a working self-signed certificate for email. The CA’s certificate did have a different serial number, but the same email address. Going against my own advice, i sent out an invitation straight out of Certificate Assistant. When the other OS X user attempted to run the configuration file, they got:
I spent about 20 minutes trying to find a workaround, coming up with nothing other than the same thing which i figured out years earlier during the first observation: ignore what the CA sends and have the non-CA user send the CA a CSR (see below).
Third observation: Same CA 5.0 on 10.15 Catalina
Same deal as for El Capitan, other than the CA’s email address differed as well as the serial number, so there should have been no conflict whatsoever. Identical error message as above when the client attempted to open the CA-sent configuration file.
To avoid this issue, i strongly recommend:
- Do not make a stand-alone self-signed S/MIME certificate for an OS X user who will also act as a CA.
- Create the CA first, with a CA cert not including email security (this is forced upon users of Certificate Assistant 5.0 pre-Sierra due to its bugs, and not possible in Certificate Assistant 5.0 with 10.14 Mojave or 10.15 Catalina). Do not send out any invitations at this point!.
- Use the CA to create a leaf certificate for the CA user which is that user’s S/MIME secure email certificate (10.13 or earlier. 10.14 and later [tested through 10.15] you’re hosed: your CA certificate is already forced-enabled for email. You skip this step).
- Send out invitations which include both the configuration file and the CA’s root certificate. The CA’s signature will not be valid until that root certificate is trusted.
If the CA’s configuration file simply won’t work, have the user ignore it and use the command in their version of Certificate Assistant. I’ve not yet seen that fail to work.
User Certificate Fails to Work and/or CA Certificate Assistant Generates Spurious User Keys
There is a bizarre show-stopping bug experienced with some versions of Certificate Assistant (2.0 for OS 10.5 Leopard, 3.0 for OS 10.6 Snow Leopard, 4.4 for OS 10.7 Lion, 5.0 for OS 10.11 El Capitan, and a variant described below for 5.0 for OS 10.15 Catalina) and likely existing in all Certificate Assistant 2 through 5 versions through at least Catalina: Usually only on the first run with a newly set up CA (esp. for Snow Leopard) when the CA runs the user’s CSR, the CA’s Certificate Assistant generates a spurious new pair of user keys on the CA’s system along with a certificate to match those keys—not the keys already (securely) generated on the user’s system by their Certificate Assistant. Sometimes Certificate Assistant presents an error message that the new user’s certificate cannot be placed into the keychain as it is a duplicate!
Fortunately, there is a workaround:
- Delete the spurious user keys and user certificate from the CA’s default (usually: login) keychain. Note that in some cases there will not be a user certificate, if Certificate Assistant presented the duplicate certificate in keychain error. Be sure to check carefully!
- If Certificate Assistant made it far enough to create the outgoing email message with the defective certificate, delete this message draft.
- Re-run the CSR your user sent in, as if you were doing so for the first time.
This is a very difficult bug to reproduce on the earlier OSes (Leopard through Lion)! In my Snow Leopard testing, once Certificate Assistant for the CA starts working correctly, it continues to do so unless the whole OS X installation is blown away and installed fresh, or at least all user accounts on the Mac and existing CA-related email messages (on the email server[s]) are blown away AND caches are wiped out. Then on another day the first certificate of the session failed in this way even though it was an existing installation which had previously been working (but the workaround still worked). On 10.5 Leopard it happened with the second CSRequest. 10.7.5 Lion did this to me once under circumstances not in any way noticeably different than the other 3 times i did the (probably not literally) exact same thing with the very same CA installation with no problems whatsoever.
The good news is that, up through Yosemite, whenever this bug occurs, no matter what OS X version, the workaround described above (trashing the bogus cert. and keys and re-running the very same CSR a second time) has succeeded. Even so, keep reading: there’s something you really ought to check on all OS X/macOS and Certificate Assistant versions.
Consistent Failure: Malformed .certAuthorityConfig file (El Capitan Summer 2016 Update)
As of OS 10.11 El Capitan, what had previously been intermittent became continuous, failing to yield to the prior workaround. I found a reproducible case where the failure keeps going, even after trashing the spurious keys and certificates. As with the User’s Certificate Assistant Fails to Work with CA’s Configuration File bug (previous one here) a corrupted CA.certAuthorityConfig file triggers this bug. To avoid problems, ensure that your CA’s config file is OK before issuing certificates. This is discussed soon below, after the Summer 2020 OS 10.15 Catalina addendum.
Malformed .certAuthorityConfig files Still Happen (Catalina Summer 2020 Update)
The bug is still with us as of Certificate Assistant version 5.0 (55188) supplied with OS 10.15.6. Thankfully there is a difference, which in this case i’ll call an improvement: the client Certificate Assistant notices the damage and throws an error:
This is an improvement because with older versions, the client Certificate Assistant would blithely proceed to create a CSR, and then the CA Certificate Assistant would generate the spurious keys and useless certificate. Not as good as things working correctly, but at least we know there’s a problem. You’ll note that this is the same error as for the User’s Certificate Assistant Fails to Work with CA’s Configuration File immediately above. They may be the same bug with different symptoms depending upon conditions and software versions.
I learned during testing that having the client fix the damaged CA.certAuthorityConfig file (discussed below) is not a good idea: the CA’s system no longer wants to accept it. This is entirely reasonable. The CA should fix the .certAuthorityConfig file on their own system.
In terms of how this file gets messed up in the first place, i have a new theory, which i am not going to test (unless someone compensates me in a manner satisfactory to me): this happened when creating a CA when that entity already had a self-signed non-CA S/MIME certificate and keys in their login keychain. Note that the serial numbers differed and the email addresses differed, so those aren’t the problem. This pre-existing certificate was the one Certificate Assistant offered and user-confirmed selected for emailing out the config file to the client (which never happened because of the Mojave and Catalina can’t send email endless loop bug). Anyone who wants to test this should try the following:
- Create a self-signed S/MIME certificate and keys for a macOS user (with email already working). Note the email address and the serial number.
- For this same user, create a Certificate Authority. Use a different email address for the CA and just for kicks though it shouldn’t matter, ensure the serial number differs from the existing certificate made in the last step.
- Be sure to choose the option for the CA sending out an invitation and when asked, select the existing certificate for the non-CA email address.
- You don’t even have to send out the .certAuthorityConfig file: just open it up in a text editor and compare with the example immediately following.
Check your CA.certAuthorityConfig file for corruption
You may use BBEdit, TextEdit, or any other app which will show you the raw text of the file.- A valid config file will be a clean, well-formatted Property List file, starting and ending like this:
<?xml version="1.0" encoding="UTF-8"?> <!DOCTYPE plist PUBLIC "-//Apple//DTD PLIST 1.0//EN" "http://www.apple.com/DTDs/PropertyList-1.0.dtd"> <plist version="1.0"> <dict> <key>BasicConstraintsPresent</key> […] </dict> </plist> - A corrupted config file will have garbage at the beginning and/or end of the file, and possibly in the middle as well. Formatting will be a run-on mess, not nice and neat. Here’s an example of some corruption (not all of it—there was a lot! Bottom 19 lines omitted here) at the beginning and near the end of one failing CA.certAuthorityConfig file:
0Ä 	*ÜHܘ
 †Ä0Ä  10	 +0Ä 	*ÜHܘ
  †Ä$ÄÇt<?xml version="1.0" encoding="UTF-8"?><!DOCTYPE plist PUBLIC
  "-//Apple//DTD PLIST 1.0//EN" "http://www.apple.com/DTDs/PropertyList-1.0.dtd">
  <plist version="1.0"><dict>	<key>BasicConstraintsPresent</key>
  <integer>0</integer>
[…]
</integer></dict></plist>†ÇB0Ç>0Ç&†   0
 	*ÜHܘ
  0C1
0 UZyla10	 U US1%0# 	*ÜHܘ
 	 email@domain.com0
160727191319Z
170727191319Z0C1
Note that i forced a few line wraps in the corrupted example above, to prevent this page from trying to display too wide. The original is even messier! For presentation here, all kinds of control characters have been replaced with spaces. As well, email@domain.com is a placeholder for a legitimate (uncorrupted within itself) email address i do not wish to share here.
In my summer 2020 testing of Mojave and Catalina, on Catalina the plist was properly formed other than garbage quite like the example above both before and after the formal XML. Manually editing the file in TextEdit, deleting all the garbage and leaving only a clean, well-formed plist file resolved the issue, which on the test system was the client’s Certificate Assistant’s inability to even open the configuration file.
Anyone internal to Apple who may be reading this might consider checking out my bug on this issue, Radar #13665874.
User Certificate Generated by CA Fails to Work on CA’s Own System
I encountered at least one case with Mountain Lion 10.8.3, Certificate Assistant 5.0, Keychain Access 7.0, and Mail 6.3 whereby Mail refused to acknowledge the brand-new user certificate right there in the CA’s account, even though Keychain Access showed everything was just fine and dandy and i’d quit and restarted Mail several times (to refresh its outlook on certificates—the only way i know). Interestingly, Certificate Assistant’s “Evaluate a Certificate” function claimed there was no root certificate found for the new user certificate:
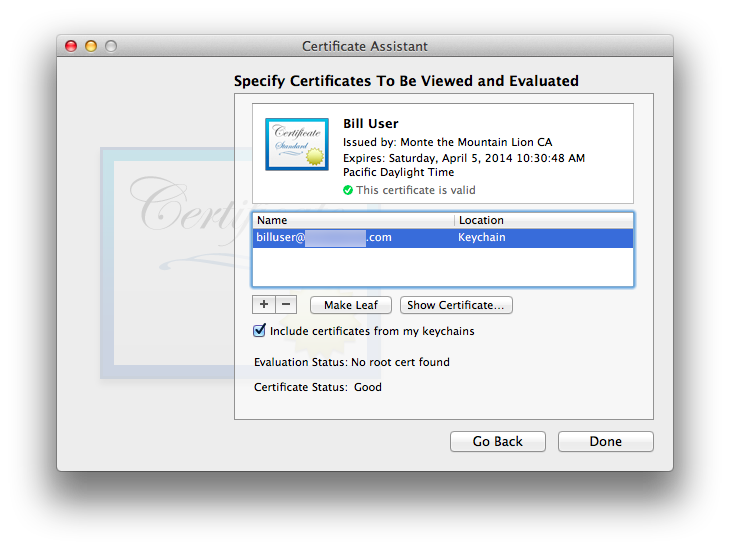
I stumbled into a workaround by accident: When i added the CA self-signed root certificate to the list of certificates to be evaluated in Certificate Assistant, BOINK!—everything started working. Certificate Assistant now showed “Evaluation Status: Success” and Mail now happily accepted the new user certificate (after a fresh start of Mail).
Unfortunately, another time this happened (and i don’t recall which OS), Certificate Assistant temporarily showed that everything was fine when both the root and user certificates remained in its evaluation window, but after any sort of logout or restart or maybe even quitting Certificate Assistant, the failure returned.
I have not found a workaround/fix. This problem occurred when i failed to select “On this machine, trust certificates signed by this CA”, and attempted to trust later in the standard OS X user account, apparently triggering this failure.
PhoneGap Build iOS error: “Certificate doesn’t match profile: The default keychain doesn’t have an identity matching”
Kindly submitted by Marcellus S.The author of this site had no idea what PhoneGap Build even was until i looked it up. Between that and having never touched Apple’s Developer Console, i believe the safest course of action is for me to quote relevant parts of his submission in its entirety:
For the past 10 hours, I’ve been struggling with PhoneGap Build’s iOS error “Certificate doesn’t match profile: The default keychain doesn’t have an identity matching”, but I have a solution!
My Mac’s OS is version 10.8.5, and my KeyChain is version 7. After following the instructions in the Be Your Own Certificate Authority article [this one —Sonic], I opened Apple’s Developer Console. I used Apple’s Console to create a Certificate and a Provisioning Profile. Finally, I created a p12 file using the Certificate I created following the instructions in the Be Your Own Certificate Authority article; please note, this final process was not a part of the instructions – but a process I picked up in the past from working on previous iOS apps.
The solution is to create your p12 file by using KeyChain to export the Certificate created by Apple’s Developer Console. KeyChain version 7 will display Apple’s Certificate with a warning/error message, stating “This certificate was signed by an unknown authority”. This can be ignored.
If you’re like me, when you saw this warning/error message, you used unnecessary caution, and created your p12 file by using KeyChain to export the Certificate created in the Be Your Own Certificate Authority article. Again, the caution is unnecessary.
As I had mentioned before, ignore the warning/error message “This certificate was signed by an unknown authority”. Create your p12 file using the Certificate you created in Apple’s Developer Console. PhoneGap Build will accept the p12 and Provisioning Profile created from the Developer Console Certificate. That’s it! I will be posting a much briefer version of this solution on PhoneGap Build’s forum only, since this situation originates in PhoneGap Build.
Version Quirks
Certificate Assistant 1.0, OS 10.4.11 Tiger, Mail 2.1.3
- Cert. Asst. fails to generate the PKCS#7 (.p7b) file of CA certificate(s) it promises to make. The Tiger CA needs to manually export its own certificate as a PKCS#7 (.p7b) or Privacy Enhanced Mail (.pem) file from Keychain Access. (I used .pem in my tests.)
- Tiger predates the Extended Key Usage Extension (EKUE), or at least Apple’s adoption of it. Any steps listed above that mention EKUE do not apply to Certificate Assistant 1.0 and Tiger. Note that in my testing so far, Tiger and its Mail 2 are fine and happy working with certificates created on other, newer systems which contain a properly executed EKUE. (This does not mean that Mail 12 or 13 play nice with Mail 2, even if the certificate itself is OK by the old OS.)
- With the exception of the initial CA invitation which is sent out via Mail, Cert. Asst. 1.0 for Tiger directly mails out notices, files, and credentials, rather than launching Mail and pre-filling out an outgoing email form.
- The CA certificate is placed into the X509Anchors keychain by the end user. It does not need to be in the end user’s login keychain (only their own certificate and keys need to be there). The CA will need their CA certificate both in their login keychain (next to their key pair) and X509Anchors, in my testing (i did not try putting all CA credentials solely into the X509Anchors keychain).
- Certificate Assistant 1 for Tiger does Not place a copy of a newly-signed user certificate in the CA’s own keychain. If the OS X user which is the CA is also going to exchange secure email messages with users for whom s/he has signed, they’ll need to receive a signed email from their user(s) and do the usual certificate trusting dance Tiger requires.
Certificate Assistant 2.0, OS 10.5.8 Leopard, Mail 3.6
- Before getting too involved working with 10.5 Leopard, remember that there’s a show-stopping crashing bug in Leopard Mail which prevents real-world usage of secure email in Leopard. If you just want to be a Certificate Authority in Leopard and will not be having back-and-forth secure email exchanges in Leopard Mail, you should be OK simply doing standard one-time CA transactions.
- When creating a CA, the User Certificate Type is set on the second Certificate Assistant window, not the first as in later Certificate Assistant versions. This mirrors behavior of Certificate Assistant 2.0 when it makes self-signed certificates or any others. It is one of many slight evolutionary design changes Apple has made so far over the life of Certificate Assistant.
- Some Certificate Assistant 2.0 Help files are out of sync with the reality of this version of Certificate Assistant/Leopard. One example is the Help section instructing the user to install the CA certificate into the X509Anchors keychain, which no longer exists (starting with Leopard)[1]. The correct answer is discussed in the next bullet item.
- CA certificates are placed into the login keychain by the end user if the CA cert. is to only be available to that one account. To make the CA certificate available to all users of that machine, place the CA certificate into the System keychain.
- Certificate Assistant 2.0 for Leopard directly mails out the CSR (rather than invoking Mail), asking to use the user’s existing SMTP information from their keychain to be able to do so. It seems to be a hybrid between Tiger’s Cert. Asst. 1.0 (which self-emails everything and never invokes Mail, other than the CA’s initial invitation) and later versions of Certificate Assistant (which use Mail exclusively for their email notices).
Certificate Assistant 3.0, OS 10.6.8 Snow Leopard, Mail 4.5
- On the first run of Certificate Assistant acting as a Certificate Authority and signing its first CSR, the CA’s Certificate Assistant may spontaneously generate user keys in the CA’s keychain, along with a certificate to match these keys instead of the one’s on the user’s system who submitted the CSR. This can happen in other OS X versions, though in my testing only in Snow Leopard could i generate a reproducible case (with difficulty). Discussed in detail above.
Certificate Assistant 4.4, OS 10.7.5 Lion, Mail 5.3
- Hard to make it work, hard to make it fail: a plethora of problems related to some sort of invisible/undocumented caching, making it extremely difficult to find reproducible cases for filing bug reports. And when it fails, it FAILS… fine for bug reports, but then try again weeks or months later on the identical installation, and BOINK!—it is working, for no sane reason. OSes 10.6 and earlier did not have this unpredictability issue.
Certificate Assistant 5.0, OS 10.8.3 Mountain Lion, Mail 6.3
- Hard to make it work, hard to make it fail: a plethora of problems related to some sort of invisible/undocumented caching, making it extremely difficult to find reproducible cases for filing bug reports. And when it fails, it FAILS… fine for bug reports, but then try again weeks or months later on the identical installation, and BOINK!—it is working, for no sane reason. OSes 10.6 and earlier did not have this unpredictability issue.
- When setting up a CA, any attempt to override defaults for the KUE for the CA will be ignored—including omitting the KUE for the CA—so the CA can’t sign its invitations. Feel encouraged to let Apple Know your thoughts on this matter (select Feedback Area: Applications/Utilities). People internal to Apple may wish to check Radar bug #13655645.
Certificate Assistant 5.0, OS 10.9.5 Mavericks, Mail 7.3
- I have not (and likely will not) test this version as extensively as the earlier ones. The KUE bug above may be fixed: my one test making a CA with a KUE with Key Encipherment worked as expected.
Certificate Assistant 5.0, OS 10.10.5 Yosemite, Mail 8.2 and Certificate Assistant 5.0, OS 10.11.6 El Capitan, Mail 9.3
- When setting up a CA, any attempt to override defaults for the KUE for the CA will be ignored—including omitting the KUE for the CA—so the CA can’t sign its invitations. Feel encouraged to let Apple Know your thoughts on this matter (select Feedback Area: Applications/Utilities). People internal to Apple may wish to check Radar bug #13655645.
Certificate Assistant 5.0, OS 10.13 High Sierra, Mail 11.5
- “On this machine, trust certificates signed by this CA” fails:
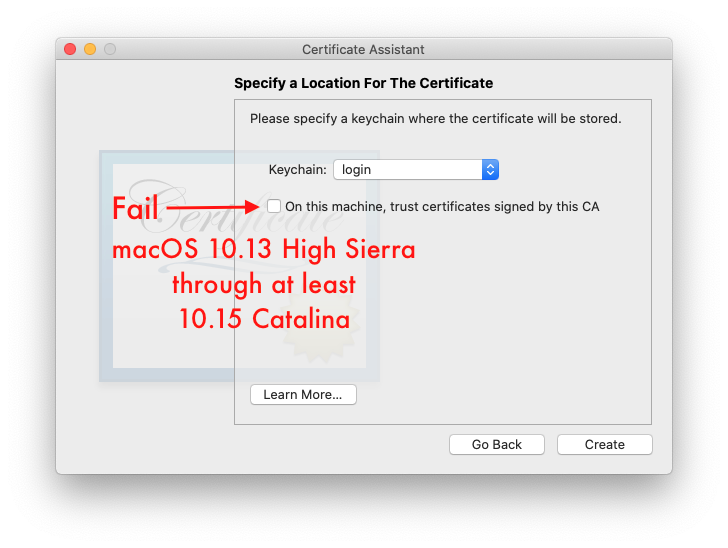
Changes in the security infrastructure lead to a disconnect between system-wide trust and individual macOS user account trust: trusting a Certificate Authority’s self-signed certificate created by Certificate Assistant at the system level prevents individual macOS user accounts from being able to trust that very same certificate. I’ve found no workaround. Further, i found it impossible to remove the system-level certificate via the Mac GUI, even from the admin macOS account (which is the only place where i could even see the certificate in the System keychain). Do not accept Certificate Assistant’s kind and generous offer to have it have the OS trust the new certificate authority’s certificate for all users of this Mac! Instead, each user must trust the CA’s certificate individually, using the usual methods.
Certificate Assistant 5.0, OS 10.14 Mojave, Mail 12.4 and Certificate Assistant 5.0, OS 10.15 Catalina, Mail 13.4
- Endless spoked wheel wait indicator in Certificate Assistant: endless loop!
And/or Certificate Assistant promises to send out an email, but never gets farther than launching Mail.Welcome to The Decline And Fall Of Apple, or at least macOS. Something changed, likely in the security infrastructure, such that whenever Certificate Assistant attempts to get Mail to send a message on its behalf, the process never completes: Certificate Assistant gets stuck in an endless loop waiting for Mail to respond/finish, but Mail never even gets into forming a human-visible outgoing message. Whatever else is supposed to happen at that point happens: certificates are created, etc. It’s the email step that’s broken and unusable. The workaround is to a) ensure that the certificate or whatever has actually been created and is in the expected location then b) Quit Certificate Assistant. A normal Quit works fine; no need to force quit. If you need to email, manually create an outgoing email message, with whatever is supposed to have been sent by Certificate Assistant attached to your email message. For any steps where something essential never happens because of this bug, start that process over and use the Save to Disk option rather than the email option.
I am so sick of Apple ignoring my bugs, i haven’t bothered filing one for this major problem. Be my guest, and good luck to you.
- “On this machine, trust certificates signed by this CA” fails: same as for OS 10.13 High Sierra
- Key size in CA.certAuthorityConfig file is ignored, even when the client system is capable of generating that size key. Let me explain with the example i tested, in OS 10.15 Catalina:
- CA sends out CA.certAuthorityConfig file to client, with client key set as RSA 4096
- Client runs received config file, accepting defaults. Replies with CSR to CA.
- CA runs received CSR, generating certificate
- Expected result: RSA 4096 key in certificate generated for client
Actual result: default RSA 2048 key in that certificate
Not Using Mail?
I have to wonder what happens when a Mac user has their OS X set up to use a Mail User Agent (MUA, a.k.a. email client software) other than Apple’s Mail (e.g. Thunderbird, Eudora, Lookout! Excess [Outlook Express] etc. etc.): will their Certificate Assistant successfully create outbound email messages in the alternate program? I’d hope so, but i’m not curious enough to actually set up this scenario and test it (i like Mail). Be wary of this point if you’re not using Mail.
[1] To be precise, the X509Anchors keychain no longer exists in the user interface, due to being deprecated. I saw one still present in /System/Library/Keychains on 10.8.3 Mountain Lion. This series of articles is only concerned with the user experience and the GUI.