Acknowledgements
This first electronic, second ever edition of Cart Caretaking is dedicated to anyone and everyone who has ever seriously messed with the audio broadcast cartridge tape format in any manner. Special thanks to KALX Production Elders Ron Wurtz, Eli Messinger, Larry Brauer, and Keith ’O Nesson for showing me the ropes and getting me started on the path to cart caretaking mastery. Also special thanks to those Cartmasters who worked along with me back in the day, including Gary Nafis, Marnelle Baden, Tony (whose last name i forgot), R.J. Plummer, Frank Estrada, Pat Wright, and all others i’m too senile to remember.
Gratitude is extended to Carl L. Martin, author of User’s Manual II—an update, An Operating Guide for NAB Cartridge Systems (Audi-Cord Corporation, 1982) and Gene Randolph, author of The History of the Cart Machine Broadcast Engineering August 1984. Information from these publications is incorporated into this document in some places.
Introduction
Welcome to the wonderful world of cart caretaking. Thank you for caring enough to take the time, energy, and effort to delve into the deep, mystical depths of the world of carts. Long the exclusive domain of broadcast engineers, cart purveyors, and other technogurus, the fine art of cart caretaking was long ago wrested from the feeble grip of the technogurus (who, legend has it, were heard to shout “good riddance!”) and thrust into the razor-lacerated hands of the only women and men tough enough to stand up to the challenge: the KALX Production Dept.
Our tribe traditionally has passed this sacred information along via the Great Oral Tradition (GOT), from Production Elder to eldest Production Daughter or Son. Unfortunately, the time most Production Elders got around to the Penultimate Sacred Archetape (P.S.A.) Ceremony, they were either already to senile to make much sense, or had miscounted by one, and were within 30 seconds of death. This forced all generations up until the present to “re-invent the wheel”(or hub, as it were).
Thanks to the recent discovery of written communication amongst the peoples of the KALX tribe (not to mention the Apple Macintosh and Laser Parlors), you, the ever-daring, ever-caring KALX Production Youth (KPY), no longer have to spend endless hours tangled up in a pile of crumpled lube tape and gooey pads wondering how it’s all supposed to work. Instead, you will find yourself spending endless hours tangled up in a pile of crumpled lube tape and gooey pads wondering why things never seem to work the way they’re supposed to. Truly a testimony of progress and a triumph of human evolution!
In The Beginning…
The History of Carts
The endless loop tape cartridge (“cart”) was invented and patented by George Esch in 1956 who either founded, or floundered into, the Fidelipac Corporation. This original cart was not used by radio stations, but was a continuous loop of non-stop sound used for background music or department store displays. It ran at 4.75 cm/s (1.875 IPS)(cassette speed) on machines that bore little resemblance to “modern” radio cart machines. This same cart is still made today as the Fidelipac 300, virtually unchanged from 1956. KALX has a whole pile of ’em (most of the gray ones).
In 1959, WJBC Bloomington, IL. Chief Engineer Ted Bailey and assistant Jack Jenkins (later a founder of International Tapetronics Corporation) had the brilliant idea(s) of making cartridge machines which would play through the loop once, then stop automatically. They modified some existing players to do just that, as well as run at the high-fidelity-enabling speed of 19 cm/s (7.5 IPS), and began to run commercials on them.[1] General managers, lawyers, and salespeople became involved, and a company was formed (ATC—Automatic Tape Control Company [please do not ask where the 2nd. capital C went…]).
As carts enjoyed a brief flurry of public notoriety as the first stereophonic recording format for the car (4-track cartridges—2 pairs of stereo programs run at 9.5 cm/s [3 3/4 IPS]) sometime in the early ’60’s, other manufacturers shattered the Fidelipac monopoly. 4-tracks soon got blown out of the water by quasi-incompatible 8-tracks (8 has to be better than 4, right? Right?), and both eventually disappeared from the mass consumer (munch, munch) world as cassettes and their machines improved. 4-track cartridges are identical or cheapened versions of broadcast carts, and can be bulk erased and used as carts, but 8-tracks contain their own sleazy pinch rollers and won’t work, which is just as well, really. In most cases, it’s best to leave the prehistoric musical sounds intact.
Once out of favor as a mass-market commodity, the evolution of the cart slowed to a crawl, with the only truly significant innovation over the original Fidelipac 300 being the ITC/3M Scotchcart, introduced in the mid-80s.
Mommy… where do carts come from?
“Real” radio stations buy them brand new and shiny, usually loaded with tape and ready for use, from broadcast supply houses. KALX, derelict penniless scunges that we are, “inherits” broken, dirty, worn-out cast-offs from more fortunate (economically—not creatively!) stations, and refurbishes them by washing, replacing worn-out pads and other mechanical parts, and reloading with new “lube” tape (explained below). Sometimes we score bigtime, and the donations are usable as-is.
What every production bunny needs to know about carts
All carts have an endless loop of special cart tape, a bottom shell, and a top shell. Beyond that, each brand and model has several other pieces, most vital, some not. These will be discussed in excruciating detail later.
Pads
Pressure pads are made out of various foam materials, some of which enjoy chemically breaking down at the slightest hint of smog (and we certainly have more than a slight hint here!). The foam not only loses its resilience, but becomes gooey and sticky. The goo wanders on to the tape, causing it to stick to itself and jam, destroying the cart. Worse, the goo enjoys hiking the short distance to the pinch roller/capstan (the rotating things that grab the tape and move it) of any cart machine unfortunate enough to be playing said cart in said condition. The goo gleefully adheres to the capstan and/or pinch roller, merrily spinning around, adhering to its buddies on the contaminated tape, yanking tape out of the cart, jamming the machine. Presumably by this point, the operator has noticed something is wrong, since there is no longer any sound from the cart, and pulls the deceased cart out of service. Alas, the agony and woe have just commenced. For you see, there’s still plenty of goo merrily spinning. Eventually it gets dizzy, and attaches itself to the tape of the next cart played in that machine. The process repeats until the goo runs out. Death toll: one bad cart, and usually 2-3 good carts, all now needing new tape (or at least master surgery).
The Tape
Cart tape is the same width and thickness as standard 1/4" reel-to-reel tape, but is impregnated (don’t ask) with a dry lubricant on the back side, which allows layers of tape to slip over each other easily and smoothly (not unlike… well… never mind), essential for low wow & flutter (consult your local nerd for elaboration). For this reason, NEVER USE REGULAR REEL-TO-REEL TAPE IN A CART. You may run cart tape on a reel-to-reel, but the lubricant will gum up the tape path, so plan on cleaning the deck thoroughly after use. Just like other tape formats, cart tape is available in several formulations, quite useful to the new cart purchaser, but a damned nuisance for you, and an all-out nightmare for our engineers. See, most tape machines can only be correctly adjusted for one formulation (our Dynamaxes fake two), which will provide the pinnacle of sound quality. Other formulations will vary from pretty good to abysmal when used on the same machine, not because they’re any worse, just because they’re different (kinda like the S.A.T. and related “standard examinations”). That’s life. KALX is standardized to Scotch 158 “lube” tape (lube=slippery back coating). Unfortunately, 3M discontinued Scotch 158 around 1981, putting us in quite a bind. Yours truly bought up as much 158 as po$$ible, in hopes it would last until carts became obsolete, or a shower of Scotchcarts descended upon KALX. As none of these things has yet come to be, please use new cart tape exceedingly sparingly—there will never be any more 158. We are slowly converting over to the tape used in Scotchcart IIs, for which i have no model #. Until Scotchcart IIs enjoy majority status, all KALX cart machines will remain biased for Scotch 158, which should continue to be loaded in all non-Scotchcarts until it is gone. Scotchcarts should be saved for the finest of music and musical production works, and be recorded only in the Dynamax cart machine in the Production Studio, with an Elevated Level Cartscan sticker attached (which lets the machine know whooo’s in the houuuse). The tape in most of the carts donated to us is almost always close enough to be usable.
Tape is known to jam from tension being too tight, too loose and loops getting caught in the case or machine, pad goo or spilled beverage contamination, floating wires in Fidelipac 300/350s, failed brakes, or just because it’s in the mood. If the jam is slight, or is caught soon enough, the tape may only sustain slight crumpling, in which case it can be carefully ironed on the lowest setting of most typical household clothing irons (personally, i iron far more tape than cloth). Severe crumples and/or stretching or breakage is irreparable, and the tape must either be shortened back to the splice, or disposed of. Anyone who uses a cart as a master with no backup of any kind has a fool for a doctor.
Testing Pads
Using soft lint-free fabric or paper as an intermediary, push in on the pad with your finger (or use a dry cotton swab) and release. If the pad jumps right back out, it’s good. If it oozes out slowly, it is on its way out, and should be changed soon. If it doesn’t come back to original shape, it is bad, and needs to be replaced immediately, or taken out of service.
Testing Tape
Start by insuring that all pads are present and good—there is no way to check the tape with bad pads. Visually inspect the tape. If the tape pack looks normal, and the visible part in the window is not crinkled, bulk and run the cart in record. Use a stereo machine if possible, and record music at normal level. Put the cart recorder in Audition, and repeatedly switch the monitor between Audition and Program. Set monitor system to Mono and repeat. If the sound quality is nearly identical in stereo Audition and Program, and no more than slightly worse in mono, and no audible drop-outs (excepting splice) are noted, the tape is good. If stereo Audition sounds noticeably worse than Program, and pads are good, the tape is bad. (If the cart is a padless Tapex, try inserting pads before condemning the tape). If stereo Aud./Pgm. are o.k., but mono Audition sounds noticeably worse, the tape is probably o.k., but the path over which the tape travels in the cart is not. Choices:
- Have a Cart Master adjust the cart’s guides (or try it yourself—make cart’s guides center the tape in machine’s guides—most accurately done by adjusting while machine is recording, and you’re monitoring Audition in mono. TAPE MUST NOT CURL ON ANY GUIDE!).
- Evict the cart to where it will only find itself in mono cart recorders.
Symptoms of Impending Doom
- Loss of High Frequencies
- Bad pads, misplaced guides, worn or damaged tape.
- Mechanical Noise
- Vagrant wire in Fidelipacs, gummy/missing hub spindle lubrication, defective brake.
Track Arrangements/Cue Tones/Heads
Except for special machines such as delay units, all cart players have one head in the center of the tape path. All cart recorders have this same play head in the same place, and add a matching record head to the left (looking into the machine through the cart slot). This leaves no room for an erase head on A size carts, so regular cart machines have no erase head. Although modern technology allows an erase head to be squeezed in to the existing cart openings, there’s really no point since bulk erasers do a far better job than any erase head (when used properly).
You already know that cart tape is the same size as reel-to-reel tape. Are the tracks the same? [Do you care?] Yes and no. Please consult the illustration:
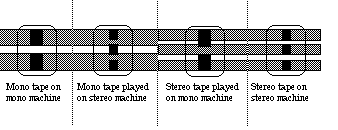
Mono carts have two tracks. The upper track carries the mono audio signal, and the lower track holds the cue tone(s).
One of the most clever innovations that Ted & Jack came up with back in ’59 was the use of cue tones to tell the cart machine when to stop. All cart machines record a short (approx. 1 sec.) 1 kHz. tone burst on the cue track at the beginning of recording, at the moment the start button is pressed in the record mode (this can be turned off on the Dynamax by pressing the record preset button twice instead of once). This 1 kHz. tone is also called the Primary cue tone. The cue track on the play head in all cart machines listens for this tone, and commands the machine to stop when it “hears” it. It is for this reason that newly-wound carts will never stop until something is recorded on them. Failure of recorded carts to stop may be due to 1 kHz. defeat being active on the Dynamax during recording, or bad pads. Always check pads of carts that fail to cue, but used to be o.k.
Some machines are also equipped with Secondary and possibly Tertiary cue tones. Originally introduced to control automation equipment, there is no universally accepted way of using these tones. Most stations use them in some form as an “end-of-message” signal to the operator, or automation controller. These tones are recorded onto the cue track manually by the operator pressing the appropriate button(s) at the appropriate time(s). KALX uses the Secondary (150 Hz.) tone as an end-of-message warning, recorded from 5 sec. ±1 sec. from the end to the bitter last moment of sound. This accomplishes two things: 1. Lights a light to warn the operator 5 sec. before the end, and 2. Kicks the player automatically into fast forward and mutes the audio at the moment of the bitter end (at least on the Dynamaxes). The KALX Engineering Dept. is reserving the use of the Tertiary (8 kHz.) tone for automatic control of EBS equipment, or other uses. Do not record Tertiary tones—you never know what might happen!
Stereo cart machines have three tracks. The top is left channel audio, the middle is right channel audio, and the bottom is the cue track. The cue system works exactly as for mono machines. So how does a cart know whether it’s mono or stereo? What happens when a mono-recorded cart is played in a stereo machine, or vice-versa?
Despite the misleading “Stereo 350” label on some Fidopacks, carts are equally capable of being mono or stereo. The machine in which they are recorded determines which they will become. Once bulked, they are free to become either again.
As can be seen in the illustration, mono carts played in stereo machines put a more-or-less full strength signal into the left channel circuits of a stereo player, and virtually nothing in the right channel. This sounds piss-poor on the air, since there’s little but tape hiss on the right channel. Operators must switch the cart to a mono machine, run to the patch bay , or play with the board. The cue track is usually strong enough to correctly operate the stereo machine’s cue circuitry, but this is by no means guaranteed. Our Dynamaxes allow a mono Cartscan label to be attached to the side of the cart to inform the machine that a mono cart is in the house and is in full effect. The machine then automatically puts the mono track out of both channels, just as a mono machine would. There is still a slight signal-to-noise degradation due to the smaller track width of the stereo machine, but it’s not a real big deal. As of this writing, all air indefinite-kill mono carts are tagged with Cartscan labels, except the Musicarts, which are allegedly being recarted in stereo wherever possible (and it’s mostly my fault when they’re not). Mono carts may be recorded in the stereo Dynamax recorder if the cart is wearing the fashionable mono Cartscan label, but the smaller track width of the record head will incite a noise penalty. Recording on a genuine mono machine is a better, higher-fidelity choice.
When a stereo cart is played in a mono machine, the wide top track of the mono player picks up the full left channel track, some noise garbage, and perhaps a touch of the right channel track. There is no magic label or any other trick to recover the missing right channel–the cart must be moved to a stereo player. The cue tone usually works correctly.
Standard Cart Lengths/sizes—conservation of carts
The carts KALX deals with are all NAB size A (the smallest), capable of holding enough tape for up to 10½ minutes of audio. NAB size B is approx. twice as big, and holds up to about 20 min. NAB C size is giant, and can cram up to 31 minutes of endless loop audio into one cart. If you’ve ever wondered why some cart machines have bigger slots, that’s why. KALX has a few of these sacred artifacts in the production museum–ask to see them sometime. Some poverty-stricken stations still use B & C size carts in delay machines for censoring naughty naughtys, but even fairly cheap stations can now afford digital delays for this purpose that work far better than carts ever could. And then some stations are just so cool and have such quick-handed, creative operators, they just don’t need a delay (any station you know?). Program elements longer than 10.5 min. are put on reel-to-reel or some other tape format, both at KALX and elsewhere. This manual only deals with size A, as that is all you’re likely to ever meet (and besides, you’re plenty bright enough to figure out Bs and Cs if you ever need to do so).
Standard KALX cart lengths are as follows:| 20 sec. | 13' |
| 40 sec. | 25' |
| 70 sec.(=1min. 10 sec.) | 44' |
| 90 sec.(=1½ min.) | 57' |
| 2 min. | 75' |
| 2½ | 94' |
| 3 | 113' |
| 3½ | 132' |
| 4 | 150' |
| 4½ | 169' |
| 5 | 188' |
| 5½ | 207' |
These are all industry standard lengths. Other industry standards include 10 sec., 100 sec., 6 min., 6½, 7½, 8, 8½, 10, and 10½ minutes. KALX winds carts shorter than 20 sec. only for specialty carts which will run a long time. Carts longer than 5½ min. are wound to the nearest standard 30 sec. (i.e. full minute or minute-and-a-half) on an as-needed basis. There are already a number of odd large sizes around, so be sure the station has been scoured before going to the trouble of custom winding.
Speaking of odd sizes (actually lengths), some of the carts inherited from other stations (as well as KALX winding mistakes and specialty carts which have killed) do not correspond to standard lengths. These have traditionally been stacked in the next-smaller standard length blank stack, in the production studio, since production people are more likely to need/more capable of using odd lengths. There is no particular advantage to modifying these carts if they are good, but please try and avoid creating more of them—they are sooo annoying to some. It is possible to squeeze more than 10½ min. into an A body, but it is not recommended.
It’s a strange and not scientifically-proven phenomenon, but it has been found true that producers who use excessively long carts happen to use exactly the sizes that other producers need, forcing the other producers to also use excessively long carts. Besides being a butt-pain for the air staff and other end-users (no pun intended), longer carts wear themselves and the cart machines out faster (due to increased friction), and you wind up having to wind more carts! So make sure that everyone uses the correct length cart at all times, and try and avert size shortages.
Winding Carts
DO NOT LOAD NEW TAPE INTO CARTS UNLESS ABSOLUTELY NECESSARY!The process called “winding” actually involves a complete overhaul. The finished cart is virtually equivalent to a new one. Note: this service is offered by many small firms known as cart refurbishers, a local example being Western States Cartridge Service, 93 Banbridge Place, Pleasant Hill, CA 94523, (415) 932-0828 (address may have changed). So, there are job opportunities in the exclusive field of cart caretaking (and you can even run it out of a home, as Western States seems to do)! Of course, this co$t$ money, so we do it ourselves at KALX. And that’s exactly what makes you so wonderfully, vitally important to the air sound of kalx, now and in the future! Sooo, stop eating, wash your hands, and let’s go…
Overview
The following steps are necessary for complete refurbishment:- Disassembly and inspection
- Cleaning
- Winding of new tape
- Reassembly and testing
Disassembly and inspection
- Remove top shell. Remove wire. Remove tape pack. Test all pads–remove and discard as necessary. Do not install new pads until after washing.
- Carefully inspect top & bottom shells for large cracks and/or missing structural parts. Repair or remove damaged brake mechanisms. Certain types of damage are not worth repairing. Scavenge good small parts and throw away the rest as necessary.
- Note any missing parts. Replace as necessary and available.
Cleaning
- Peel off all old labels except cart timing or manufacturing labels.
- Give top & bottom cart shells a soap & water bath (liquid dish detergent is fine, 409® or Fantastik® work very well also). Focus your attention on the exterior. Dry thoroughly.
- Use alcohol or other solvent to remove old center hub shaft lubrication if the cart was excessively mechanically noisy. Leave clean and dry for now.
Winding
Most stations that wind their own carts buy special winding machines. Our clever elders discovered that an obsolete Magnecord “portable” reel-to-reel works just as well, since it runs backwards from standard reel decks of modern times. This is ideal for all windable carts except Tapex, which want to be wound in the regular direction. The VM reel-to-reel is specially adjusted to wind Tapex carts. The Magnecord has also been custom adjusted for cart winding. Scotchcarts cannot be wound on either of these machines—please consult the Scotchcart section.
- Invert tape pack/hub over trash can (sorry, no one currently recycles magnetic tape as far as i know), allowing tape to unwind itself into can (this can actually be quite a lot of fun). Clean tape hub.
- Place hub on takeup side of winder using appropriate bottom spacer cardboard pieces (spacers). Place appropriate tape spacer ring on hub.
- Thread reel of lube tape on winder. Remember, carts are “B wind”, so the oxide (brown for Scotch 158) side should be facing outward as wound onto the cart hub. Fasten loose end of tape under spacer ring. Fasten top cardboard spacer and reel clamp in place. Wind 1–3 turns by hand.
- Set the VM winder to 7½. The Magnecord always runs at this speed. Now, whichever machine you are using will run in “real time”—the same speed as our cart machines.
- Simultaneously turn on winder and start your stopwatch, or otherwise deal with timing. Continue to supervise the winding process. It’s a good time to glue in pads or start your next cart if you’re baby sitting a long one.
- Stop winder 4-5 sec. after desired length has been reached. This guarantees that a 3½ min. cart will hold 3½ minutes of audio, even if the cart machine it’s recorded on runs fast. Please be consistent about this unless you’re winding a specialty cart.
- Cut tape with razor blade near supply reel. The excess will have your fingerprints all over it, and will be cut off, rendering the correct length.
- Remove Reel clamp and top cardboard spacer from hub. Slowly and carefully scootch out the spacer ring, holding the top edge of the tape pack with free fingers. Make sure at least 4-5 cm. of the inside end is sticking up.
- Hold outside end, and turn on winder again. The hub will spin until the slack is taken up, then will stop while the machine’s reel table continues to spin underneath. Turn off winder at this point. If inner end falls into pack, stop winder immediately and rescue it.
- Using red ink only, write winding date on hub or back of pad. Write time on left front side edge of cart body in any visible color, directly on body or on a small label. Optionally write the time on the hub (red ink only).
Reassembly and Testing
- Code current date on the spine of any new pads used, in BLACK INK ONLY. Mastercart pads only allow month and year, others should include day also.
- Apply white glue to the slot(s) of Fidelipacs, Tapexs, and Aristocarts. No pad glue is usually necessary on Audiopaks. Insert and position pads.
- Insert teflon® washer (if used). Place reel hub on shaft.
Verify correct tape tension as follows: Release brake (if so equipped). Pull inner end outward along the axis of the tape, as the machine normally would. You should feel some slight resistance. Now pull sideways outward. Tape should decline to go this way. It is too loose if it does, or if you felt no resistance in the previous test. If you felt strong resistance, or the tape began to crinkle, in the first test, the pack is too tight.
Excessively tight packs are loosened by rotating the pack clockwise (all except Tapex. Reverse all rotational notes in this section when dealing with Tapexes), working from outer layers toward inner, using finger(s) on the top edge of the pack. Be very careful not to fold loops of tape over in the middle of the pack. Retest. Excessively tight packs are the rule if the spacer ring was left out during winding.
Seldom are packs excessively loose if the above instructions have been followed. If a loose pack is encountered, hold the inner end/first few inner turns of the pack, and pull out on the outer end until an increase in resistance is felt (Felt—a much better band when Elisabeth Fraser guesting on vocals). Retest.
- Pull out enough of the inner end to be past what you have contaminated by handling (nothing personal—just presuming you’re a biological creature like most humans, and secrete finger oils). Thread through the cart’s tape path. Do the same with the outer end, being sure to pass by contaminated parts. Mark or memorize splice point.
- Carefully remove hub, and splice tape on splicing block. Use the blue mylar splicing tape if possible, even though it’s harder to cut (try a razor blade). The splice is on the shiny (black/gray on Scotch 158) side of the tape. The quality of your splice directly affects the life of the cart, as well as the sound quality if some bonehead records over it—give it your best.
- Put hub back in cart shell, rethread tape. Reinsert wires and other quirky small parts. Reassemble shell and snugly tighten case screw(s).
- Run the cart in a working machine. Listen for creaks, squeaks, and groans. Excessive squealing may indicate the need for lubricant on the hub shaft. Disassemble cart and sparingly apply some grease-type lubricant, then test again. If tape jams, go back to cart school.
- Record music on the cart, monitor cart machine in Audition, and verify that the sound quality is nearly identical in Program and Audition, both stereo and mono. If not, consult a cart guru.
If all tests are passed, it’s done. Put it in the blank stack, and pat yourself on the back. Good job!—you’re work is done……now have fun.
Specific Cart Brand/Model Information
…is handily provided on separate web pages, for your speedy loading time and avoidance of unwanted information pleasure:- Fidelipac 300 (gray)—This page contains detailed information on carts in general, not repeated on the pages for other specific carts (so: recommended that you read this page)
- Fidelipac “Stereo 350” (gray)
- Fidelipac Mastercart (red or gold)
- Audiopak A-2 (black)
- Audiopak AA-3
- Aristocart (clear/black/light blue—boxy front)
- Tapex (clear with tapered, angular front)
- Scotchcart, Scotchcart II (usually brown, sometimes black)
The Future
(Left intact for your new millennium reading hilarity)As of this writing (late summer 1989), digital audio workstations are beginning to supplant carts at a few major-market commercial stations with bottomle$$ pocket$. These contraptions have few/no moving parts, excellent sound quality, and allow non-destructive editing. Although obscenely expensive and able to hold only short audio segments, they, or something better than them, will one day replace carts, and eventually reel-to-reels also.
What does this mean to you and KALX? First, the illustrious Production Director should keep abreast of developments in the audio workstation field, and rate of price change—there will come a time when it will be cheaper to dump some or all worn-out carts in favor of these things. Make no mistake about it–KALX is destined to have lotsa carts kicking around until at least the turn of the millennium, barring dramatic price drops on the workstations, which brings us to…
Point two: as commercial/wealthy stations get these new toys, they will no longer need carts. The aforementioned illustrious Production Director needs to be on the lookout for stations wishing to lose carts to a poverty-stricken, waif-like non-profit entity such as ourselves, in exchange for a gracious thank-you letter and a healthy tax writeoff. Sonically and economically, it’s best to hunt down Scotchcarts, as they are less expensive to refurbish, and work better. The relative value of other brands will be determined by parts availability and price. Other carts seen as of this writing in declining order of sonic quality:
- Aristocart
- Audiopak AA-3/Fidelipac Mastercart (tie)
- Audiopak A-2/Fidelipac 350/300/Tapex (4 way tie for last—almost an album title)
Knock yourselves silly, and keep those packs o’ tape relentlessly rotating.
[1] Prior to this act of genius, programmers had to grapple with dozens of dinky reels of tape, relentlessly threading, playing, rewinding, and unthreading them to run commercials, PSAs, promos, and other short program elements. Music was virtually always direct from vinyl/shellac.