Secure Email in OS X, Apple Mail
with side explorations into Being Your Own Certificate Authority and transferring the Mac-made security credentials to an iPhone 4S running iOS 9
Acknowledgments
This article is based upon the wisdom of many sources, and could not exist without:- Numerous entries on Mac OS X Hints
- Fun with Certificates by JW Walker
- Various Apple documents
- Various standards documents
Introduction
Most people know that standard Internet email is sent and received in what is called cleartext, which is to say: the actual 1s and 0s making up the message as it “goes over the wires” (or passes through the series of tubes ![]() ) is trivially easy to decode back into human-readable prose. Anyone anywhere along the path from sender to receiver (with a few specific exceptions we won’t discuss in this article) can easily snag a copy of the message and read it… and in some cases change it without being detected! In this way, standard Internet cleartext email messages are often compared to post cards in paper mail: anyone along the way can read them with basically no effort.
) is trivially easy to decode back into human-readable prose. Anyone anywhere along the path from sender to receiver (with a few specific exceptions we won’t discuss in this article) can easily snag a copy of the message and read it… and in some cases change it without being detected! In this way, standard Internet cleartext email messages are often compared to post cards in paper mail: anyone along the way can read them with basically no effort.
Further, as anyone who’s received phishing emails knows, with standard Internet email it is trivially easy to pretend to be someone else. It takes a bit of effort and a good whack of technical expertise on the part of the recipient to prove to themselves that a particular email message is legitimate, and at least as much effort on the part of the sender (and in some cases, their Email Service Provider) to do what little they can to “prove” that the message is legitimate. Many systems have been proposed and a few have been implemented to combat spam and phishing, yet so far none are both fully effective and widely deployed.
Choices
There exist several different systems to directly address these problems. The cleartext problem is handled via encryption: converting the cleartext to ciphertext, unreadable “gibberish” to human eyes, which cannot be read/decoded without knowing the encryption details and possessing a specific digital key (code) to “unlock” the human-readable cleartext. The “Are you really who you claim to be?” and modification in transit problem is handled by some form of authentication, such as a digital signature.
One system which was popular (at least amongst the tech-savvy and security-minded) in the 1990s and early 2000s and still has many adherents today is PGP (and GPG and maybe other relations). One significant problem with PGP and its relatives was and is deployment: PGP etc. have not been widely deployed. Despite everyone’s best efforts, setup can be difficult (last i checked… circa 1998). Security-conscious techies have no problem and are all over it, but their many correspondents who are not those things find it too much hassle and trouble, and don’t bother.
Like PGP etc., any currently-known encryption and authentication system needs to have support at both ends of the email transaction: sending and receiving. Support in the middle (ISPs, ESPs) already exists as long as the entities support Internet email standards, which virtually all of them do. People typically being some combination of busy/lazy/unconcerned tend not to go to much effort to install nor set up these sorts of systems[1].
Over the last decade or so, S/MIME—a system of digital certificates combined with a public key infrastructure—has become prominent. The huge advantage of this certificate/key system is that it is widely supported across different email client software (MUAs) and platforms. It comes pre-installed on Apple’s Mac OS X computers, most completely and in a real-world usable form starting with OS 10.4 Tiger.
Scope of This Article
There are many different ways to obtain or create certificates and pairs of public and private keys, and many uses for these items. I’ve read that most computer systems and many different email programs support certificates and keys. I only have direct experience with Mac OS X and Apple’s Mail program.
- Obtaining a certificate from an existing, well-established certificate authority
- Using certificates for anything other than securely exchanging email messages
- Platforms other than Mac OS X/macOS*
- Email client software (MUAs) other than Apple Mail
How Secure Email in Mail Works (once everything is set up)
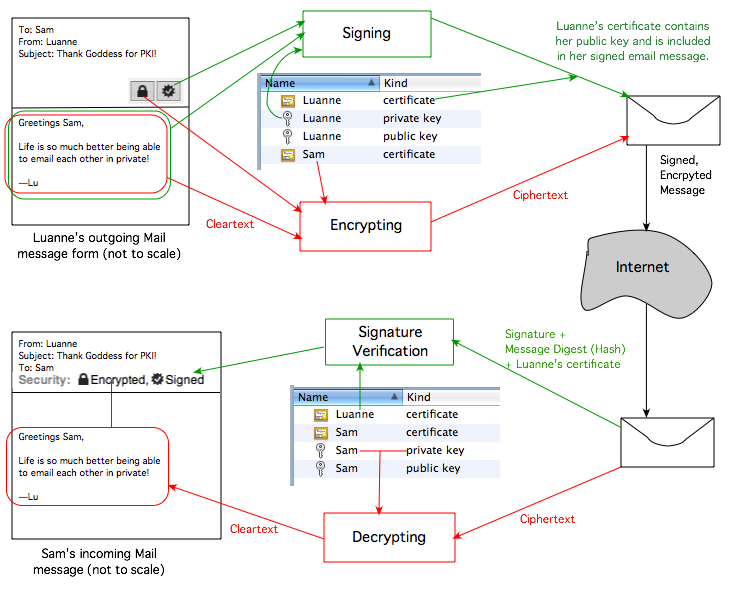
Luann composes an email to Sam. She wants it to be private, so she clicks the padlock icon so it shows as “locked” (and it is highlighted). This tells Mail to use Sam’s public key (part of Sam’s certificate) to encrypt the message. Because everything is already all set up, Sam’s certificate (containing his public key) already exists on Luann’s machine in her keychain. Only Sam has his private key from this key pair (on his Mac), so only he can decode Luann’s message to him (and only on the Mac[s] properly set up with his private key).
Luann also wants to let Sam know that the message definitely came from her, not some impostor or “man in the middle”, and that it has not been modified in transit. She clicks the seal icon so it shows a checkmark inside (and it is highlighted). Her Apple Mail for Tiger message composition window’s upper right side now looks like this:

Mail will use Luann’s private key to sign the outgoing email message, and will include her certificate (which contains her public key). Sam’s Mail will use his pre-existing pre-installed (into his keychain) copy of Luann’s certificate to verify that the signature matches, and thus that the email message truly came from Luann. (This of course assumes that Luann and Sam can trust the self-signed certificates they receive from each other. As it turns out, there are several fairly simple ways to do this.)
Because the signing process performs mathematical operations on the actual message content, if a “man in the middle” attempts to change the message, the signature will no longer match. So in addition to knowing that the message truly came from Luann, Sam will know that it has not been altered in transit, even if Luann had chosen not to encrypt it.
Note that signing and encrypting a message are two separate, independent processes. Most of the time, people who are fully set up to exchange secure email messages leave both options engaged… there is no reason not to.
In some cases, a person may want to prove their identity and that the message has not been altered in transit yet may have no need to ensure that the contents of the message is private. Example: Jen may want to send a single email message to a group of her friends: Margo, Alicia, Rupert, and Sid. The content of the message does not need to be kept private, but Jen wants to ensure that her friends know that the message really came from her (Jen) and was not altered between her sending and their receiving the message. If and only if Jen has emailed a signed message to each of her friends in the past and each one of them has (at that earlier time) gone through the needed steps to accept Jen’s certificate as legitimate, Jen will be able to tick the seal box (highlighted, checked) to digitally sign the message, but will leave the padlock unlocked. Note that each friend’s involvement is restricted to accepting Jen’s certificate at some point in time; none of them need to have created their own certificate/key pair.
Going the other direction (and considering just one single friend to keep things simpler), in theory Margo can send an encrypted email message to Jen, since Margo’s Mail will use the public key inside Jen’s certificate to encrypt the message, and Jen has her private key to decode it at her end. But since Margo has no certificate/keys, she can’t sign the message. So, she’d click the padlock icon, but would not have the option of clicking the seal icon, which would remain grayed out. In reality this cannot happen, because Mail does not even show the security checkboxes to the user unless that user has their own valid certificate-key credential set already installed. Margo (and/or any other friend) can reply to Jen with a traditional insecure email message, or she may choose to set up secure email on her system and go through the steps with Jen to get Jen’s system to accept her certificate, at which point she could then reply securely with any combination of encryption and/or signing.
Obtaining a Certificate vs. Self-Signed
For those who wish or need to securely correspond with a large number of people, everyone involved will find it easier to obtain a certificate from an existing, known, legitimate certificate authority (CA). Most CAs charge a fee, yet some have been known to supply a single certificate for personal-use email for free (check your local search engine for links to the latest current information). The advantage to using a certificate from an existing, known CA is that your new certificate will be automatically trusted by the computing devices used by your correspondents, as theirs will be on your system if they also use a known CA.
Self-signed certificates are great for those who:- Are thrifty (or cheap) and don’t want to pay for a certificate
- May not trust existing CAs
- Have few correspondents with whom they wish to exchange secure email messages, and those individuals are willing to do the setup at their end (or let someone else onto their equipment to do the setup)
- Like to get their geek on and learn how stuff works
- It is not necessary for different people to use the same CA. Any legitimate CA whose own valid, unexpired certificate exists in most computing systems (distributed with the OS) is fine.
- It is OK for one person (say, Tom) to use a self-signed certificate and the other person (say, Alison) use one from a known CA, as long as Alison is willing to make the effort to accept Tom’s self-signed certificate on her system.
Overview of the Setup Process
- Create a root certificate and public/private key pair
- Install and authenticate the certificate and keys
- Transmit the certificate to each and every correspondent with whom you wish to have a secure email exchange
- Have them authenticate (trust) your certificate on their system, possibly using some independent means of verification
- Have them perform the same steps at their end
- Test sending and receiving email messages with and without encryption and with and without signing, both directions
Points common to all OS versions
The certificate and key pair are created using Certificate Assistant, which is invoked via the application menu of Keychain Access.
It is usually easiest to send a signed but not encrypted email message to the other party(ies) to get your certificate (with your public key inside) to them. It may be a good idea to use some independent means of verification that the certificate you just received actually came from the person who allegedly sent it. One good way to do this is to talk on the phone as the certificate is being emailed and received, then having both people open up the Details section of the certificate, then having the sender read one of the fingerprint codes to the recipient and have the recipient confirm. The process of exchanging and trusting is discussed below in detail.
It is very important that each person back up their credentials (certificate, public key, private key) and keep them secure. The private key is especially important: encrypted messages cannot be decrypted without it… now or in the future! For this reason, be sure to save old/expired credentials—at least your private key(s) and others’ public keys or certificates—for as long as you retain old, encrypted email messages. Backing up your new security credentials is discussed in detail below.
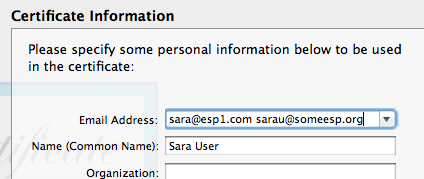
During the certificate creation process, you will be asked to fill out a large number of fields of Certificate Information. Note that it is not necessary to fill out any information fields other than:
- User Email Address
- Common Name
- Serial Number
- Validity Period (days)
Certificate Structure
The certificate structure is derived from the X.509 v3 standard. It was designed to support the X.500 system, a hierarchical system which has almost never been implemented. Each of those fields has a specific meaning within the original nature and goals of that standard, but are irrelevant for the purposes of S/MIME email security. They may be left blank or filled in with free-form information (though doing the latter may in some cases make the certificate unusable for purposes besides S/MIME). Perfectionists may want to attempt to fill in as many of the fields as accurately as possible, in case they want to use the same certificate for other X509 purposes.
I have found that—at least for Mac OS X and Mail and self-signed certificates—the Serial Number does not seem to matter. During testing, i repeatedly re-used the value “1” with no difficulty. Similarly, choosing other numbers seemed to have no effect. If you plan to have more than one certificate for the same Common Name and/or email address in the same keychain at the same time, i recommend ensuring that the serial numbers differ (and even then, there are reports that the OS and/or its bundled software have trouble keeping multiple certificates for the same name or address straight).
Now, Certificate Authority (CA) certificates (root and subsidiary) are another matter: serial numbers very much matter with those: no duplication (within a single keychain) allowed! This is discussed in detail in the article on making certificates for others.
It should be obvious that the User Email Address should exactly match the correct address for which the certificate is being made—watch out for typos! Enter just the address:
Yes: user@emailservice.comNot the human-readable part:
No: Super User <user@emailservice.com>The Common Name is not truly essential, but it does make it easier to find the certificate in the keychain. It may be any text. It will be visible as the name of the certificate, both to you on your system and to all your correspondents on their systems. It usually makes sense to have it match the “real human” name you use with your email address (the part of your full email address other than the you@youresp.com part. In other words Super User in the example above), but this is not required for proper operation.
Extra Credit: X.509 v3 Certificate Extensions
Those of you who merely want to make this stuff work and get on with your lives are almost ready to do just that (a little farther below). Those of you who prefer to understand as much as possible about what’s going on may wish to peruse this fool’s findings (over many years) regarding X.509 version 3 Certificate Extensions, then return here.
New Security Credentials
In all cases, the final question asked by Certificate Assistant is in which keychain do you wish your certificate (and keys, though Certificate Assistant does not mention those) to be stored? The default location is your OS X user’s login keychain, and this is in all cases the correct answer.
Once you click Continue this one final time, Certificate Assistant generates three items, which it places in your login keychain:
- Your certificate
- Your public key
- Your private key
This is slightly redundant in that the public key is wholly contained within the certificate. I have done some brief testing in the past whereby i deleted the public key or did not move it over to a new Mac (moving only the certificate and the private key) and secure email in Mail still worked fine. I expect that the public key is created for use with other security systems (maybe PGP?) which need both keys but have no need/use for the whole X.509v3 certificate. I left this key in its default position during the testing which led to this article. Tiger and at least some other OS X versions work fine for me without the public key, yet i did not explicitly track/test this across all OS X/Mail versions and have no plans to do so. I will note that Keychain Access in newer OSes (e.g. Sierra) may complain (put up error messages) if/when a public key made elsewhere is imported into them when a certificate (with the same public key) is already present.
Backup
I suggest in the strongest possible terms that you back up your newly-created security credentials (ones you actually use… not any you may have temporarily made for testing-only purposes). You really should keep all three items, together. The most critical is your private key, which needs to be stored securely in a manner whereby other people won’t be able to access it. One excellent, secure way to do this is to create a new keychain and move copies of the items into it. This is discussed in detail below.
Sharing One Set of Credentials with Other Machines
One set of your email security credentials, properly created, should be used on all devices you own. If/when you get a new (or another) Mac, or other device capable of S/MIME, you’ll need to follow the instructions for that system to import your certificate and private key, or your public and private keys, or all three items, as your particular system requires. For other OS X Macs running Tiger or later, move a copy of the keychain containing two of the three files (the certificate .cer and private key .p12 files, skipping the public key .pem), or copies of those items separately themselves if that is how you are storing them, perhaps via your backup medium, or file sharing, or whatever. Import the Keychain, or double click and add each item in turn to the login keychain, or use in Keychain Access. Check the setup instructions for your particular OS X version for further details plus any quirks which may apply.
Instructions Apply to OS X Standard User Accounts
Specific details of what happens, especially as described on the Detailed Setup Information for your OS X version, very likely will vary if you’re setting up secure email in a (default) OS X administrator account instead of a standard user OS X account. The definition and explanation of these terms is outside the scope of this article. Security-minded people likely already understand what i’m talking about and the many security and stupid mistake avoidance advantages of running your Mac every day from a standard user account. If you have no idea what these terms mean, i respectfully suggest you investigate them and consider reconfiguring your Mac(s)(if needed) to make full use of standard user accounts before further increasing your security via secure email.
The most likely variances between administrator and standard user accounts will be when/where authentication windows/sheets appear, and their exact wording.
Interoperability
In my testing so far, if self-signed certificates are created, installed, trusted, and shared per the instructions in this series of articles, the certificates/keys and secure email operation will interoperate across OS X and Mail versions tested as follows:
- OS 10.4 Tiger and Mail 2 through OS 10.13 High Sierra and Mail 11
- OS 10.6 Snow Leopard and Mail 4 through OS 10.15 Catalina and Mail 13 (newest tested as of the most recent revision date of this article)
Please note that there are so many combinations of settings and software versions and ways to install and trust them that it could take one person like me years to thoroughly test every option. Put simply: i didn’t. My testing has focused on settings relevant to S/MIME only… and i may not have tested every combination of these! I have only done limited testing with creating security credentials (certificate + keys) on one OS X version and importing them to another Mac with a different OS X version, yet since i’ve been testing that on the newest OS X/macOS available to me (Catalina 10.15 as of this revision) back and forth with Tiger 10.4.11 and it was working through 10.13 High Sierra, it is likely that the intermediate versions will work as well. Mojave 10.14 broke Tiger compatibility, yet works back to 10.6 Snow Leopard, so the basic premise remains intact. Precise forwards- and backwards-compatibility details are available on the relevant Detailed Setup Information OS-specific pages below and in the Key Size page.
Key Size, Algorithm, Security, and Compatibility
Added for the 2018 revision of this article, this is complicated enough that it’s on a separate page. The tl;dr is that through 2018 i’ve always considered 2048 bit RSA keys secure enough, but that may not apply to your needs, nor the future. Read the linked page for non-crypto-expert thoughts and suggestions as they related to S/MIME in Apple Mail on Macs.
Major Changes with OS 10.12 Sierra and newer
Historically this article recommended omitting the Key Usage Extension (KUE), which worked great on all OSes and their bundled Mail/Keychain Access/Certificate Assistant all the way from OS 10.4 Tiger through OS 10.11 El Capitan. As of OS 10.12 Sierra, Apple requires S/MIME certificates to have a proper KUE, else Mail will not accept them and secure email won’t work. As of 27 August 2017, all individual OS pages have been updated with this information, so any newly-made certificates should work all the way from 10.4 through at least 10.13 and likely later. There is no known workaround to get existing KUE-less certificates to work in Mail 10 for Sierra or newer.
If you have solid, well-tested/researched information regarding S/MIME and other products and you can see that the certificate settings i’m recommending will prevent Mac systems from interoperating with this/these other systems you know quite a bit about, i’ll appreciate learning what you know, and perhaps looking into adding needed information to this article series to enhance interoperation beyond Macintosh computers running OS X and using Apple Mail.
One Credential Set, Multiple Email Addresses
Believe it or not, it is possible to have one credential set (certificate, public key, private key) be associated with multiple email addresses! …Depending on your OS X version and what’s available to you, that is.
When using Certificate Assistant version 2.0 for OS X 10.5 Leopard or later, simply type in the multiple email addresses (just the RFC822 actual blah@someesp.com address part, not the human-readable part) separated by a single space:
(Some newer OS X versions [e.g. Mountain Lion] work equally well with comma+space-separated addresses, but older ones [e.g. Leopard and Tiger] do not. [I didn’t test on Snow Leopard nor Lion.] Space-separated has greater interoperability.)
Interestingly, Certificate Assistant version 1.0 for Tiger 10.4 cannot create credentials with multiple email addresses, but Mail 2 will happily use such credentials which have been created with a newer version of Certificate Assistant—as long as the addresses are space-separated, not comma-separated (tested with Certificate Assistant version 5.0 from Mountain Lion 10.8.3 and the final version 2.1.3 of Mail with the final Tiger 10.4.11 and all updates).
I’m not so sure of the real-world value of this, since if one changes email addresses or the credentials become compromised, all addresses will need a new multiple address credential (or individual credentials for each address). Still, some people may find this facility very useful indeed! I only tested with two addresses; i do not know the limit of the number of addresses. No clue whether non-Apple systems will take kindly to one certificate (or public key) with multiple addresses.
Detailed Setup Information
Apple continues to improve (in theory) its security systems with each OS release. Thus, each OS X version is at least a little different than others, and one has show-stopping horrible bugs which prevent real-world usability!
OS 10.5 Leopard through OS 10.15 Catalina work similarly, yet have individual differences (and bugs). OS 10.4 Tiger works very differently: somewhat bizarre and quirky, yet reliable and minimally buggy (once set up).
- Setup for OS 10.4 Tiger
- Setup for OS 10.5 Leopard MAJOR SHOW-STOPPING CRASHING BUG… Cannot Be Real-World Used! Let Apple know this is Not OK!
- Setup for OS 10.6 Snow Leopard
- Setup for OS 10.7 Lion
- Setup for OS 10.8 Mountain Lion
- Setup for OS 10.9 Mavericks
- Setup for OS 10.10 Yosemite Flaky security indicators
- Setup for OS 10.11 El Capitan Broken security indicators
- Setup for OS 10.12 Sierra
- Setup for OS 10.13 High Sierra Lying security banner
- Setup for OS 10.14 Mojave Breaks Tiger Backwards-Compatibility and Generally Broken
- Setup for OS 10.15 Catalina No Better Than Mojave, And That’s Not Good
Unless and until Apple fixes their bugs, if you have a choice, use any OS X version from 10.4 Tiger through 10.9 Mavericks except not 10.5 Leopard, or macOS 10.12 Sierra. So far as of the last modification date of this page, Mail 8 for Yosemite and especially Mail 9 for El Capitan have heinous S/MIME email bugs, and Mail 11 for High Sierra introduces a new annoying one. Mail 12 for Mojave and Mail 13 for Catalina double-down with even more awful bugs and break Tiger backwards-compatibility. The least buggy version to date is OS 10.6 Snow Leopard. Next best is a tie between OS 10.12 Sierra with the fewest bugs of the more recent OSes, and 10.4 Tiger, which is very stable once its crazy-insane setup is done to work around its many bugs. Unfortunately with the new(er) Mojave and Catalina bugs breaking Tiger, i can no longer recommend it as any sort of primary S/MIME Macintosh email system. Each of OS 10.7 through 10.9 and then again 10.12 are about as good/bad in terms of solid S/MIME secure email support in the OS and Mail, with 10.12 having a slight edge. I very strongly urge those of you who are stuck using 10.5 Leopard, 10.10 Yosemite, 10.11 El Capitan, 10.13 High Sierra, and especially 10.14 Mojave or 10.15 Catalina to follow the links above to learn more about the problem with your OS (or its Mail) and contact Apple with your thoughts and encouragement that they fix their bugs!
Preserve Your New Security Credentials: Back Up!
Now is the time to back up your new certificate, public key, and private key, archive them, or both!
Be sure to back up all three of these new items, ideally together. The private key in particular needs to be preserved—without it, if something goes wrong with the original on your system, you won’t be able to read encrypted email messages sent to you—ever again! If someone else gets ahold of your private key, they’ll be able to read private, encrypted messages sent to you—probably not what you want. If someone else gets ahold of your certificate (or public key, for other systems), it’s no big deal. Still it’s a good idea to have a backup in case you need to put your credentials on multiple machines, or you move to a new Mac.
One might think (or hope) that selecting the three items and dragging and dropping from inside Keychain Access to somewhere out in Finder would work… nope. Works for the certificate only, but not the keys. Even selecting all three items in Keychain Access then choosing fails, in a similar way: a promising-named item is created, but again it is only the certificate.
Note: the following information applies to all OS X versions tested to date (10.4 Tiger through 10.15 Catalina), however the windows and menus differ enough for Tiger that in addition to what lies below this same information with (mostly) Tiger screenshots is available on the detailed setup page for Tiger.
Credentials in a New Keychain (Best Option)
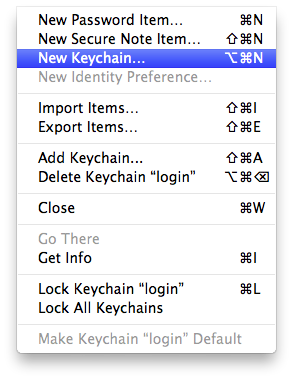
The best option to preserve these three credential items and keep them together is to create a new keychain and drag copies of them into this new keychain:
- Select from Keychain Access’s menu.
- Name the new keychain and be sure to save it some place where you can easily find it. I prefer the desktop.
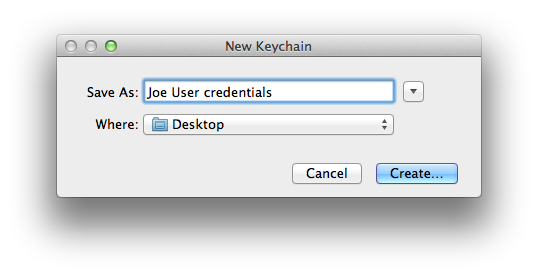
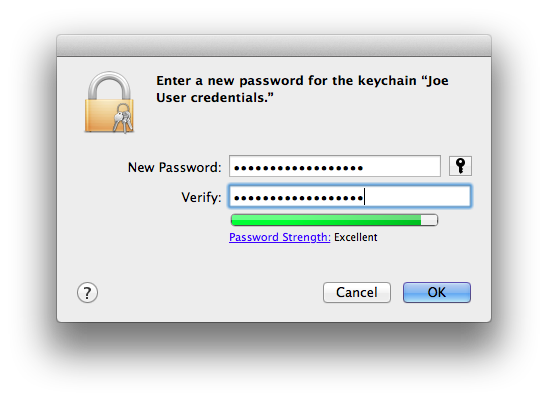
- Enter a strong password or passphrase for your new credentials keychain. Note: your private key is only as secure as this password/passphrase and where you eventually store this keychain! Be certain that you will not lose nor forget this password/passphrase! Not having the password/passphrase is effectively the same as no longer having any of these credentials, especially the private key, at all.
- Select the three items (certificate, public key, private key) in your login keychain. Hold down the Option key and drag these items as a group into your new keychain. You should see the usual green + sign with the items as you drag.
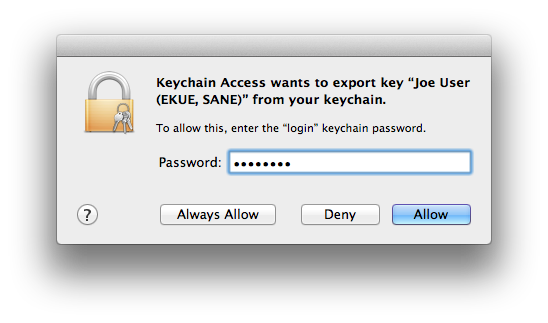
- Keychain Access will ask permission to copy your private key (as part of the group of 3 items you’re copying). Enter the password for your login keychain (not the one you just made) and, for security, click (but not ).
- Double-check that the three items still remain in your login keychain. If they moved rather than copied, go to your new keychain and carefully repeat the step above. In the end there should be one set of the three credentials in the login keychain and another in the new keychain you just created.

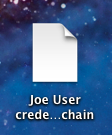
- Save one or more copies of your new keychain in one or more secure locations. Here’s what the keychain file looks like, out on the desktop:
Individually Saved Credentials (troublesome, buggy)
Another alternative which i used to use but found out doesn’t work as well is to save each item as a separate entity. If you use this approach, each item needs to be individually selected in Keychain Access, and exported using . For reasons not wholly clear to me, Keychain Access does not allow bundling all three items into one container, and it seems to be strict regarding what options may actually be used. I’ve only had success saving each item individually and in the following formats:
- Certificate (.cer) for the certificate:
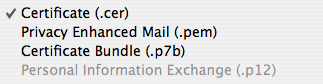
- Privacy Enhanced Mail (.pem) for the public key:
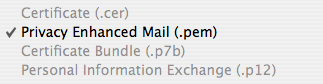
- Personal Information Exchange (.p12) with a password for the private key:
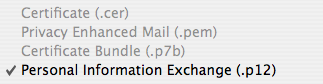
For this last format only, you will be asked for a password, without which you will not be able to open the .p12 file and retrieve your private key. Be sure to choose a suitably strong password to protect your private key, and be certain that you will not lose nor forget this password! Not having the password is effectively the same as no longer having the private key at all.
Creating Credentials for Someone Else
I need to exchange secure emails regarding high finance and family scandals with Grandpa, but the whole idea of all this makes his head spin. Like me he doesn’t trust public Certificate Authorities, and he lives across the continent! Is there anything I can do to get him set up?
You’re not going to visit your Grandfather and set it up for him in person (and fix the garage light like you promised to do last visit)?! Bad Weebus!![]()
You, ungrateful grandchild, get to take self-signed certificate playtime to the next level: you’ll create your own certificate authority and create a set of credentials for Gramps from the comfort of your own hoarder hovel (which, if anyone else in the family saw it, might create its own new family scandal). Here’s how….
Exchanging Certificates and Trusting Your Correspondents’ Certificate
The only credential of the three items created by Certificate Assistant which needs to be shared with each of your secure email correspondents is your certificate, which contains your public key. The whole process is fairly easy.
Exchanging
You have several options for exchanging certificates. The two with which i am familiar are:
- In person, via file sharing (networked or removable mass storage medium)
- Via email: send a signed email message to your correspondent(s)
In Person Exchange
Simply copy the certificate to the other person’s machine. The recipient will then double-click the certificate, add it to their login keychain, and trust it (discussed below).
Presumably when sharing in person, each of you are right there to authenticate “in person”: by being who you are, physically in all ways. There should be no issues about trusting certificates so obtained… unless one of you (or both!?) is/are 1/2 of a set of identical twins who play pranks on people (or have some other form of doppelgänger).
Email Exchange
Sending a certificate via email is more problematic: how does the recipient know for sure that the email message really did come from you? Sure, they could do forensic analysis, such as noting your prose style quirks, analyzing the email headers and comparing them to other recent messages from you, and so forth. That’s a lot of work, and even then, they couldn’t know for sure. Here’s what i do:
- I make arrangements in advance for about 20 minutes or so work-together time when the other party and myself can be at our Macs, and which of us will place a voice telephone call to the other.
- Each person sends the other an email message (new or a reply, and one can start and the other can reply in the same message thread, if desired) which the sender has signed, but Not encrypted. All you have to do is ensure that the seal icon has a checkmark and not an X, and that the padlock is unlocked, then send your message. There is no need to manually attach your certificate and in fact doing so will most likely only create more work and possibly problems.
ID Verification
- Each recipient verifies with the sender that the signed message they just received actually came from the sender. There are probably any number of ways to do this, and i’ll leave you to research them if you don’t like mine. I like to communicate, by voice, on the telephone with the sender. I confirm that i just sent a signed email message, and confirm its Subject line.
- The other party opens (double-clicks) my certificate in their copy of Keychain Access, and, if necessary, scrolls down to the Fingerprint area. I open my own certificate in the same way and read off the letters and numbers of one of the fingerprints (I use the longest fingerprint: SHA-1 on older systems, SHA-256 on newer systems.).

- The other party compares what i’m telling them over the phone with what they’re seeing on their screen. Assuming the letters and numbers all match, we can both rest assured that the other party has successfully received my certificate and that it really came from me.
- The process is repeated in the other direction: with the other person’s certificate.
Trust (activation on recipient’s system)
Assuming there aren’t any trust issues, each person trusts the newly-received certificate using the very same procedure they previously used to trust their own certificate. See the specific section for your OS X version if you’ve already forgotten how this is done.
As with the doppelgänger situation, if there is someone out there who can exactly mimic your voice over the phone and also match your personal email style, there is still the possibility of mistaken identity. My correspondents know me well, and if there was any doubt (so far there has not been), we could get into mentioning idiosyncratic topics which only we would know.
Really, the bottom line is: if you have any doubts about the source of a self-signed certificate (or, for that matter, the chain of authenticity of a certificate issued by a CA), don’t mark it as trusted!
Verification of Success
Finally, each person takes turns sending secure email to the other, and verifying with the other that the result is as expected. It is probably sufficient to do one test message (each direction) which is both signed and encrypted, though i like to test each direction with one of each possible kind of message:
- Plain insecure email: padlock unlocked and seal has X
- Signed, not encrypted: padlock unlocked and seal has check mark
- Encrypted, not signed: padlock locked and seal has X
- Signed And Encrypted: padlock locked and seal has check mark (normal secure email operation)
That’s just me. I’ve yet to find a case where testing the way the system is normally used (Signed And Encrypted) failed to reveal a problem which any of the other 3 tests found.
Note that i’m describing each type of message as seen by the sender. The recipient will see information in the header section of the email message window, displaying in text and icon(s) the security status of the message. Here’s how it looks on a received message in Mail 2 for Tiger which is both signed and encrypted:
On newer Mail versions with the redesigned iOS-like Mail interface, you may need to Show Details before you see these icons and the accompanying textual description.
All Done!
Congratulations! You and your recipient(s) have completed all necessary setup steps! You are now free to securely exchange email messages with reasonable expectations that the sender is who they claim to be, the message has not been modified in transit, and that no one else has read or will be able to read your missives! (Unless they have access to truly massive computer processing power and feel it worthwhile to burn up some of that power cracking your/your correspondents’ keys.)
Wait!: How Does This Work On Apple Handhelds (iOS etc.)?
You’re certainly not going to create any certificates on any of those platforms, so if you’re going self-signed (which is what this article is all about) first you’ll need to create either self-signed certificates or create a Certificate Authority and make certificates through it, on a Mac (or, using other sources than this article, some other platform). Once you’ve done this, and ideally have everything working between two Macs (or at least tested between 2 OS user accounts and differing email accounts on one Mac), depending on your device and OS version you may be able to get the certificate(s) onto the iDevice and get S/MIME working.
Problems?
As always, first carefully go over the instructions for setting things up, both the general instructions relevant to all OSes and those for your particular OS. Also note that each specific OS setup page has its own Bugs and Problems section at the bottom of the page, with issues specific to that particular OS/Mail/Keychain/Certificate Assistant version.
Inexplicable Weirdness: Old Certificates/Keys
One reason this article has taken me several years to publish is that i did a great job getting myself all tied up into knots with seemingly intermittent problems. I’d get frustrated and drop the project for some number of weeks or months.
Eventually i found that most of my problems were due to older certificates hanging around. I’d delete them out of the OS X account login keychain, but then without notice they’d reappear. What was happening is that the older test email messages with these older certificates still existed in my IMAP email account on the server. Mail dutifully would send these along (back) to the keychain, and BOINK!—there they were again.
The root of this problem is sub-optimal handling of multiple certificates for the same email address by the OS X security infrastructure and/or Apple Mail. The Apple software picks one or the other, doesn’t tell the user which one, and may not always make the same choice.
The solution for me was to scrupulously delete every trace of old test email messages from my email account (both in Mail and on the server, which for IMAP correctly set up happens at the same time when using Mail) then Quit Mail, go to Keychain Access, and clean out the old stuff.
Bottom line: be sure you have only one set of security credentials (certificate, private key, public key) for a given user/email address!
GMail: Not Helping
Even once i knew about this issue, i still ran into trouble… until i figured out that one of my test email accounts was on GMail. As you may know, GMail never throws anything away. Actually, permanently deleting email messages from GMail, such as temporary test messages, is next to impossible (in my experience). Once i stopped using GMail for testing and used only traditional “normal” email accounts on my primary ESP (Fastmail.com, formerly Fastmail.fm), the mysterious intermittent problems vanished.
Note: secure email should work fine on GMail… just don’t use it for testing with multiple test messages with different certificates for the same email address!
Broken Certificates
Sometimes a certificate and a pair of keys (specifically the private key, since the public key is already inside the certificate) can all be happily sitting together in the keychain yet not play nice together. The most common cause i’ve found is the Certificate Assistant bug whereby Cert. Asst. acting as a CA generates phantom keys on the CA’s own system and matches the certificate to those keys, instead of the user’s keys. Yet there are other circumstances where a certificate which seems like it should work simply will not.
I don’t have a cure for these problems, but i do have a way to tell whether a given certificate and private key are playing nice, for OS 10.5 and newer:
- Open Keychain Access
- Under Category, select any one of:
- My Certificates
- Keys
- Certificates
Actually, if you look under My Certificates and your certificate is not there (and it is yours), you already have the answer: not linked, won’t work. Looking under one of the other two options, you will see one of two things:
- Private key indented under certificate (when looking at Certificates/My Certificates) or certificate indented under private key (when looking at Keys)

- Certificate only or key(s) only: nothing indented

In case a, the certificate and private key match and are successfully linked together. They should operate just fine. In case b, the certificate and private key are not linked to each other, and will not operate properly. I regret that i have absolutely no information on re-linking properly matched certificates and keys which used to work and stopped working. Per my last WWW search, no one had a solution for this, other than getting a fresh set of credentials.
Note that Keychain Access 3.3 for Tiger 10.4 does not indent keys under certificates nor certificates under keys, whether they are properly linked or not.
Certificate Assistant is supposed to be able to evaluate certificates, yet so far i find its information inconsistent and not necessarily helpful.
Interoperability Problems
macOS 10.12 Sierra introduced a brand new interoperability problem for those who followed the instructions in this article as it was pre-27 August 2017. I used to recommend omitting the Key Usage Extension (KUE), as it wasn’t necessary, was kludgy, and Apple’s Certificate Assistant defaults didn’t work until Certificate Assistant 5.0 (55174.50.1) released with macOS 10.13 High Sierra. OS X and bundled software (e.g. Mail) from OS 10.4 through 10.11 didn’t care whether the KUE was present or not, as long as it was correctly filled out for S/MIME if it did exist. 10.12 Sierra (and newer) very much cares, and requires a proper KUE. If you have older certificates lacking a proper S/MIME KUE and wish to use OS 10.12 (or newer), you’ll need to create/obtain new security credentials including a new certificate with a valid KUE. All pages of this article have been updated to reflect this new reality.
After years of beautiful forward and backward compatibility, Apple broke compatibility between Mail 2/OS X 10.4 Tiger and Mail 12 (and 13 and maybe later)/macOS 10.14 Mojave (and 10.15 Catalina and maybe newer). All the sad details are at that link. The tl;dr is that between that and the total brokenness of Apple S/MIME in 10.5 Leopard, the oldest OS X + Mail still fully compatible through 10.15 Catalina is 10.6 Snow Leopard. Looking at it from the other direction, the newest macOS + Mail still compatible with 10.4 Tiger is/was 10.13 High Sierra.
In theory, S/MIME should interoperate between technology platforms and different software products. In practice, i don’t know… i did not test anything outside of Mac OS X and Mail—and that’s a whole lot right there, given all the settings options! If you are having trouble getting things to work when one or more of your correspondents is using different software—and especially if they are the ones having trouble accepting your certificate—it may be that their system is more strict regarding the precise content of certificates. You may need to experiment with other settings of the Key Usage Extension, Extended Key Usage Extension, SANE extension, keeping/omitting each of these, and so forth.
Final Thoughts
I am So Done testing this stuff
This is the final update of this article by me, for the foreseeable future. Reasons:
- As of macOS 11 Big Sur, i once again no longer own nor have long enough access for testing to a Mac able to run this newer OS.
- I am sick and tired of Apple utterly failing to fix bugs i reported to them years prior, many major OS versions ago! They seem to not even be trying.
- This testing is a lot of work, and i’m not getting compensated for it past good vibes and an occasional Thank You message. Life Priorities.
The planned summer 2019 update never happened because i was yet again in another near-death situation. Each time this has happened, i have had to take a very hard, very real look at my priorities and my bucket list. Fucking around documenting Apple’s seemingly endless bugs and struggling to work around them is no longer a ranking priority for me vs. other ways to spend my limited remaining life time—especially when i dutifully report them through the developer interface and they almost never fix them!!!! This is especially irksome as someone who used to be paid by them and had a full-time job working for them doing software QA testing in the mid-late 1990s—when they almost always fixed bugs i and other testers reported. And that was “the beleaguered Apple Computer corporation”, nearly dead (and the very start of the Steve Jobs comeback)!
Future?
To make it easier for the worldwide community to re-use and possibly update the content in this article, i hereby revise licensing to the Creative Commons Attribution-NonCommercial-ShareAlike 4.0 International License (specifics in footer below). I’m new to the whole Creative Commons, copyleft, and other licensing/rights systems vs. standard copyright. If CC-BY-NC-SA 4.0 is too restrictive for you to repurpose this article so it may live on and be improved, please let me know how and why it can’t work for you, and what form of licensing you’d need instead, and i’ll carefully consider. I intend to keep this article at the existing URL(s) for as long as this site remains live, or so very many years pass that no one cares any longer (rough order of magnitude: a decade), whichever comes first).
Regret(s)
Really only one main one: it didn’t occur to me until 2020 (when i’m Over all this intense work) to test the command line versions of Keychain Access and Certificate Assistant. It could well be that goofy-ass bugs that drive us batty may not exist on the command line… or maybe they’re as bad or even (gulp) worse.
Head on in to Terminal and try apropos certificate and see what you get. man certtool is fun. CertTool appears to correlate to Certificate Assistant in the GUI. keytool does some of what Keychain Access does, but certainly by no means all of it. Given that it puts its key store in a different file in a different location, i can’t see it as the back end of Keychain Access. Happy Exploring!
Suggestions?
For at least a little while, say a year, starting with this article’s last modified date, i’ll be quite interested in your suggestions and corrections. This is also the point of contact if you wish to take this project over.
Note: If you have corrections regarding technical details of the certificate and especially its X.509 aspects, i’ll only consider implementing your corrections if you present them in terms easily understood by a reasonably intelligent non-security-expert computer user. More information on this point is on the X.509 version 3 Certificate Extensions page.
[1] Not Sealed But Delivered: The (Un)Usability of S/MIME Today 13-Fry_Chiasson&Somayaji